I hope you all have a wonderful holiday season. Enjoy your time with family and friends!


I hope you all have a wonderful holiday season. Enjoy your time with family and friends!


Good morning! Just a few more days until Christmas!! Are you ready!! I am all set to go! I am just waiting for family to come so we can spend some time together. Maybe you are looking for something special to do with the family you are with. Here is a game that is fun for all ages.

I played a game similar to this back when I was in high school, back in the stone ages, you know, before cell phones. :0 I think we used Polaroid cameras. I guess now that Polaroids are back again, you could still use them! This game will take a little planning ahead of time, but it’s not too difficult.
You will need:
Before the party, you need to decide where your scavenger hunt will be. Will it be inside the house, around the neighborhood, at the mall? Once you decide where, you will need to walk around that space and make a list of the items you want found. This can be as easy or specific as you want. It could be a general item like an inflatable Santa to finding the house with 3 palm trees and a penguin. You will want a list between 10 -20 things depending on how long you want the game to go and the space you selected.

Divide your large group into smaller groups, between 2 and 6 are probably the best. It can include any age groups too. If you have younger kids, you will probably want an adult as a chaperone and to help out when needed.
Each group will get the same list of items, but in a different order. That way they are going in different directions and won’t see where the other groups went. They will follow the list and take a picture of each item as they find it. They need to be back at a designated point within the allotted time with their pictures.

Some things to decide and to explain before you start.
Now you are ready to start! Get your groups divided, explain how the game works and go! Once time is up, the teams should be back at a meeting point with their pictures.
Now, have fun and make some great family memories!!


Good morning! We are part of the way through December already! Are you ready? Is your shopping done? I think I am done, but there always seems to be something else to buy! I do have my decorations up, so now I can sit back and enjoy. I hope you enjoy the little tour today!
I collect these little birds from Target, buying one each year. I set them up right in my entryway this year. I bought the birdcage at a yard sale, the wreath and white trees came from the 99 Cent Store. The white runner came from Hobby Lobby and is soooo soft! I love to just rub my hand across it each time I walk by.

Turning into the living room, I set up my frosted tree. I usually decorate this with a very coastal look, but this year I wanted to do something different. I kept the same white, silver and gold colors, but added in woodland animals. I bought about $20 worth of new ornaments at the 99 Cent Store, but the rest were pieces I already owned.

Ok, a penguin isn’t really a woodland animal, but he was too cute to not include!


I decided to hang the stockings on the mantle this year too. I added a couple more deer, a lantern, a lighted tree and a chalkboard.

Down the middle of the table, I lined up several lanterns, added some trees inside along with more woodland creatures.

This old kitchen cupboard belonged to my grandparents in their home. I love to decorate it with vintage style Christmas things. The old light up tree on the bottom shelf came from my grandma on my fathers side of the family.


This is my doggy corner! Each one has a handmade stocking and monogram. As you can see, they already have a few treats inside. I added a few of my other dog decorations on the bench. My daughter gave me the adorable gold and white wooden Christmas tree last year.

Here in my family room, I have my Disney tree! Lauren and I went through all the ornaments and found we had plenty of Disney ones to fill the tree. I love it! Most are mine, but there are also some from both girls.

Old movies and new ones.

Lady and the Tramp is my favorite old Disney movie!

And the iconic castle!

I posted about my village a couple of weeks ago. I set it up in my fireplace this year. I really like it here and I get to enjoy it every day. You can find it here.

Well, I hope you all have a Merry Christmas! It’s been a tough year, and I am looking forward to what 2021 has to bring to us. Thank you all for following me. I love to read your comments and looks forward to meeting with you next year too!


Good morning! It’s been a couple weeks since I have been here and now we are in December and all things Christmas!! I have all the decorations up and now I can just sit back and enjoy the lights and other decor. I was finally able to find a place to display my Christmas village this year. I had the perfect place for it at our old house, but we have been here for 4 years and I was still having a hard time figuring out where to put it. So I tried something different and I think it turned out pretty good. This will probably end up being its new place each year.
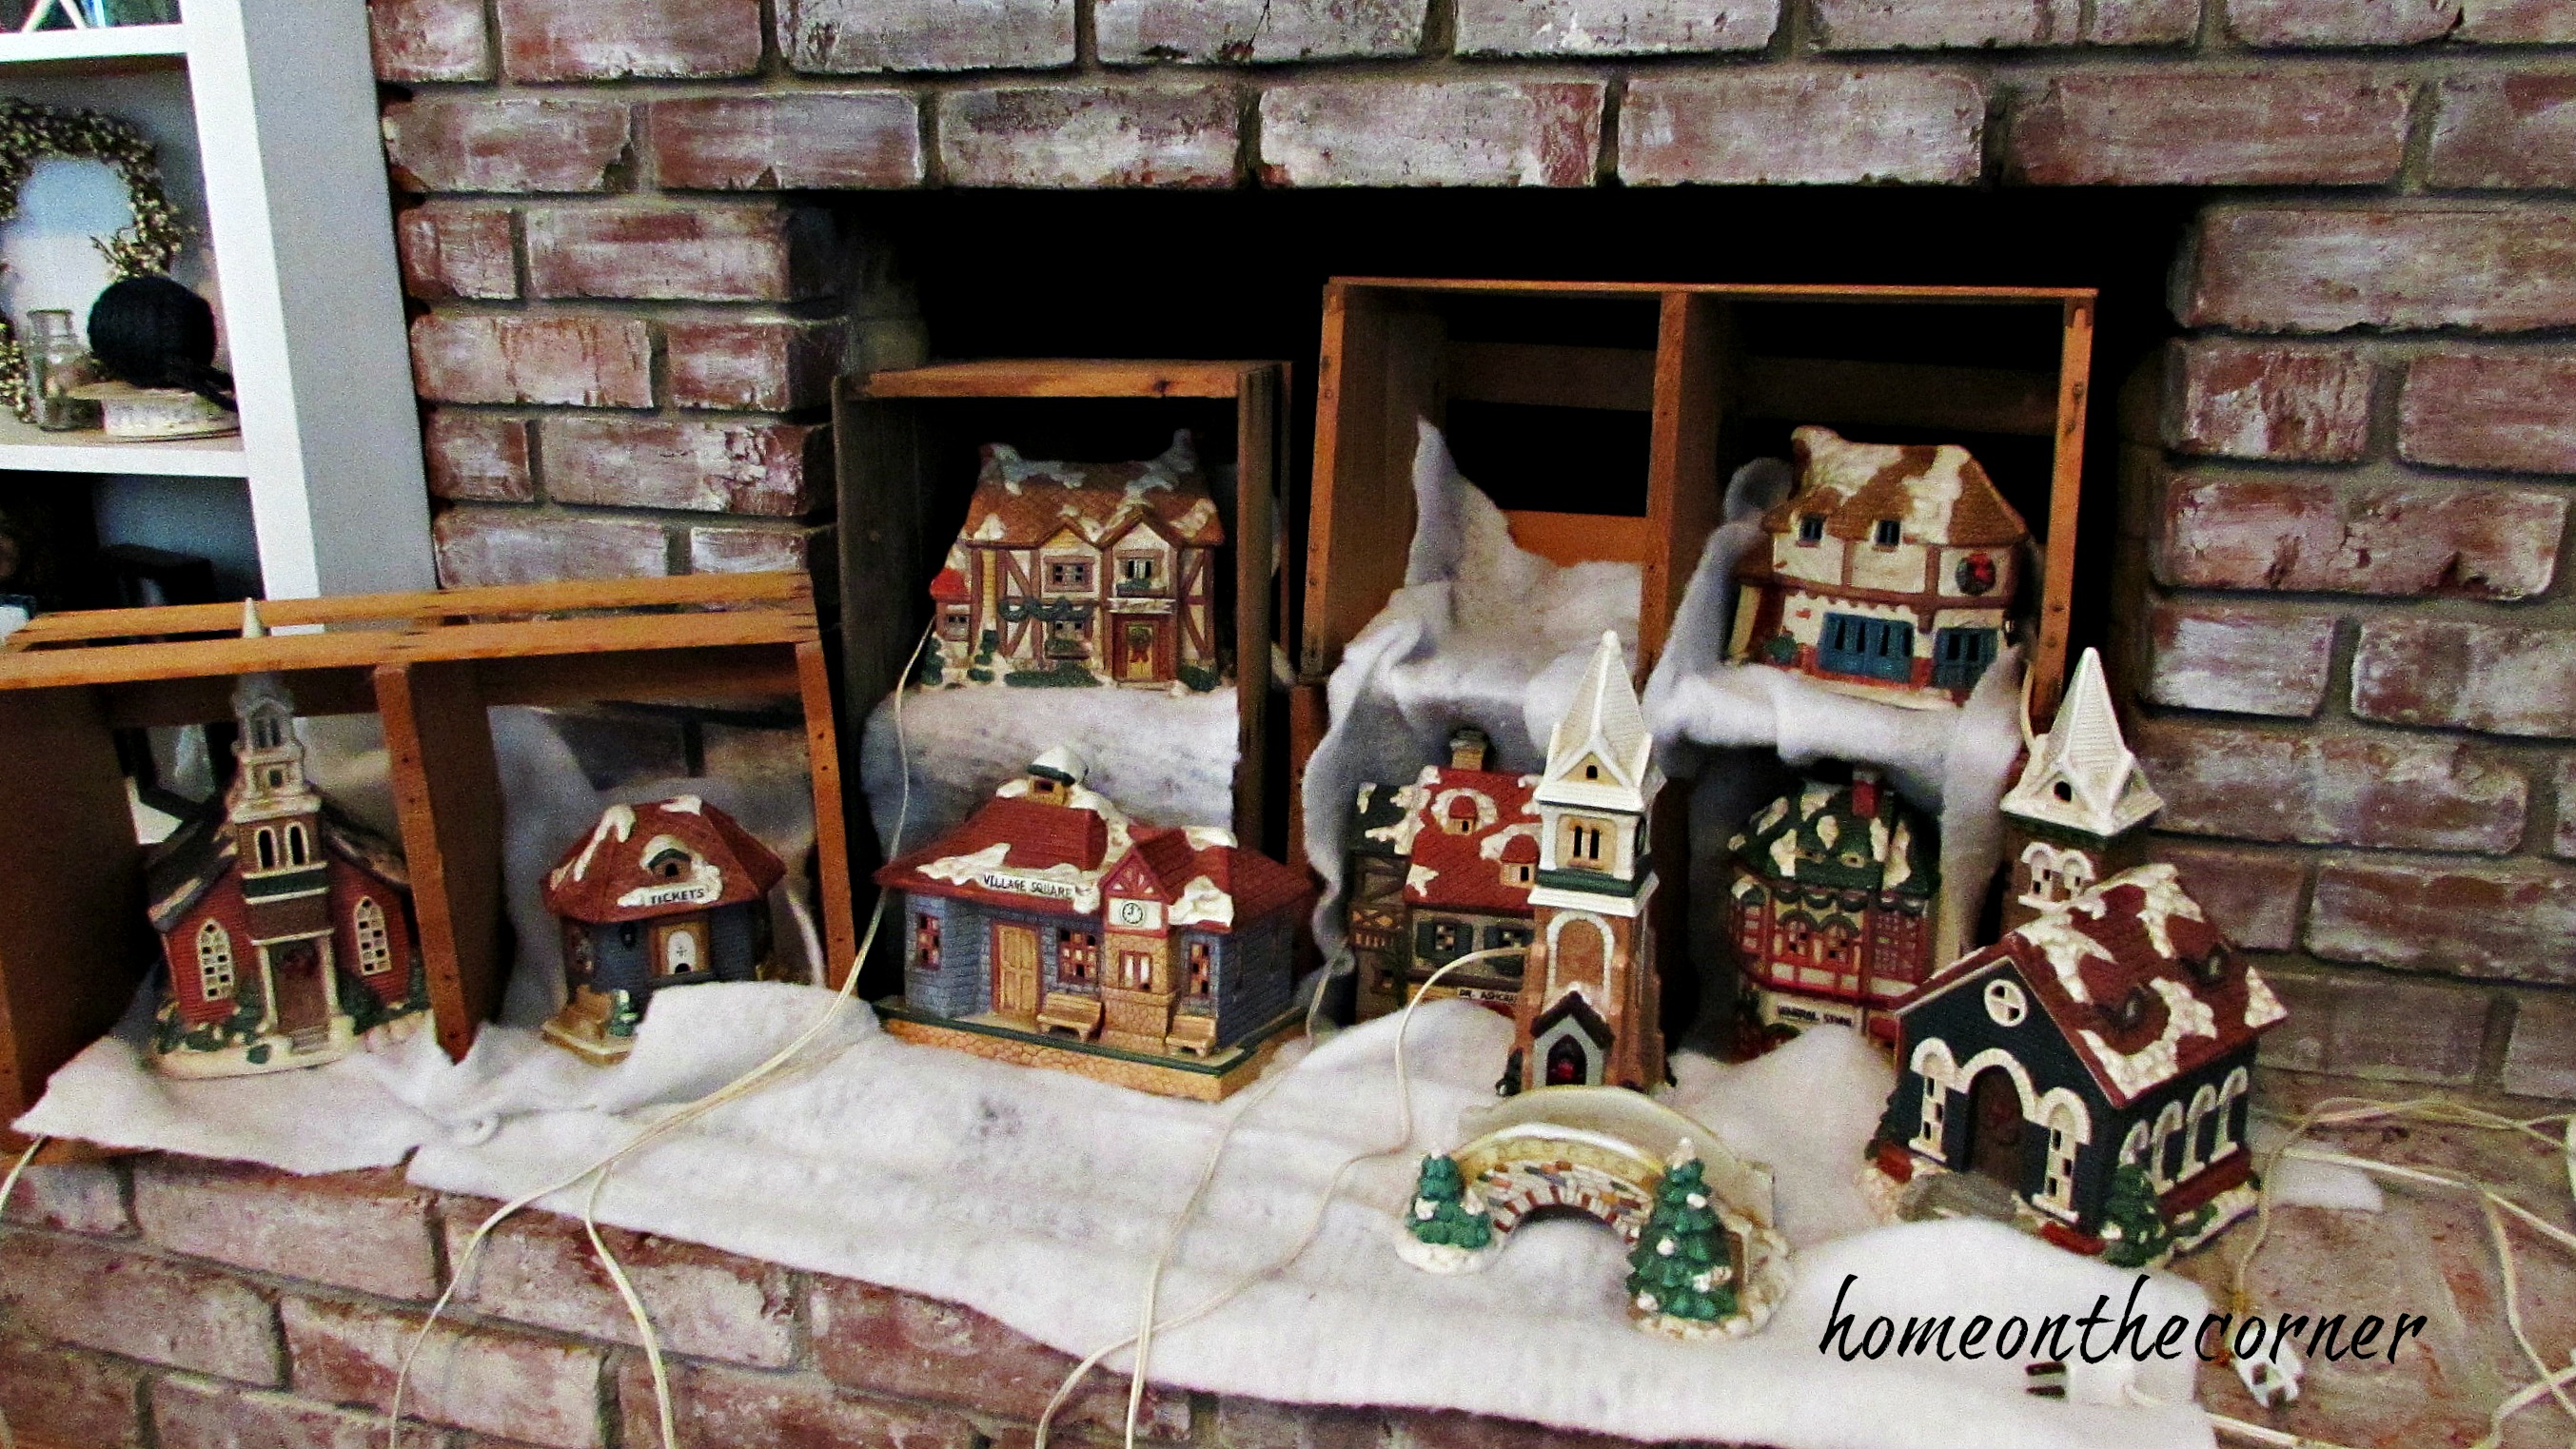
This is what my fireplace looked like in the fall. This is in my family room. I have had the crates in here for a while and thought maybe they would work for the village too. The first step was to clean everything out and put it all away.

Once everything was cleared out, I gave it all a good cleaning. I also added another crate and set it on the hearth.
I placed soft white felt in all the crates and on the hearth. I found a white tree skirt at the 99 Cent Store that worked perfectly. I pulled out all my large pieces, plugged them in to make sure they worked and then set them where I thought they worked best.
Now comes the hard part…getting them all plugged in and hiding the cords! Whew! I was ‘glistening!’ I have a cord that has outlets every couple of feet and I can plug in 2 or 3 at each outlet. I ran all the cords out the back of the crates and hid them under the ‘snow’ as much as possible. Thankfully there is a wall outlet nearby.
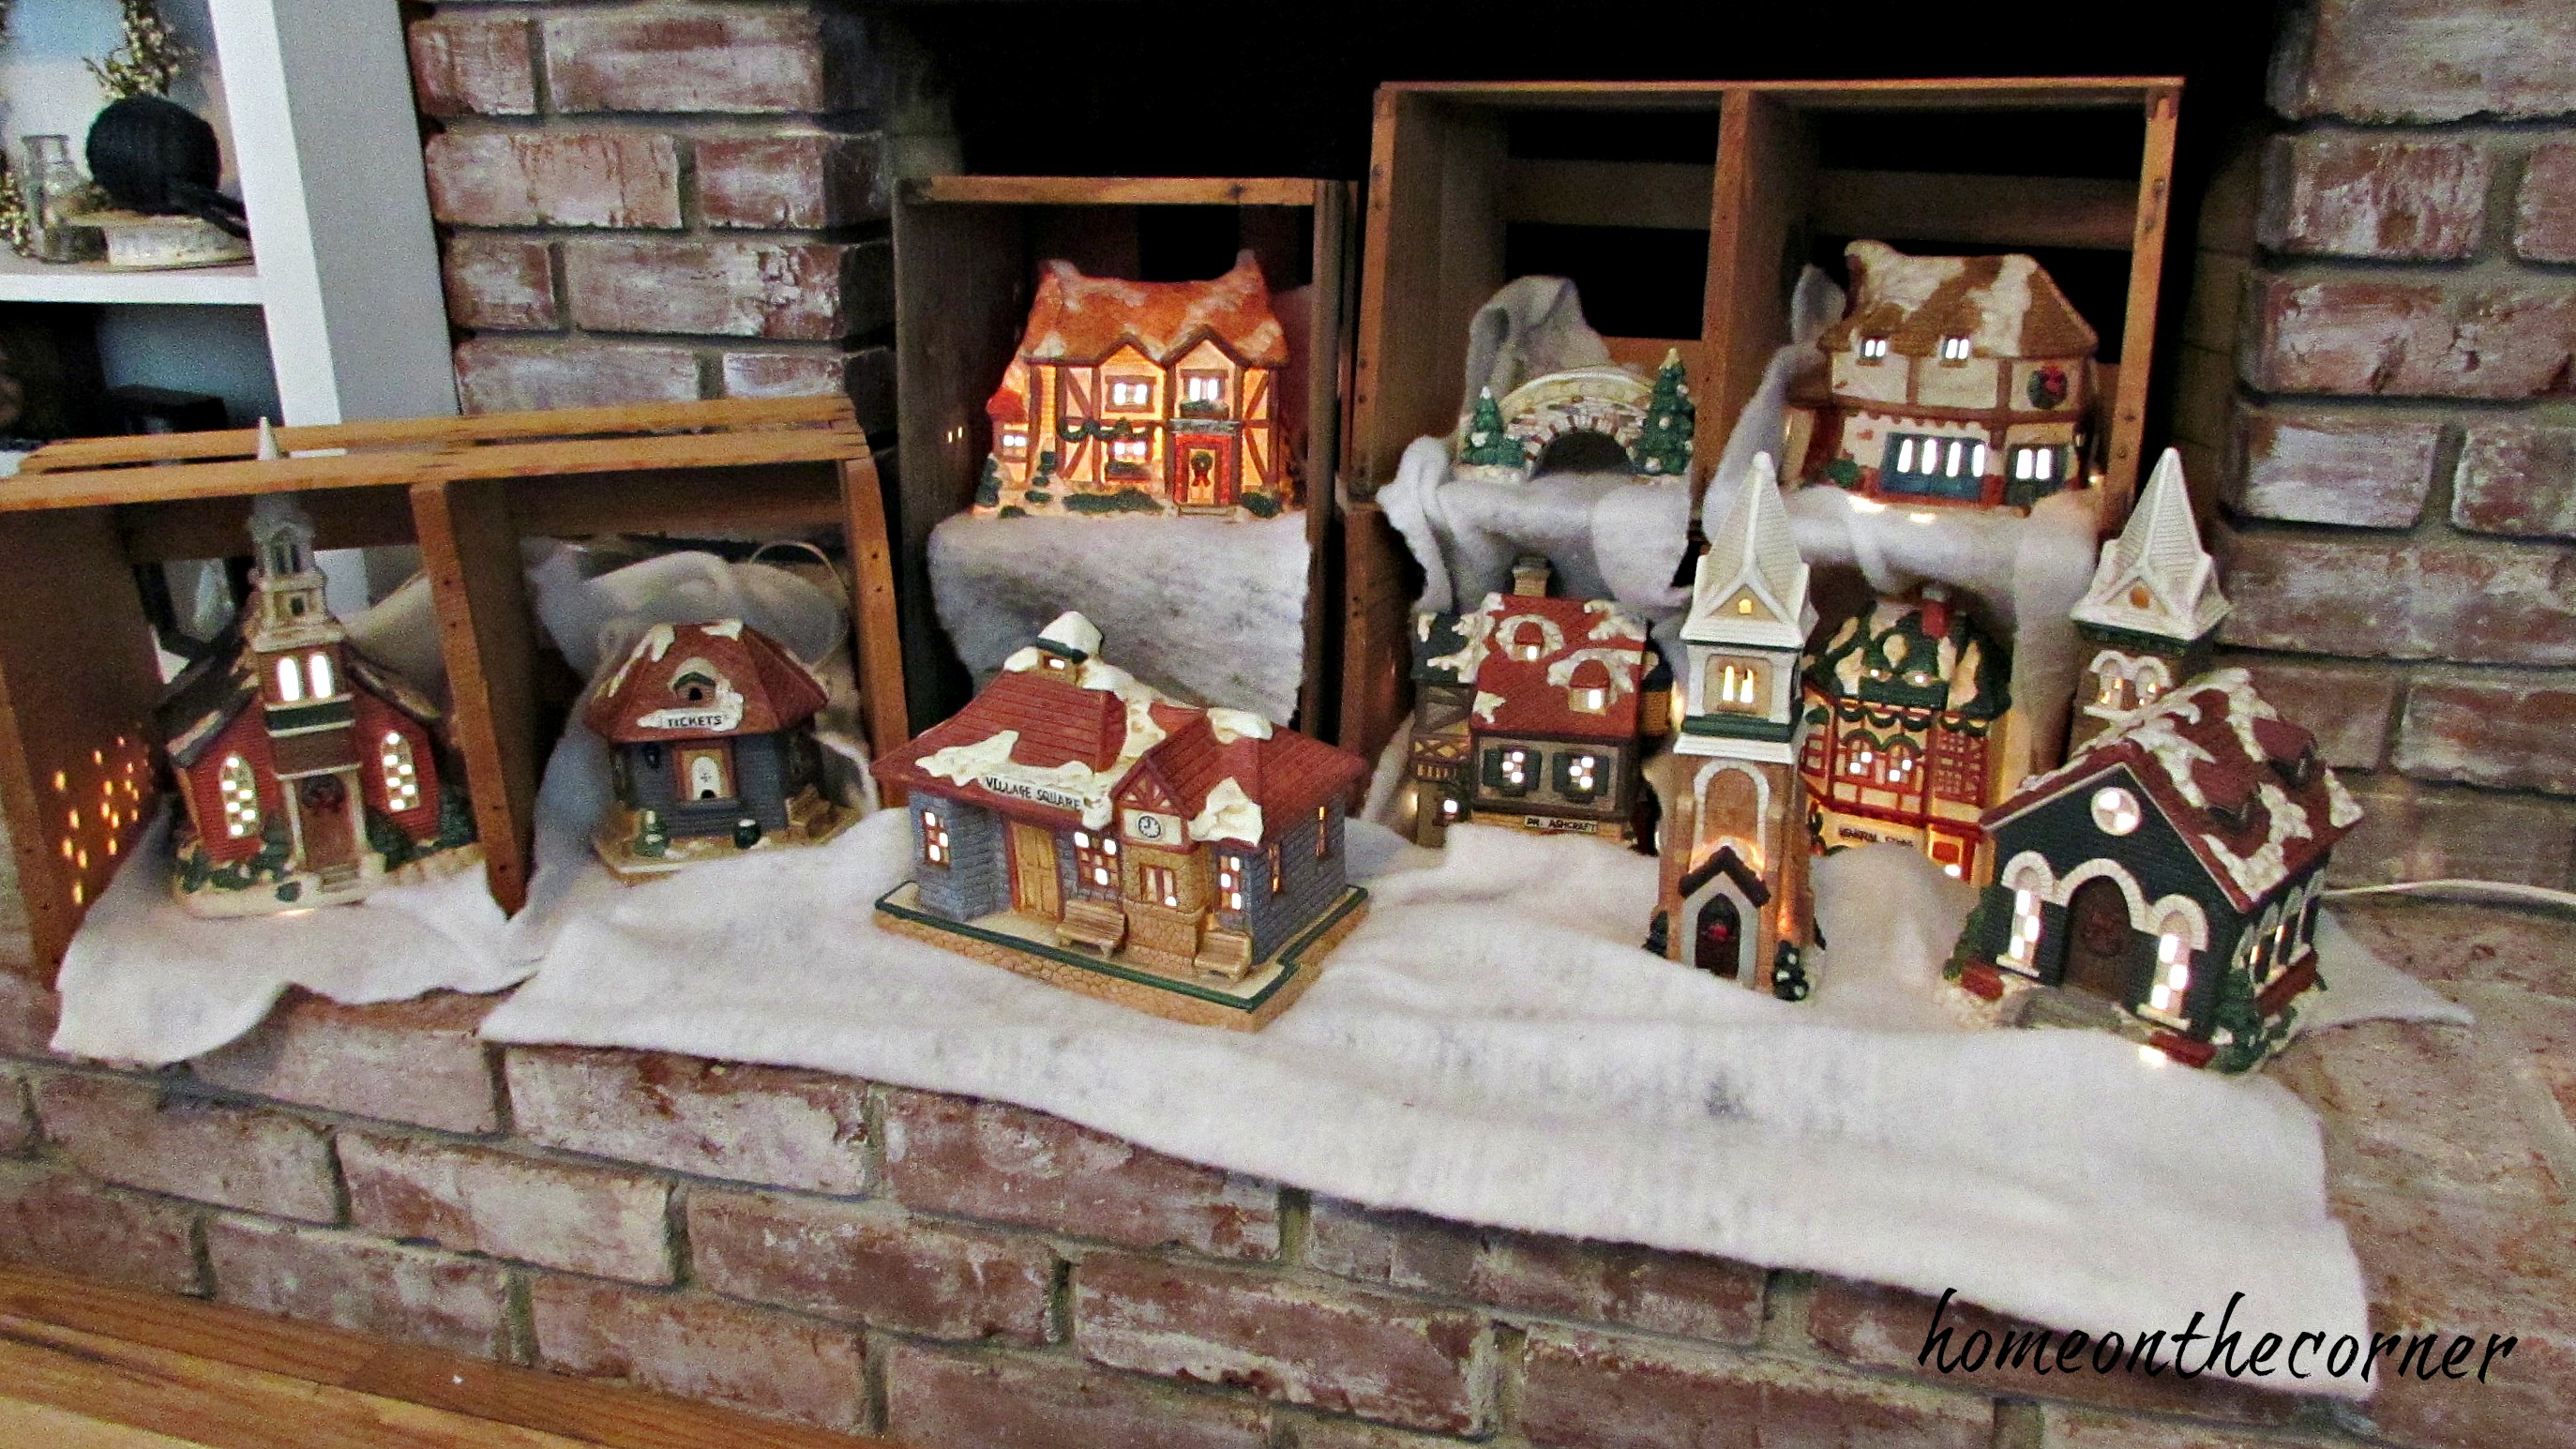
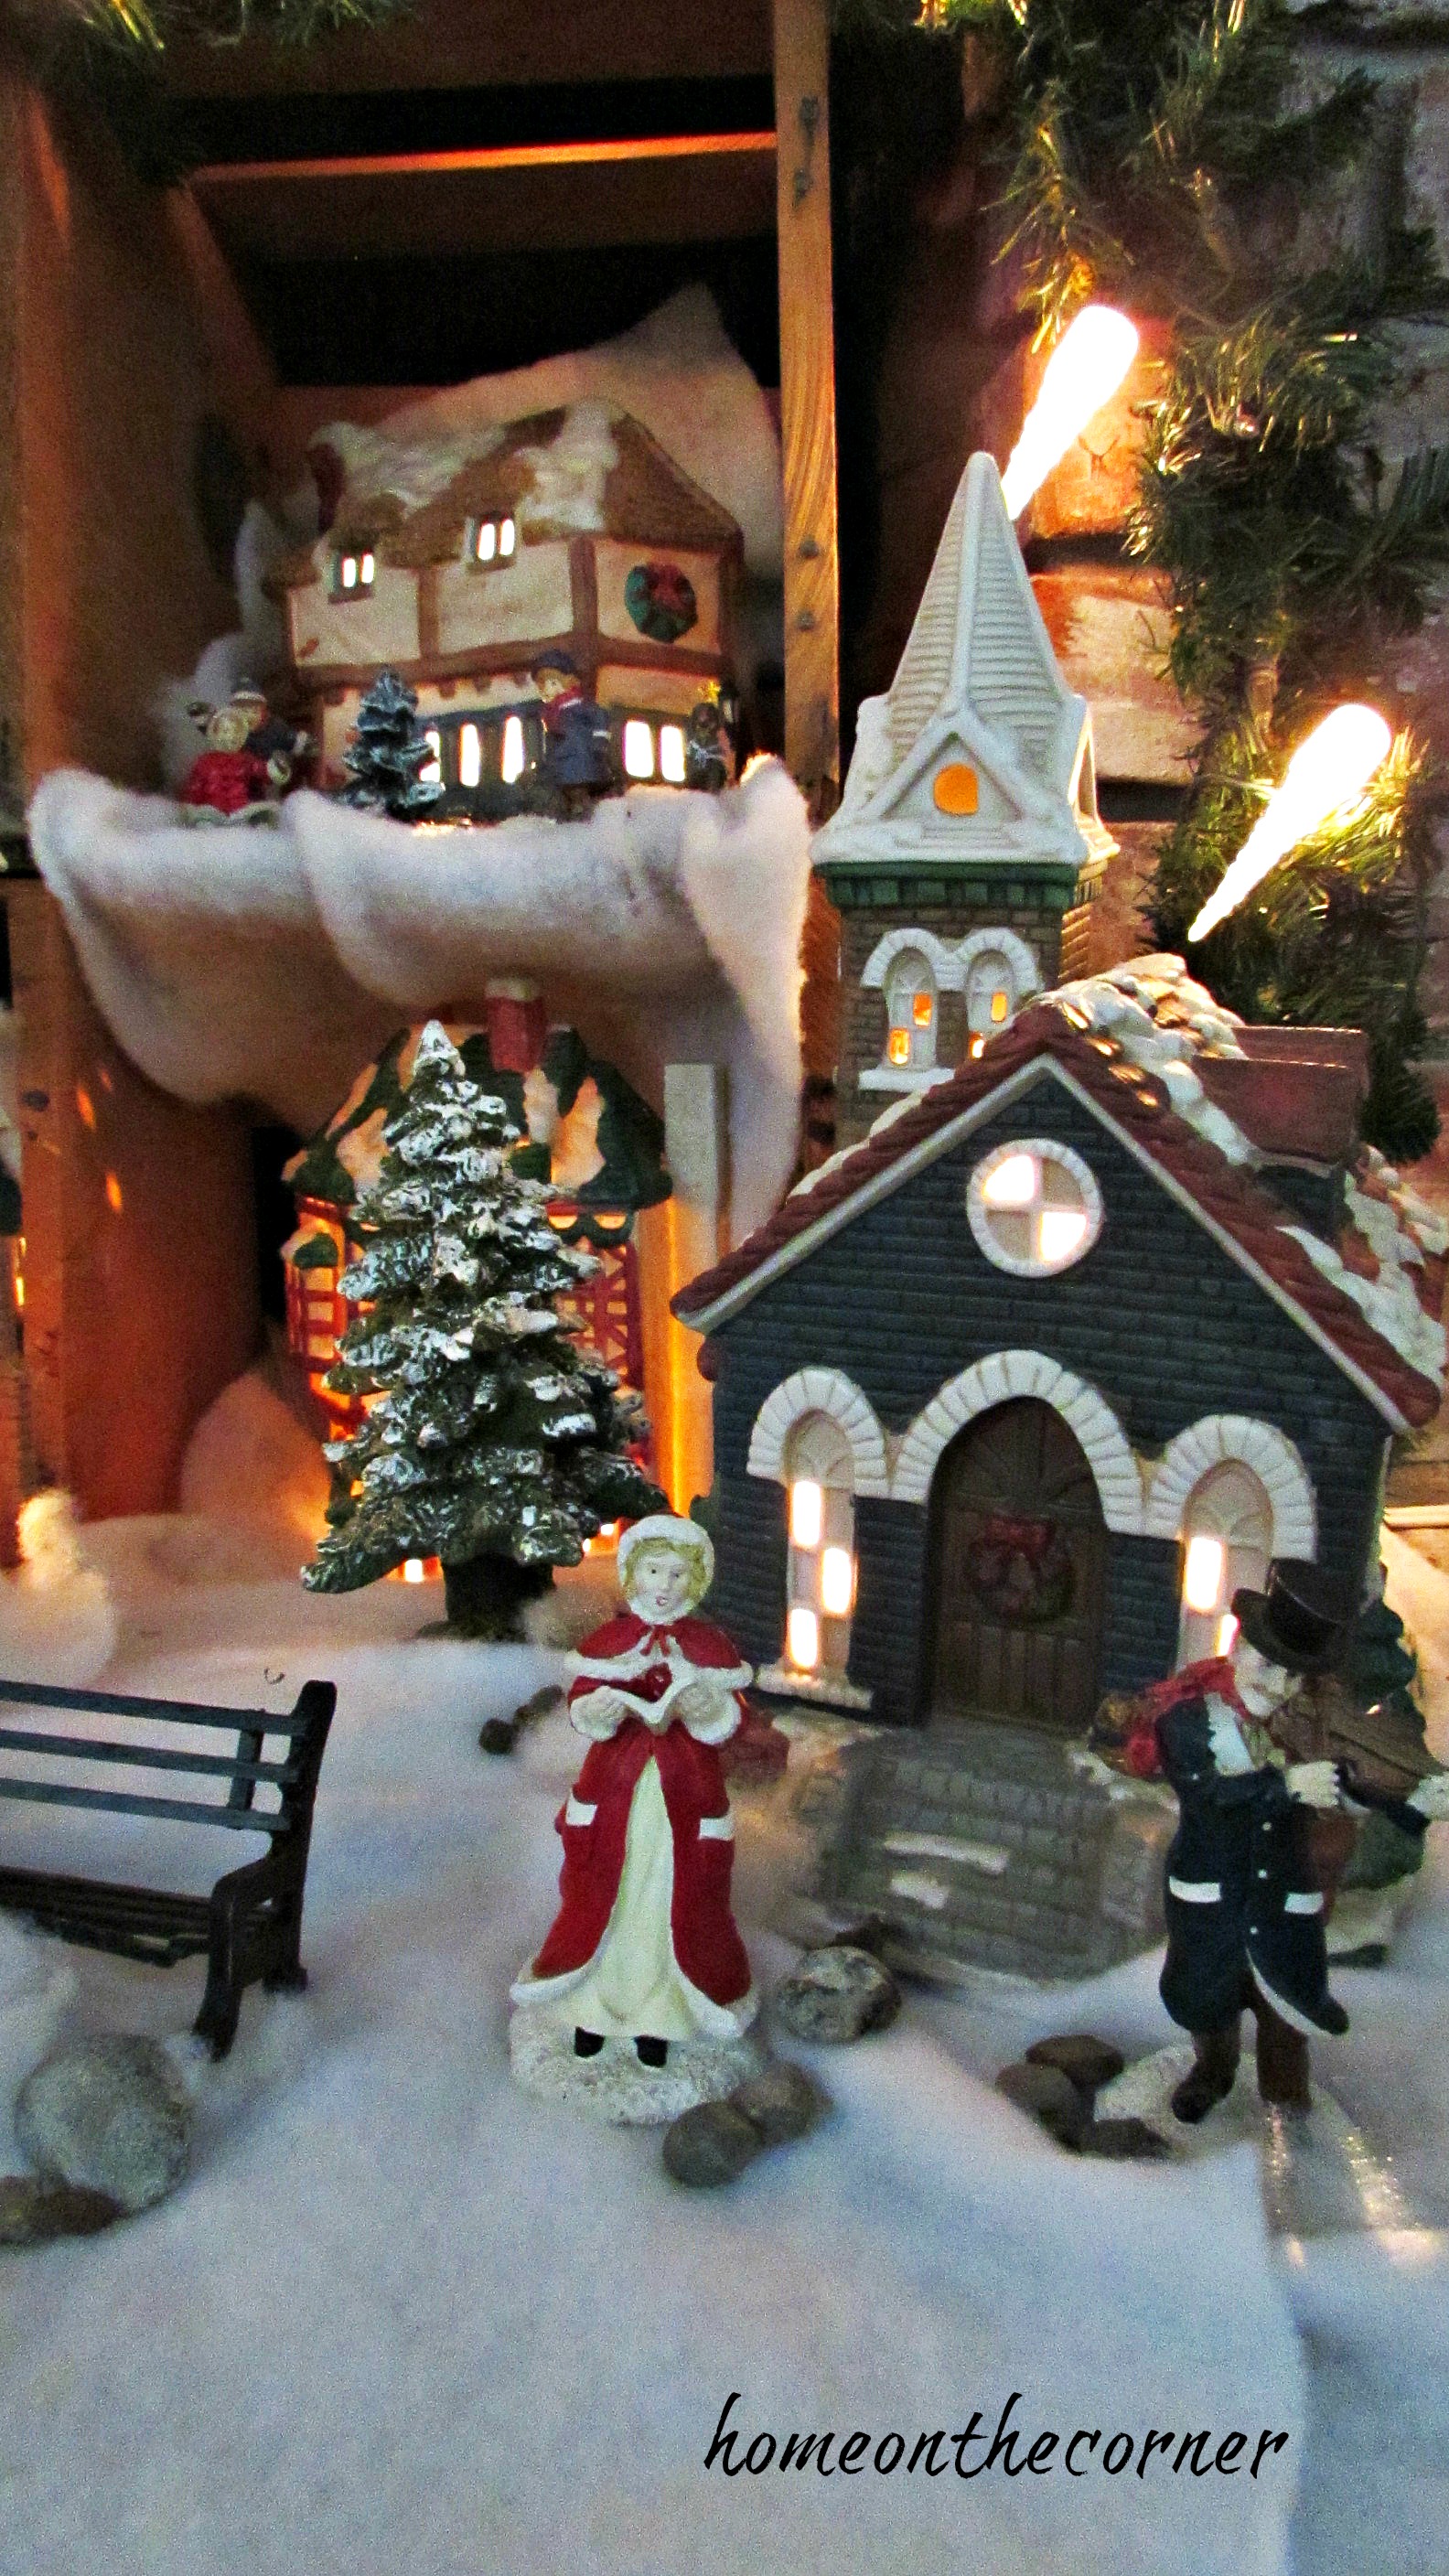
This next part is easier and more fun! I placed all the smaller accessories into the scene. I have trees, benches, people, and dogs. I use fiberfill for little tufts of snow and I even have some little rocks I place around the scene.
The last piece to add was a garland and lights over the top of the whole thing. It looks so pretty at night!

I have two churches, one on each end of town. This village came from Mervyns when they were around. My husband usually bought me a new building each year.

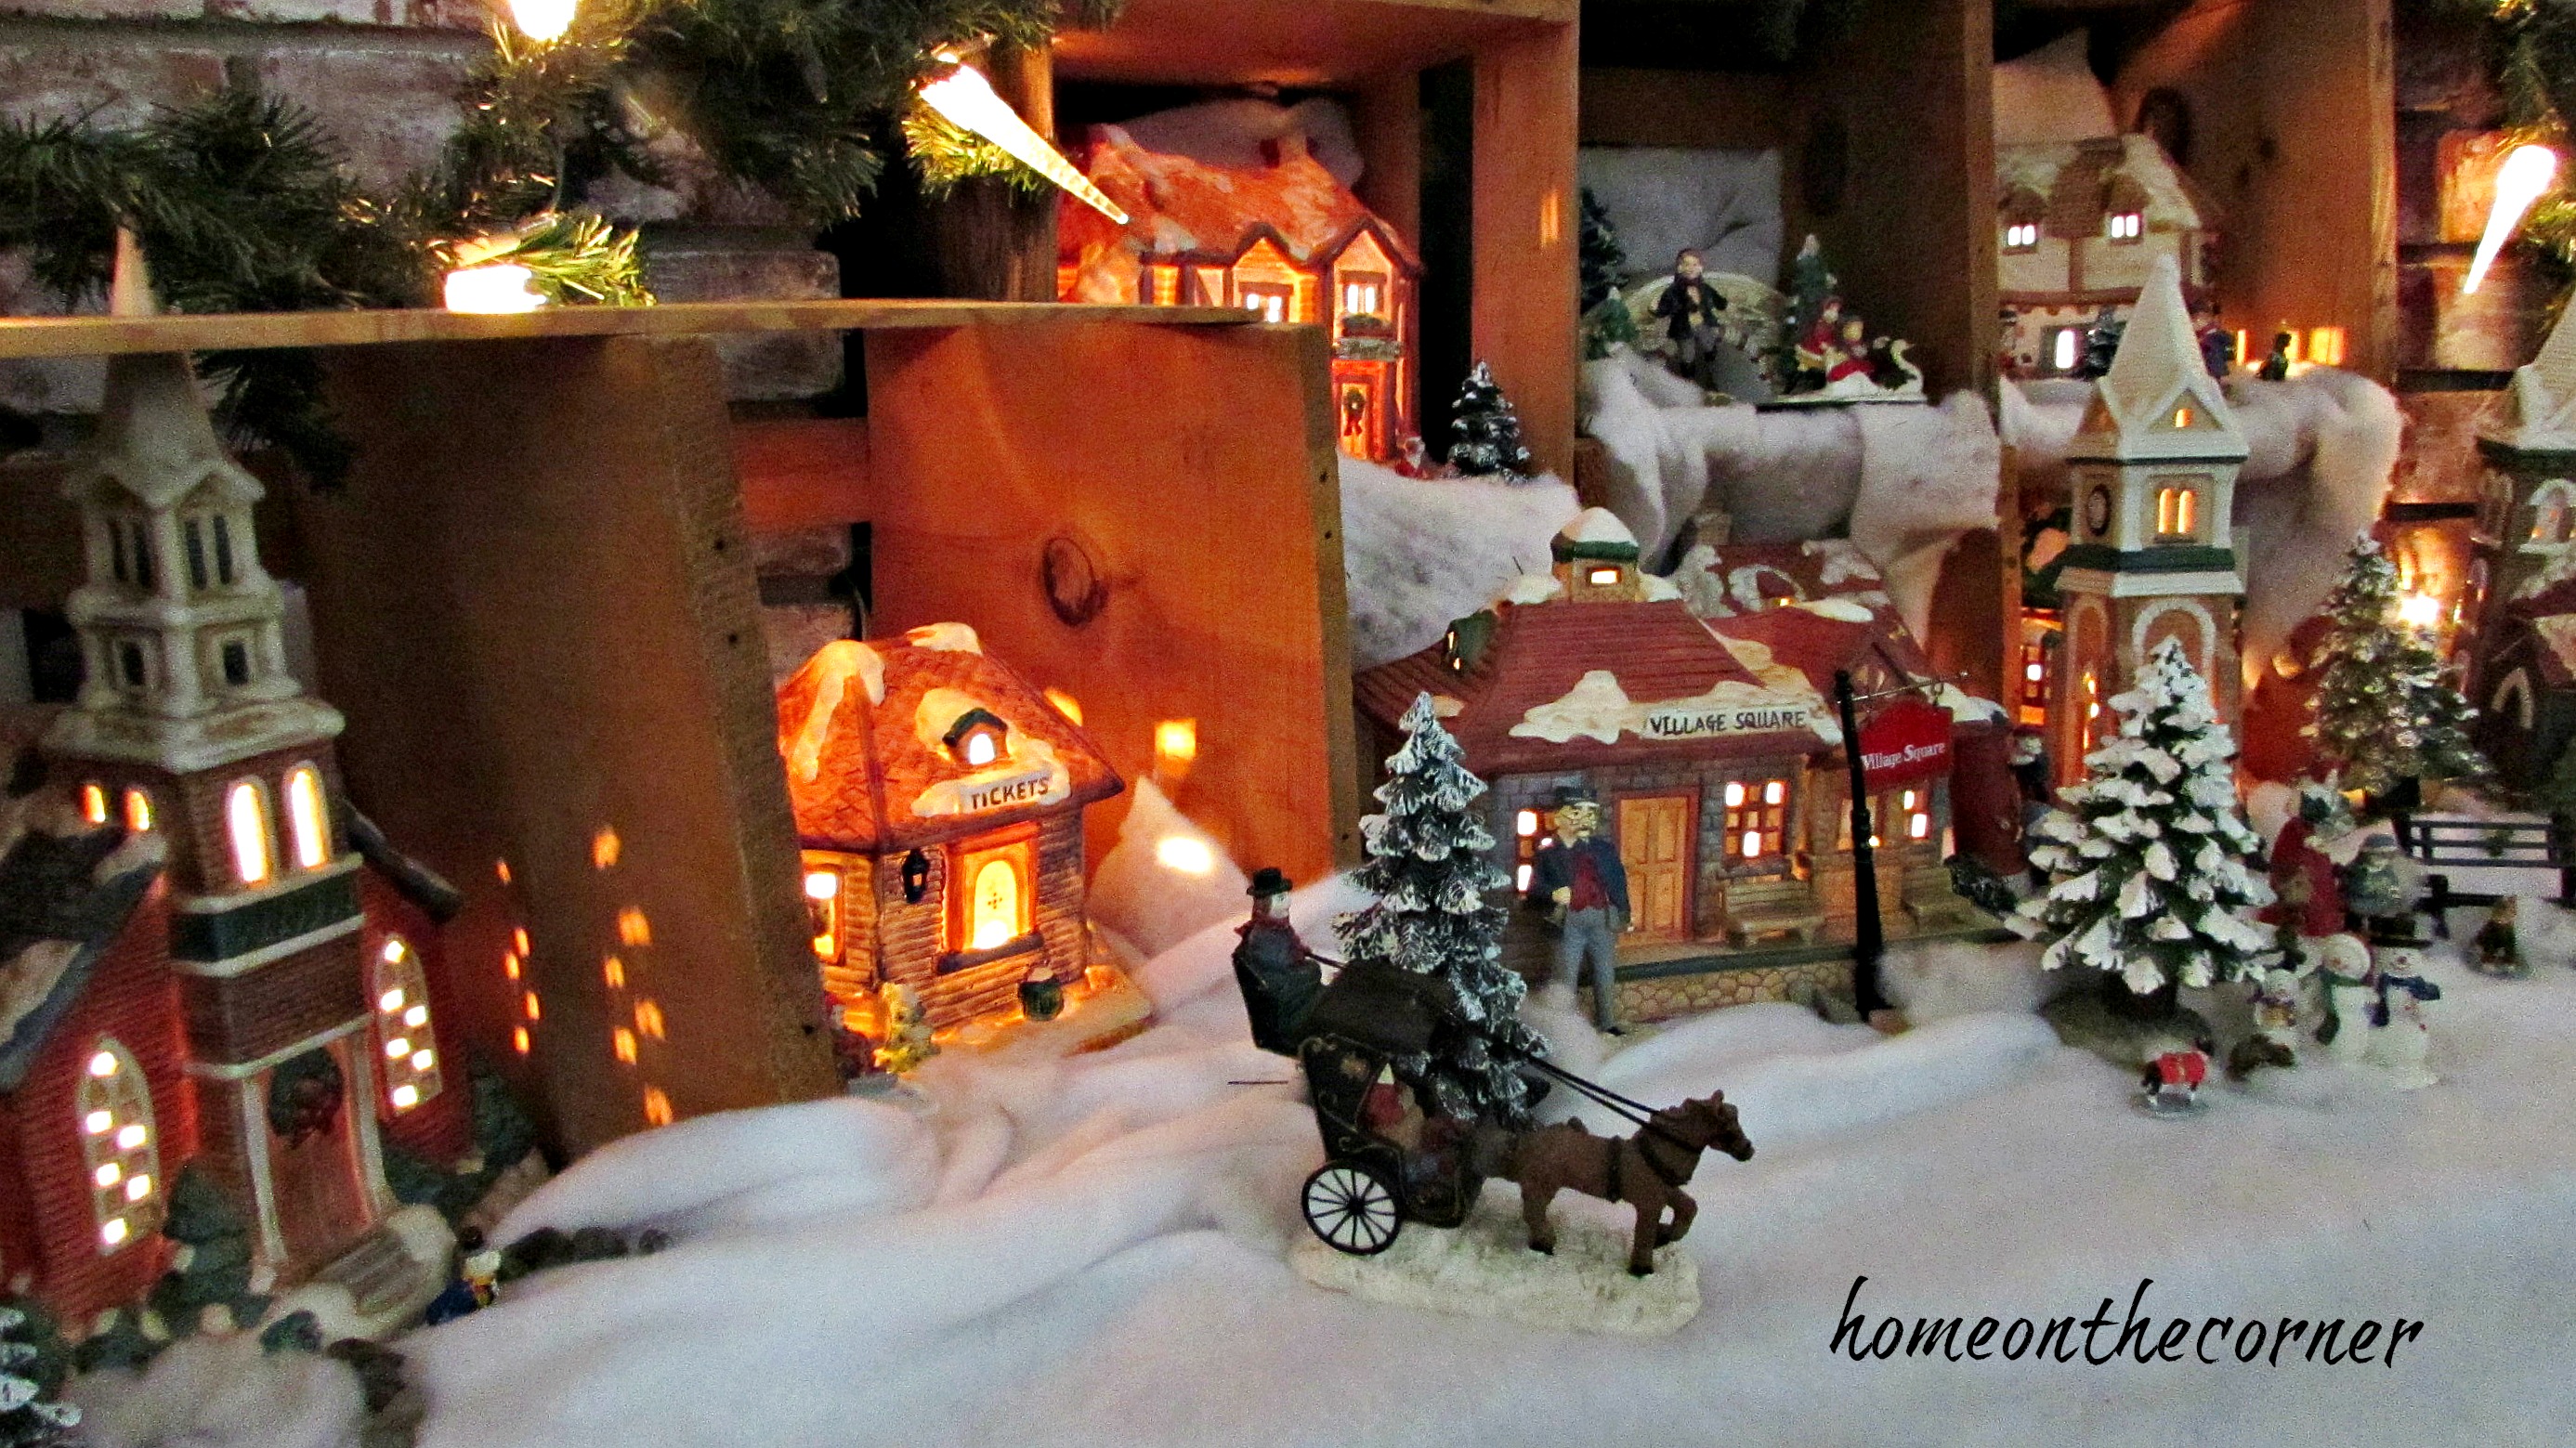

Here you can see the set was part of Village Square. I still see pieces around once in awhile at thrift stores, but I never had enough room for any more pieces. But if this is where I decide to keep it, I can fit more in!


I’m so glad I finally found a good place to display my village. How about you? Do you have a village? How do you display it? I love to see everyone’s villages and how they set it up! Have a great week!


