Cute and Simple Easter Egg Decorations

Hello everyone!  I hope you had a wonderful week!  I am reposting this because I found that you can still purchase these items or similar items.  Enjoy!

So, this project started when I was walking through the 99 cent store.  And to be honest, I love shopping at the 99 cent store.  I can go and buy dog treats, Arnold Palmers, lunchables, spatulas, mixing bowls, and stuff for your car all in one spot.  It’s like a lesser version of Walmart!

While shopping through the 99 cent store, I came across some Styrofoam eggs that could be used for decorating for Easter.  And then I saw some smaller eggs on Kabob sticks.  And I thought, what if I put the smaller eggs in the larger egg to make an arrangement?

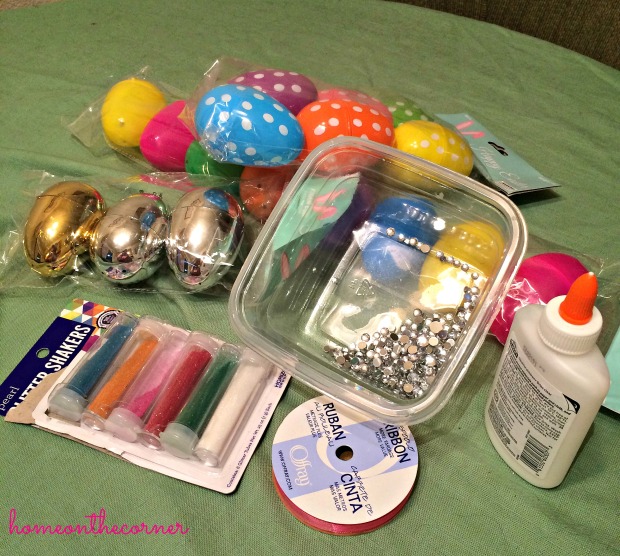
And then I bought the supplies!

supplies

I bought two of the bigger eggs, one package of bigger eggs on sticks, and two packages of the smaller eggs.

eggs

I split all the eggs into two separate piles.  There were four big eggs in each arrangement and ten smaller eggs in each arrangements.  I knew that the biggest problem was going to be the long Kabob sticks.  So as I went along, I broke off the sticks to make them shorter and easier to stick into the large Styrofoam eggs.

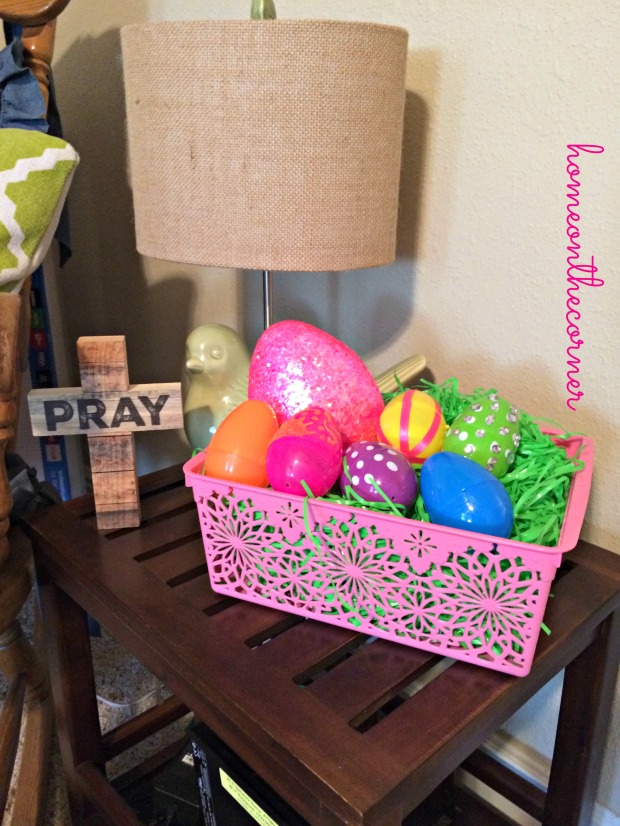
And here are the end results.

Finished Eggs 5Finished eggs 1Finished Eggs 2Finished Eggs 3Finished Eggs 4

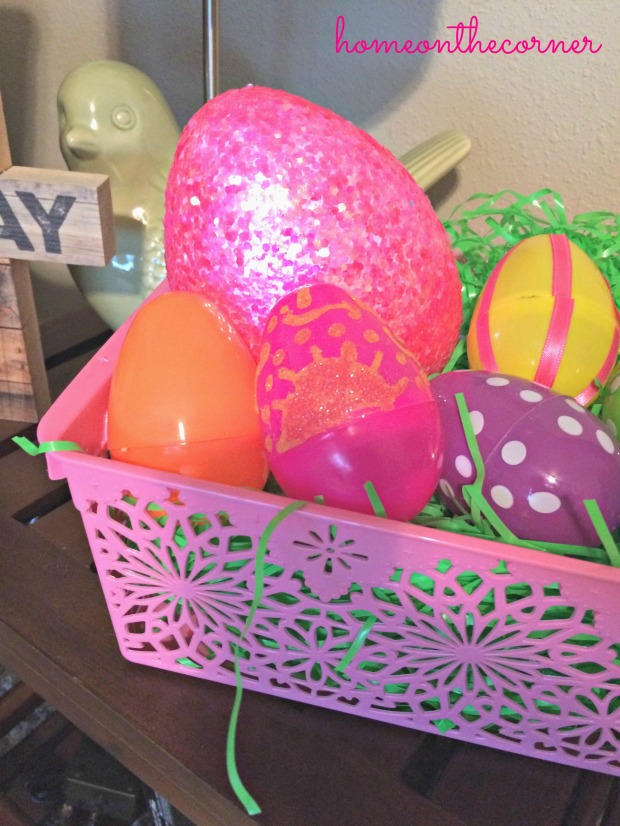
So…I’m not completely happy with how they turned out.  I like all the colors worked together, but it didn’t go exactly as planned for how the eggs looked once they were in the giant eggs.  I had a completely different idea of what they would look like when they were done, and this isn’t what I had in mind.

But other than that, it was a very simple project to do for Easter.  I only spent $5 creating this, but you could spend a little more if you wanted to add more egg Kabobs (or whatever they are actually called), go for it.  This is what I made with what I had, but I might go back and buy more egg Kabobs to fill in the arrangement.

sparkle

Creative Easter Eggs!

I AM SO SORRY FOR THIS BEING LATE TODAY!  WE HAD NO INTERNET YESTERDAY SO I COULDN’T UPLOAD UNTIL NOW!  PLEASE ACCEPT MY APOLOGY!

So, Easter is coming fairly soon (April 16th to be exact).  And of course, what is the number one thing that people think of for Easter?  PEEPS!

No, just kidding. It’s the Easter eggs.

And don’t you think that most Easter eggs are boring?  They are just a single color, for the most part, with nothing creative.  So here are some ideas for how to have more creative Easter Eggs!

Supplies you need are eggs, glue, glitter, ribbon, acrylic jewels, and any other things that you think you want to decorate your plastic eggs.

Easter Eggs Supplies

So I started with a pink egg (obviously).  It is very simple and I knew what I wanted to do on the egg.

Easter Egg Pink Egg Before

I took my glue and drew my own design in it to cover with glitter.  I decided to draw a sun with some other designs like dots and swirls.

Easter Egg Pink with Glue

Next, I went with a yellow egg.  This one was going to get a very simple makeover.  I decided to use my pink ribbon to add something to the egg.

Easter Egg Yellow Before

Finally, I went with a green egg that has white polka dots on it.  So, it is a little more creative.

Easter Egg Green Before

So I decided to add a little glue to each dot and bedazzle it!  Is that super obvious for me?  Here is the first one I did before I covered the egg.

Easter Eggs Green with Jewel

So here is the finished eggs in a cute Easter basket!

Easter Egg BasketEaster Egg Basket Close UpEaster Egg Pink Close Up

I love how they turned out!  They were super easy and it only took about 10 minutes for each egg! I did have some trouble with the green egg because while the glue was drying, the jewels slipped into a different spot.  But, they still look pretty!

sparkle

Papering the Wall with Barnwood Wallpaper

Good Monday morning! I hope everyone is safe after some of the storms going on lately! We have had beautiful weather and now it is raining again. Not that I am complaining-we need it and this will probably be the last big storm. We won’t get much of a spring and will go right into summer. Are you ready?

Have any of you tried out the new removable wallpaper? I found this at Walmart and thought I would give it a try. This is not like the old glue wallpaper, thank goodness! I have scraped enough of that stuff off to last a lifetime! This is more like contact paper. It has a back that peels off and you stick it to your wall or whatever else you want to use it for. If it goes on crooked, just peel and re-stick!

barn wood wallpaper room mate

Here is the one I got and another similar one with turquoise in it. Love!!


I wanted to paper one of the walls in the front living room. The barn door/window is on that wall, so I really can’t put anything else there. This really added a lot of character. I have even had a couple of people think we actually put wood up! It looks so great!

It took 2 of us to put it up, well 3, if you count Rozy. Haley would start of the top and I would hold the rest of it to make sure it lined up and slowly peel off the paper backing. We used rulers to make sure all the bubbles were out and the paper was smooth.

barn wood wallpaper application

The top and bottom were trimmed with a razor blade. That really was it! It went up really easy and it has stayed up! I really love how it looks!

barn wood wallpaper rulerbarn wood wallpaper trim razorblade

This is where the barn door/window slides over it. I love that you can see it through the window. It really reminds me of an old farmhouse or beach-house.

barnwood removable wallpaper with barn door

Looking towards the front door that I painted turquoise, my favorite go-to color. See the little white thing on the carper? That’s Munchy’s ice-cube she didn’t finish. 🙂

barnwood removable wallpaperbarn wood wallpaperbarn wood wallpaper hydrangeas in basketbarn wood wallpaper full wall

I’m so excited how this room is turning out! It feels so light and fresh!

barn wood wallpaper hydrangeas and wicker table

I hope you all have a wonderful week!

sunshine-and-blessings-picmonkey


Last Minute St. Patrick’s Day Celebrations

Happy St. Patrick’s Day!  What a wonderful holiday where we all wear green and pinch people who aren’t wearing green.  What a great day!

What???  You didn’t realize today was St. Patrick’s Day???  Well…here are some last minute ideas that you can pull together to still celebrate with the rest of us!

-For breakfast eat green eggs and ham!  You could also have some green milk to finish off the meal.

-Now onto to what to wear.  Obviously green.  But, you could also spruce up your outfit by wearing these adorable shamrock hairbows or the headband.

St. Patricks Day Bows

-You know what else you can do?  Paint your nails super festively.  I recently painted my nails gold with gold sparkles on top to be like the pot of gold.  Of course you could do green with shamrocks, or something of the sort.

Gold Nails

-Want something fun to do?  How about some St. Patrick’s Day Mad Libs!  You can find some really cute ones by just searching for them on Google.

-And finally, what about something really sweet for desert?  How about McDonald’s Shamrock Shake?  If you like mint ice cream, then you will love this milk shake.  But it is only available through today, March 17th.  So get it today if you want it!

Shamrock Shake

I hope this helps you celebrate St. Patrick’s Day.  This is something short and sweet and really easy to complete!

sparkle


New Gallery Wall in the Dining Room

Hi everyone! Did you all have a good weekend? I drove up into our mountains with Haley and enjoyed the beauty up there. It was so nice and green and the water in the river was flowing. I love the sound of the water running over the rocks. It’s so relaxing.

kings river

I have been trying to complete lots of little things around the house, but nothing is quite finished or it’s not enough to be blog-worthy. We have just about completed the entryway-I am painting the floor this week. Probably won’t get the stenciling done right away, but at least it will look better. We have had quite the adventure with the light fixture. I was going to order the one on Amazon, and then thought I would just see if there was anything similar at the local stores. I found the hanging lights where you can add whatever shade you want and thought that would work instead. There are so many pretty shades! But then we couldn’t find what we needed to hang it without it being too long. I also realized I already had a drum shade from the old house. We finally took everything back and found the ceiling fixture we needed and now it is finally up. That’s what happens when you try to be creative and not have something everyone else does! 🙂

*This post contains affiliate links for your convenience. Any purchase made will not cost you any extra. Thanks for your support!*

I did manage to finally hang up some pictures on my dining room wall. I took everything out that I had and laid it all out on the floor. It stayed like this for an embarrassing long time. Here are just some of the pieces. I played with the different pieces until I found the way that looked best to my eye.

gallery pictures

Here’s what I came up with. You can see I used different shapes and different types of textures. Using different textures allows you to have a more neutral wall, but not look boring.I also try to use odd numbers, whether on the wall or in a vignette.

gallery wall dining room

On this side I used a metal diamond shape piece, a round rattan mirror and a square canvas.

gallery wall mirror, metal, beach

Here I have a metal star, and wooden frame with a printable in the middle and a metal round piece that was actually a charger plate I found on clearance at Target.

gallery wall pictures, star, eggs

Here is my favorite piece! I know it’s a little early for summer weather, but I am ready!

gallery wall summer subway sign

Here it is with the table. I love adding pattern with tablecloths and then adding items to the centerpiece. Using a tray helps things together and creates a vignette.

gallery wall dining room table and chairs

I added everything to a tray which helps create a focal point. It’s also easy to move out of the way if needed. I added a little bit of beach and a little bit of spring.

gallery wall dining table centerpiecegallery wall dining room table centerpiece orange and turquoise

Well, one more thing to check off the list. This week is the entryway floor and the baseboards in the hall bathroom. I still don’t have anything over the couch in the family room, but oh well. I’m still on the search for the ‘perfect’ thing.

Hope you all have a great week! Talk to you next time!

sunshine-and-blessings-picmonkey

*This post contains affiliate links for your convenience. Any purchase made will not cost you any extra. Thanks for your support!*

Here are some other posts you may want to check out!

turquoise and white spring tablescape title       scrabble-letters-spring-sign-spring-mantle      concrete planter stencil succulents