Corner News-April 30, 2016

Hello everyone! This is a bit (lot) late today. We have been gone the last couple of nights and I woke up this morning with a sore throat. Probably from all the wind we have been having.

This is where we were last night. Our local Triple-A team won the National Championships last year, so we went to cheer them on. We ended up leaving a little early because of the wind and Lauren had to be to work early. They ended up losing, but I don’t think these games are too important yet.

corner news april 30 baseball

I did get these great finds at Goodwill yesterday, along with a few other things. The paper organizer is an Isaac Misrahi from Target. I purchased it for only $1.99. I think it will be perfect for Lauren’s room along with the cute little polka-dot bucket.

Corner News-April 30 pink

That’s going to be it today. I will be back on Monday with a little coastal decor!

Sunshine and Blessings

Old Drawer Recycled to a Purse Organizer

We live on an alley. Needless to say, we find a lot of junk! One day, Haley found these 2 drawers sitting out there, just calling to her that they needed a new home. So they came home with us! Now just to figure out what to do with them!

I was talking with Lauren one day and mentioned that I didn’t know a good way to store my purses. They always seemed to be getting lost in my closet. Voila! An idea was born!

drawer organizer title

We actually have 2 of these, but I will start out with just one today. I have a couple of ideas for the other one, but I have to pick which one! As you can see, they are pretty big drawers. They were 18 inches across, 23 inches tall and 9 inches deep.

closet and purse drawer makeover

Steve took apart the old cupboards in the laundry room to make space for the lockers, so we had a bunch of wood left from that. Since this would be going in the closet and wouldn’t be a show piece, we just used particle board for the shelves and dividers.

closet and purse drawer makeover boards

Steve even made the braces for the shelves to sit on. This was a completely free project!!

closet and purse drawer makeover shelf

I measured out some of my purses and then comparing that to the size of the drawer, I came up with the measurements for the cubbies. I wanted 3 large spaces on the bottom for large totes and bags, 4 small spaces for wallets and small handbags, and 2 on top for the medium size purses (sounds like the 3 bears!-sorry! Preschool teacher here!)

closet and purse drawer cubbies

Yep! I pulled all this out of my closet and this was just one corner! I found purses in every nook and cranny. I was putting them wherever I could find space. I pulled boots out too because the new organizer would be occupying that corner.

Closet and purse organizer

After a couple of coats of white paint, it was ready to bring in the house and organize!! I love how well it fit everything!

IMG_6109

I should be able to find what I am looking for now!

IMG_6110

These are the cubbies for the smaller purses and wallets.

IMG_6111

Here are the larger ones.

IMG_6112

I always love finding ways to get more organized and a way to recycle old stuff!

drawer organizer title

Now I just have to figure out which idea to use for the other one! I will keep you updated! Have a wonderful week!

Sunshine and Blessings


2 Projects in 20 Minutes (ish)

So, this week, I have 2 projects.  I was going to split the into 2 separate blogs, but realized that they were too short and sweet to post separately.  So they are here together!  Because, as you know, sharing is caring.

The first thing on the docket is a Poshmark binder.

I was looking through my Poshmark sales (shameless plug: follow me on Poshmark @2smallofacloset), and even though I have a full spreadsheet on my computer of my sales and all the information, I wondered what would happen if my computer completely died.  Like, blue screen of death, never turning back on died.  How would I have all the information besides on the app?

Oh yeah, I have all the info on the app.

But what if something happens to my phone?????

Anyway, I decided that I wanted to print out all the information on separate pieces of paper to file in a binder.  It would be easy for me to look through and find out my sales and what my items are selling for.

Supplies Pink Binder.jpg

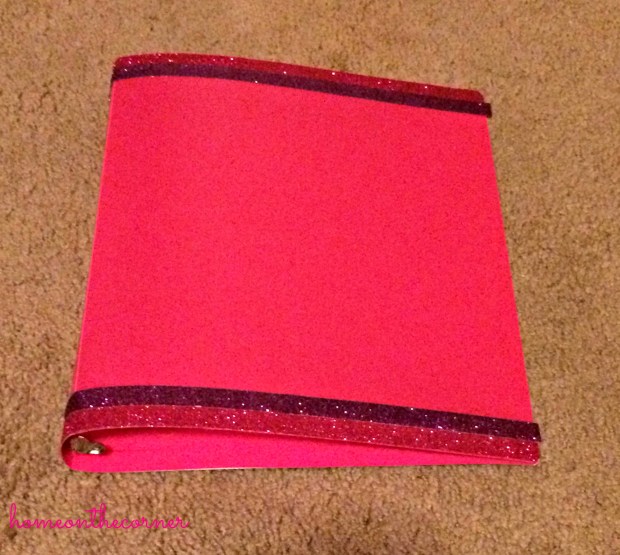
Here are my supplies: A pink binder (duh), a pink folder with a cute typewriter on the front, pink and purple glitter tape, pink and purple gel pens, and my sales paperwork.  I also used a hole punch and scissors, which are not pictured.

The first thing I did was take the pink glitter tape and line the top and the bottom of the binder.  I just used a long strip and went along the edge of the binder.  I then took the purple tape to make a second strip on the binder.  I finally added two small strips on the spine of the binder so I know which side is the top and the bottom.

Binder with Tape BeforePink Binder with TapePink Binder Spine

The second thing I did was hole punch all of the paperwork.  To make sure that they were all hole punched the same distance apart (because I don’t actually own a 3 hole punch), I placed one paper in the folder and hole punched it.  Of course, I then took that paper and used it for the rest of the papers.

Hole Punched Papers

The third thing I did was write single sale or bundled sale on the paperwork.  This is just for “office work” so I know if my bundled sales are working or not.  I wrote single sale in pink and bundled sale in purple, and even added a glitter tab to each paper so they are easy to page through.

And this is the final product.  I’m really happy that I got it to work and look this nice.  It took me approximately 10 minutes to put it all together.  It will take a little longer if you still have to type out all of your sales from Poshmark.

Pink Binder Final

The second project I have is a nautical plaque.  Mom and I found a blue piece of wood in our shed and I took it to figure out what I wanted to do with it.

Supplies Blue Board

Here are my supplies: a blue piece of wood, rope, design of your choice, and sparkly glitter glue.  You can use paint if you want, but I found this glue at Michaels and had to buy it because of reasons.

The first thing I did was hot glue the rope to the board.  When I got it around the edges, I cut the end and hot glued the end of the rope so it wouldn’t fray.  I don’t know if it will help, but it worked for me.

Board with Rope

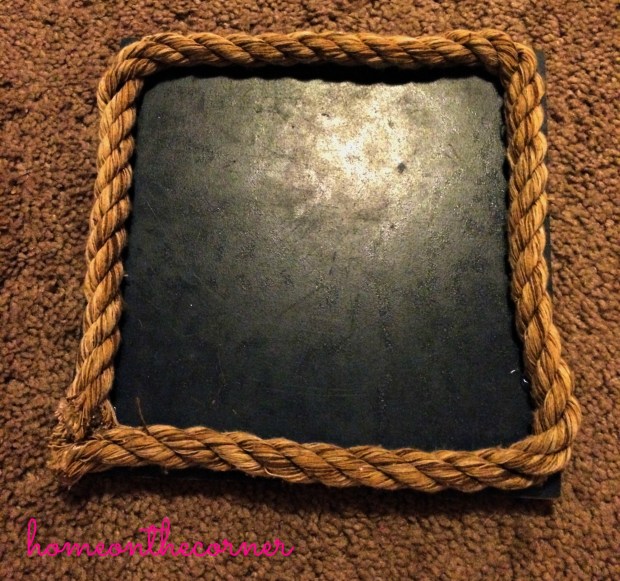
The second thing I did was trace my design onto the board.  I found this compass on Google images and decided to use it on the board.  I covered the back of the piece of paper with pencil and then traced it onto the board.  The only issue I had with this was that it was a little difficult to see the design on the board because it is blue.

Board with

The third thing I did was use the silver glitter glue to cover the pencil design.  I really like how it turned out, but I do wish that it was a little thicker.  I thought that it would be much brighter where you could see the design better.  Oh well, I still like it.

Compass Close Up

And here is the final product.

Board Final

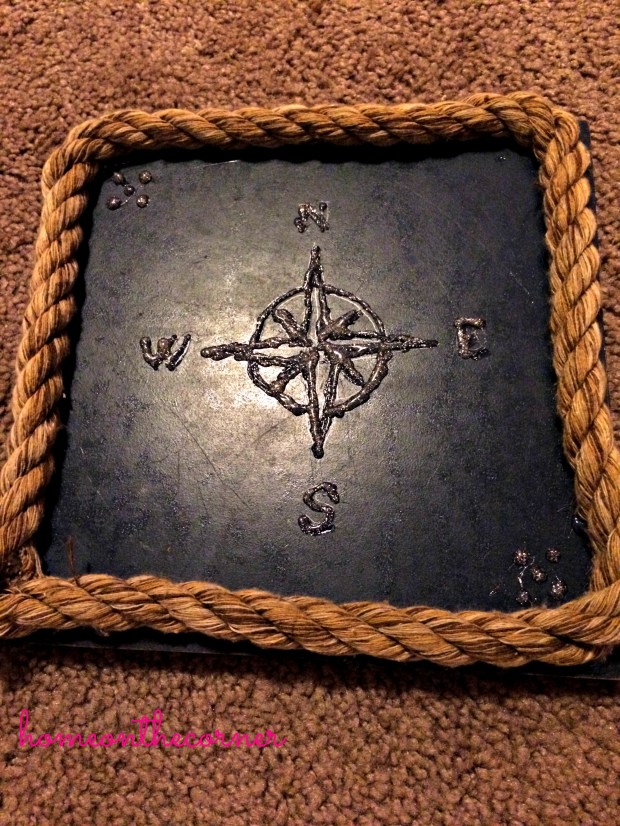
I like how it turned out.  It’s very simple and perfect to hang in a nautical themed room (maybe my living room when I move into a house?).  I am happy with how it turned out and can’t wait to actually have it as a decoration.

So, I hope this gave you some inspiration for some easy projects.  They took about 20 minutes to finish both of them all together.  The Poshmark binder has already come in handy when looking at sales and the board will come in handy very soon.  Thanks for stopping by and I can’t wait to see you tomorrow for the Corner News!

sparkle

Beachy Dining Room Refresh

dining room refresh collage

Good morning! I hope you all had a wonderful weekend! We have been enjoying some amazing weather here. A little bit of rain, a bit of wind and lots of sunshine!

The beautiful weather has inspired me to freshen up my dining room! This was the corner for spring. I still had a bunny there, some silver branches and some heavier quilts on the ladder, so I decided it was time to lighten up and add a few beach items.

dining room beachy refresh

First, I took everything away. As you can see, we have a lovely wall air conditioner here. Isn’t she a beauty! She’s not pretty, but we sure do need her in the summertime! So I had to move the door out of the way, but decided to replace it with a shutter. That way we can open it up when we need it. I’ve never done it before, so I will see how it works. Hopefully it won’t block too much of the cool air.

dining room refresh air conditioner

I put the ladder back, but added a lighter-weight blanket. The white and gold one was one of the Lily Pulitzer items from Target last year, but guess where I found it! Goodwill!! In fact, I found 2, this one and a pink one for Lauren. I also replaced the wagon and the driftwood bowl.

dining room refresh shutter ladder wagon

As you can see, I already changed where the driftwood bowl was placed! I decided to hang it like a wreath with a grey ribbon and I added a seashell garland, which I made with more of my stash of seashells.

dining room refresh vignette

I added some nautical pillows into a big metal basket. The anchor design is a pillow cover from Amazon. I love these! They store so much easier than a bunch of pillows.

dining room refresh blankets and pillows

I added a large driftwood candle holder and a basket of fishing floats into the wagon.

dining room refresh wagon ocean floatsdining room refresh wagon, shutter

Here is a closer view of the seashell garland. I used a couple of seashell necklaces we received when we went to Hawaii and made them into one long string. I drilled holes into the different shells and then strung them on the necklaces using twine.

dining room refresh driftwood bowl seashell garlanddining room refresh seashell garland

I moved the door to the other side of the dining room, behind the bar cart. I kept the Welcome sign, but added a fishing net that has hung in my bathroom forever!!

dining room refresh welcome door


I also gathered up some flowers and blossoms from my yard, arranged them in some bottles and then placed them in a metal basket. Such a fresh look for spring!

dining room refresh welcome flowers in bottles

If you want to look at last years spring decorating, click here. Although looking back, most of what I took pictures of, has completely changed!

I hope you enjoyed my little dining room spring tour! Thank you so much for stopping by!

Sunshine and Blessings


Pallet Project Update-Kitchen Plate Rack

pallet farmers market collage

I’m finally back with a project today!! I’m sure you are all thrilled! 🙂

Steve cut out this pallet rack for me several years ago, so I don’t have a tutorial for that part, but you can find them on Pinterest. Lauren, a friend and I did some craft shows a few years ago, and I had made pallet racks to hold books. This one had never sold and had been just waiting for me to come up with a project for it. Finally inspiration struck!

Pallet plate, platter holder update

I spray painted black over the letters first.

pallet plate and platter holder update black

While it was drying, I picked out the phrase I wanted to put on it and found the fonts and size on Microsoft Word. I printed them out and then cut them down to make them easier to work with.

pallet plate and platter holder update lettering

To transfer the lettering to the wood, I rub pencil on the back of the paper. Then I turn the paper over, place it where I want it to go and trace the letters. When you are done, there should be a faint outline of the words. You can see how I did this for another sign too.

jpallet plate and platter holder update farmers market

Once my tracing was on the board, I painted it in with white chalk paint. I used a really stiff brush to fill in each letter. After it was dry, I sanded it down a bit to look more worn. The last step was to go over it with a clear varnish. I knew I was going to hang it in the kitchen, so it needed to be protected.

(please don’t look too hard at the kitchen, ugh! It really needs a make-over. BADLY!!!)

So here it is hanging over the stove. The perfect place to store some platters, plates, and cutting boards.

pallet plate and platter holder update in the kitchen

pallet farmers platter and plate holder

pallet market plate holder

pallet farmers market kitchen plate holder

After looking at the pictures, I realized it was kind of bare on the wall above it. I was roaming through my local Goodwill and found this little cow head. Perfect! Her name is Amelia. She is a little small for the space, so I mounted her on some old boards we had. I didn’t even know I had the one with writing on it. Love it!

pallet rack and amelia

amelia the cow

pallet amelia the cow lettering

I am on the lookout for a little wreath to go around her neck. Or maybe a cowbell! Have a wonderful day!

Sunshine and Blessings