How To Use Spray Paint for Home Decor

Good morning! I posted this last year, but figured it wouldn’t hurt to put it out there again for you all!

Summer time is my time to get some larger projects done at home. We are finishing up a lot of the work in the living room and I am so pleased with how it is turning out! What a huge difference flooring and opening up spaces does to a room. I can’t wait to show you all! I have a few more things to finish up and then it will be ready to go!

How to use spray paint for your home decor

Last week, my favorite blogger, KariAnne, from Thistlewood Farms, blogged about spray painting different items for your home. Please hop over and take a look! I started thinking about all the items I have spray painted. In fact, my mom laughs at me when I say, ‘Just spray paint it!” 🙂 So I thought I would make my own list too. Some of the items are the same as Karianne’s, but most are different. There are just so many options!

1. Frames

I have painted SO many frames!! I find the outdated ones with fancy woodwork on them at the thrift store, take them home and spray paint them. You can paint them any color to match your decor. I have made mine into chalkboards, Christmas decor, or gasp! an actual frame!

pink christmas black frame wall decor

sweet-something-valentines-chalkboard-even-the-winds

2. Outdoor Furniture

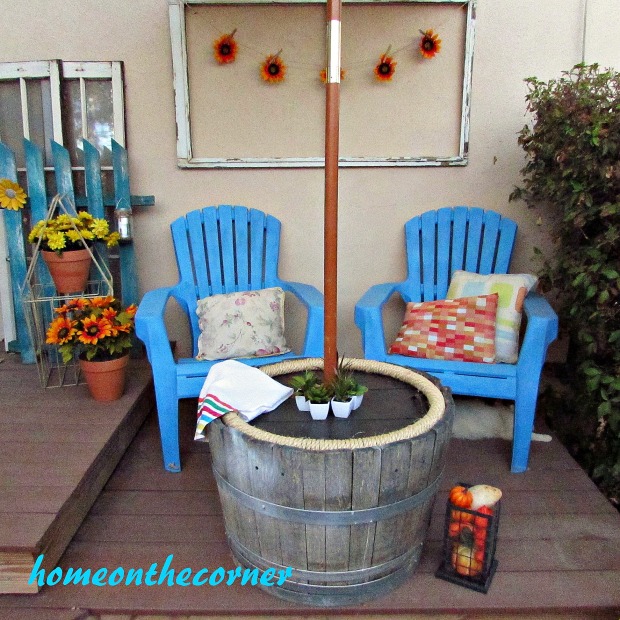
Spray paint is a great way to refresh our outdoor furniture. The furniture can get faded and worn over time and this revives it. Be sure to clean the pieces well before painting. These Adirondack chairs are plastic and were a hunter green color, so I pulled out my favorite turquoise color and they look great! In fact, I just repainted them a couple of weeks ago! I also used spray paint on the metal furniture. Black is a great basic color and makes them look fresh and clean.

Transitional Back Patio Full view 2015

outdoor patio chair cushions recovered

3. Dishes

I wouldn’t recommend actually using these painted dishes to eat off of, but its great for decor pieces. The pitcher had an 80’s design on it, but a few coats of white spray paint and it is up to date.

spray paint white pitcherspray paint starfish plate

4. Home Decor

Do you have a vase you really like, but the color doesn’t go with your decor? Or find a piece in the thrift store, but it doesn’t match? That’s right! Paint it! This cow was too cute to pass up. A fresh coat of white paint, and she is perfect!

spray paint home decor cow

5. Indoor Furniture

I have painted beds, dressers, chairs and so many other furniture pieces. I usually paint larger pieces by hand. But if the piece is rattan or wicker, spray paint is so much easier. It can get into all the little spaces better than a brush. I used white spray paint on this rattan table for my living room.

spray paint white rattan table

6. Lamps

Again, wicker is so much easier to paint with spray paint. You can also use paint for the base of an outdated table lamp. Put a pretty new shade on it and you are all set.
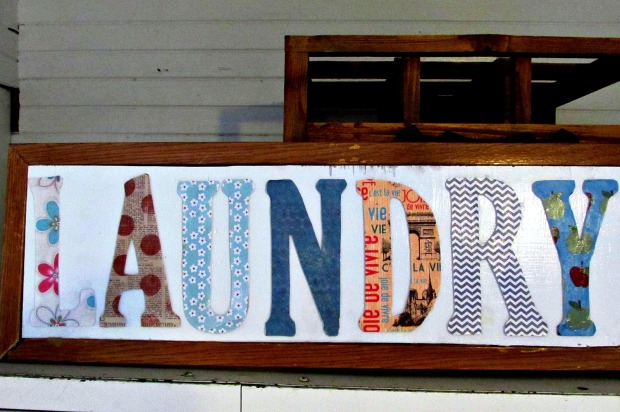
spray paint silver lamp

7. Wooden Signs

I spray painted the background on this sign and then hand painted the letters. This will work for any piece of wood. On the second sign I added chip letters to form the word ‘Laundry.”

lazy days and lemonade wooden sign potting table

Laundry room letter sign

8. Planters

I made these planters years ago from a concrete block, but I have also painted regular ceramic or plastic flower pots. Spray paint is great for covering any type of surface!

concrete planter stencil succulents

There you go! 8 different ways to use spray paint, and there are so many more! What have you transformed with spray paint? I would love to hear from you! Thank you so much for following along!

sunshine-and-blessings-picmonkey

Decoupaged Disneyland Map Tray

Good morning friends! I hope you are all staying safe. So much has happened in the last few weeks in our country. I am praying that we will find peace and some resolution to everything that is going on.

I mentioned last time that I am missing Disney, so I created another Disney DIY that is so simple. Here is the link to the Disney Lego Table if you missed it. This time I took an acrylic tray that I no longer wanted and decoupaged it with Disneyland maps. I knew I wasn’t going to be visiting Disneyland for quite awhile, but then Casey from Disneyland Daily posted that she had extra maps if anyone wanted any. She was kind enough to send me two so I could make my project!

I first cut apart the maps. I kept one whole map and then cut out the different lands and of course one with Mickey.

I laid out my pieces on the tray and figured out that they wouldn’t completely cover the tray. I found some of my Disney scrap paper and found some yellow with stars to go around the edges of the tray. I also added white polka-dot paper in the middle, just in case there were some open areas between the pieces when I put them on.

Once I had the lay-out figured out, I used Mod Podge to attach it. I brushed the Mod Podge on the tray where I would place the papers and once the papers were on, I spread another layer of Mod Podge on top.

After I attached the large map, I laid out the smaller pieces and attached each one individually so I could make sure the lay-out worked. I spread another layer of Mod Podge over the whole thing to protect it from any future spills.

Now I’m ready to serve summer refreshments! I added the Disney pitcher and cups I received several years ago as a gift.

Of course, I had to place it on the Disney table! It makes the perfect setting!

I can’t wait until we are able to go back and enjoy the Disney magic, but at least I can keep some of the magic when I use the tray! Thank you all for stopping by today!

More posts you might enjoy!

Disney’s Mickey Lego Table Makeover

Hey everyone! It’s been awhile since I have been here! I have missed you all and your sweet comments! I have several projects I have completed, but just haven’t sat down to post them. It’s hot this weekend though, so I thought this was a perfect time!
I bought this child’s Lego table a while ago at a garage sale and had it in my classroom, The paint was getting pretty worn, so I finally brought it home and gave it a makeover. I guess I have been missing Disney, because I have done a couple of Disney projects including this one!
I started out by sanding the chairs a bit. The paint was glossy, so I knew it would need some sanding. I used 120 grit paper and sanded by hand so I could get into all the crevices.
Once the chair was sanded, I painted 2 coats of Kilz Primer. I probably should have done 3 coats! The blue just wanted to keep seeping through. After the primer was dry, I painted 2-3 more coats of semi-gloss white paint.
Once the paint had dried, I wanted to add a Mickey Mouse head shape onto the chair seat. I printed out a Mickey head silhouette onto cardstock paper, cut out the shape and then used it as a stencil. I used a small brush to paint blue inside the stencil. I painted a couple of coats of blue.
Next, I did the same on the table, but this time I DID paint 3 coats of primer. It made covering the red much easier.
I wanted to protect the pieces better so the paint wouldn’t wear off so easily, so I brushed on 2 coats of Minwax Polyurethane on all the pieces.
I didn’t take pictures, but I also painted a small Mickey head on each side of the table using the same technique as above.
I really like the color scheme for this table and chairs! The kids at school loved playing with Lego’s and it was one of the activities I enjoyed doing with them.
Of course, the Disney and Mickey theme is perfect for our family and the turquoise and white colors are perfect for my home!
I even managed to make a pretty good ‘D’ out of the Lego’s I had!
I hope you enjoyed this makeover! I would love to hear your comments! I would also love it if you would pin the image below!

Here are some other Disney posts you might enjoy!

Tomorrowland Graduation Party
Minnie Mouse Ornament
Disney Tips and Tricks

Springtime Concrete Painted Planter

How is everybody holding up? Going stir crazy or getting things done around the house? I hope everybody is well. We are still doing good over here on this end!  Is it springtime in your neck of the woods? We have had some absolutely beautiful weather here! We had some much needed rain this weekend and now back to sunshine again. This type of weather makes me want to get outside and enjoy it. It also makes me want to start planting again. I love the look of freshly dug up dirt and the wonderful flowers and plants put in the ground.

I posted this several years ago and it always seems to be popular. So, I figured this would be a good project to keep you busy!

I decided to make a new small planter for my front porch. Well, actually two of them-one with my address and one with a fun graphic flower. I found these over at Lowes.com/LCI-concreteplanter. I am not affiliated with Lowes, just thought this was a fun project for spring.

I started out with 2 of the concrete blocks and a can of Rustoleum Mulitcolor Textured Spray Paint. I used a color that was very close to the color of the block. This will help seal the concrete so the other color won’t leak through when you spray your design. I first cleaned off the block with a wire bristled brush and then wiped away the dust.

Concrete painted planter

I sprayed the whole block with the spray paint. Here is the right side painted and the left is not. You can see how closely they match. Perfect!

concrete painted planter textured paint

Have you ever heard of a Xyron Sticker Maker? I use the refills for my scrapbooking. It is perfect for all the little letters I cut out on my Cricut. Just run the letters through it and then place them on your page. I thought I would give it a try for this too.I printed out the design-you could use your Cricut or find a design you like online-cut it out and then ran each piece through the Xyron.

concrete painted planter xyron

Once each piece had the sticky stuff on the back , I placed it on the concrete block.

concrete painted planter stencil

Then I spray painted over the whole thing. I painted all the sides too. I did have to keep pushing down my pieces to make sure the paint didn’t get underneath, but they did okay. I used 2 coats of paint.

concrete painted planter lagoon spray paint

On my second block, I decided to put my address numbers. I painted the whole block with the textured paint and then laid out some stenciled numbers. I covered the rest of the block with paper so the paint wouldn’t cover the rest of the block.

concrete painted planter number stencil

Then paint!

concrete painted planter numbers lagoon spray paint

I sprayed some sealer over the whole thing since it will be sitting out on my porch.

concrete painted planter flower stencil

This one looked a little plain, so I did add a blue stripe along the top and the bottom.

concrete painted planter address number

I added some succulents and placed them on my front porch. I left the plants in the pots for now, until I can figure out a way to keep the water from all draining out.

concrete painted planter front porch

concrete planter stencil succulents

concrete planter painted address

3 years later and I still have these blocks and they look great! I would love to see what designs you come up with!

sunshine-and-blessings-picmonkey