Corner News-September 17, 2016

House update: Our house is sold!!! It only took 4 days and we were even offered a little bit more than what we put in on the market for! Now we just have to have everything else go smoothly and that part will be done. We have been looking at houses to buy too and boy, is it tiring and overwhelming! There are so many different aspects to look at, sometimes my brain goes on overload. I know the right one will come along, hopefully sooner, than later!

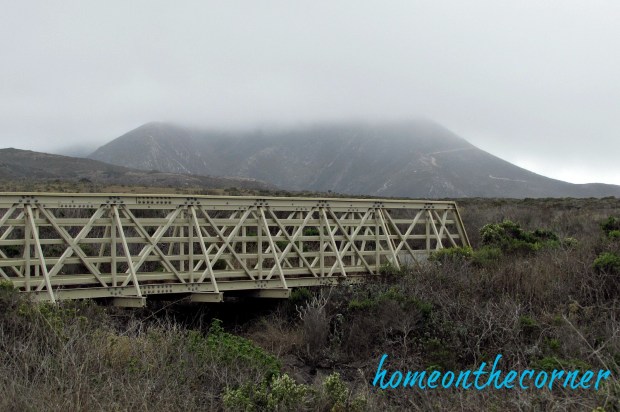
Last weekend, Haley had a friend visiting from Florida, and since my brain was tired, we spent the day along the coast. We live about 2 hours from the coast, so it makes a nice day-trip. coastal-views

It was overcast and slightly foggy, but we could still wear shorts and t-shirts. Perfect! We walked a trail along some cliffs that took us to some areas with tide-pools.

coastal-bridge-pictures

Beautiful wildflowers along the way.

coastal-flowers

Unfortunately, the tide was still pretty high, even at low-tide, so we weren’t able to see too much sea life. But it was still nice to hear the sounds of the sea and smell the salt air.

coastal-tide-pools

We combed through the rocks and shells and found plenty to bring home.

coastal-rocks-and-shells

It was so nice to get away for even just a little bit. I hope you enjoyed this little picture get-away too! Have a wonderful weekend!

sunshine-and-blessings-picmonkey

Headboard to Project Helper-Part 1

Hello everyone!  I am going to apologize in advance for how short this blog post is.  It isn’t super amazing, but I am going to show you the beginning.

So I bought this headboard from a yard sale a few months ago.  I thought it looked absolutely adorable!  I loved the look of it and I can’t wait to do something with it.

full-headboard

I love the details on the posts of the headboard.  It has so many corners on it, but the ball on top of it adds to it.

headboard-post

And finally, the slats on the headboard are so cute!  And I have a great idea for them!  I want to buy some hooks to hang screw into the slats to hang buckets off of.  In the buckets, I want to hold things like paint brushes and small tools.  This would be so handy for when mom and I are working on bigger project and need all of our tools in the same spot.

headboard-slats

Again, apologies for such a short blog post.  I wanted to show this off before I paint it and finish the look.  It will look so much better when it’s done!

sparkle

Golden Yellow Fall Tablescape

Good morning! Are you ready for a new week? Just an update on the house…we got an offer and accepted it within 4 days of putting the house on the market!!! Woo hoo!! God is good! Now we just have to worry about the inspection, and hope nothing major comes up. We have been looking at houses and it is making my head hurt. 🙂 I know I am being pretty picky, but we will probably never buy another house, so I want this one to be one we will be in for a very long time. The right one will come along!

I set up a very simple tablescape for the blog this week. It’s a little difficult to come up with stuff to post since I am packing a lot of it up! But I do still have my dishes out, so you might be seeing a lot of place settings!

I used my white tablecloth and then used golden yellow and white napkins for the placemats. I have been wanting to try this out for awhile and I do like how it turned out. The plates on the bottom were the dishes I received for my wedding. They are called Blue Peony and are white with a little bit of blue around the edges and some flowers in the middle. I paired them with a grey plate and a smaller white plate. The napkins are kind of a greyish blue and I found some ribbon in my stash that was just the right color yellow. I used mismatched silverware this time. I have been picking up miscellaneous pieces from thrift stores when I see them. A mug for something warm and some iced tea finish it up.

fall-2016-yellow-gold-tablesetting

For the centerpiece, I used a ceramic pot which looks like a stump and placed some sunflowers inside, with a few other various stems. I put some small pumpkins and gourds inside a black candle lantern. I added a couple others onto the galvanized tray.

fall-yellow-centerpiece

I think the secret to a nice looking place-setting is the layering of the different pieces. It looks so nice to have all the different shapes and colors.

fall-yellow-gold-placesetting

I hope you all have a great week and see you next time!

Sunshine and Blessings

Here are a couple of other fall posts you might like!


Fall Tablescape Placesetting Pumpkin 2015         2015 Home Tour Fall Glittery Pumpkin

Corner News-Doggie Favorites

*This blog post contains affiliate links*

Hello everyone!  This corner news is a little bit different because I am here to talk a little about some of our doggie favorite websites!  Basically, I did nothing interesting recently or if I did I have no pictures to prove it lol.

The first one is Hot Dog Collars.

Amazing Pet Products

This website is awesome!  They have just about everything you could ever need for your pet to look awesome!  They also have toys that are super cute and fun to play with.  And they have a wide variety of designs.  They have many categories and subcategories that you can look through to see if there is anything that you like.  And who doesn’t like having multiple collars for their dog?  So hop on over to Hot Dog Collars and see what they have in store for you!

The second one is Best Bully Sticks.

BestBullySticks.com

Now, if you have had a dog that needs to be busy and chew on something, you have probably heard of bully sticks.  They are really hard treats that take dogs a while to get through, keeping them busy for quite a while!  Best Bully Sticks has all of your bully stick needs!  They have everything from bones to antlers to even pigs ears!  So go check them out if you need to keep your pup busy for a while while letting them chew on something they enjoy.

Well, those are some of our favorite doggie website.  Hope you check them out and hope you enjoy the rest of your weekend!

sparkle

Fun Braided Leather Headbands

Hello everyone!  We are here with another simple blog, but it is very fun and easy to do!  I hope you are all excited!

I was in Target in the dollar section (a very dangerous section of the store for me and my mother) and found this awesome leather ribbon.  I loved the colors and knew that they would look great as some sort of project.  I didn’t know what, but I would figure something out.

lanyard-leather

And that I did.

I took each piece and measured it out to the size and a half of my head.  I then added a little extra for safety.  I did this with all three pieces for all three of the designs I am about to show you.

The next thing I did was tie a knot in the end with a loop.  This was going to be the end of the headband.

lanyard-knot

The first design I did was a simple chevron design.  I had the brown as the outside strands, white as the second and fifth strand, and blue and the middle two strands.  I crossed the outside strands over to the middle from both sides to make a v shape.  I then continued this pattern until I finished the entire headband.

lanyard-chevron

The second design was a bit more fun, but tricky.  I laid the leather out in the same pattern.  But this time instead of doing a chevron design, I did a bow design.  I tied a bow about the entirety of the leather and put the tails in the middle to use again.  After tying 3 bows of each color, I then braided the rest of the leather in a simple three strand braid.

lanyard-bows

The final design was the most complex, but probably the most fun.  I separated the strands into two sets of three, with one color in each set.  I then started with a braid and went a short distance.  After that, I tied a knot around the entirety of that set, five knots for each color.  Unfortunately, the strand was a lot shorter than I expected it to be.

lanyard-braid-and-knot

So with the other set, I did a simple braid on the entire thing.  When I finished that braid, I tied the two together so they wouldn’t come apart.  Unfortunately, it looks a little silly, but it works if you have a side braid or ponytail.

lanyard-braids

And here are the three finished looks!

lanyard-chevron-finishedlanyard-bows-finishedlanyard-double-finished

And there they are!  I really like how they turned out and they were super simple and easy to make.  And the supplies weren’t super expensive!  If you have any questions about how I made any of these headbands, please let me know!

sparkle