Creative Easter Eggs!

I AM SO SORRY FOR THIS BEING LATE TODAY!  WE HAD NO INTERNET YESTERDAY SO I COULDN’T UPLOAD UNTIL NOW!  PLEASE ACCEPT MY APOLOGY!

So, Easter is coming fairly soon (April 16th to be exact).  And of course, what is the number one thing that people think of for Easter?  PEEPS!

No, just kidding. It’s the Easter eggs.

And don’t you think that most Easter eggs are boring?  They are just a single color, for the most part, with nothing creative.  So here are some ideas for how to have more creative Easter Eggs!

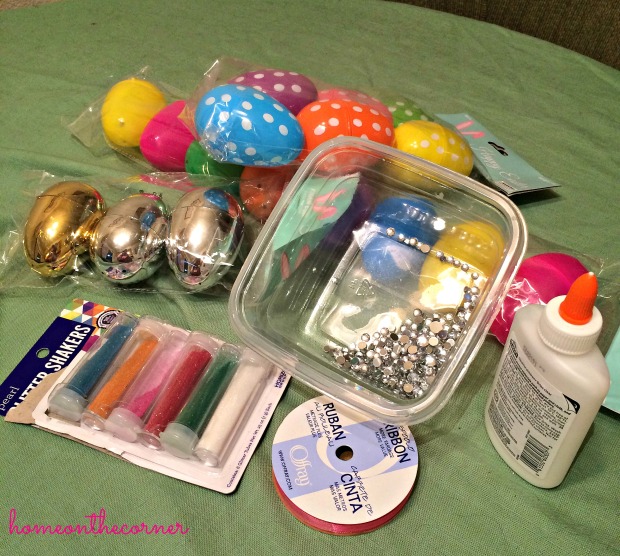
Supplies you need are eggs, glue, glitter, ribbon, acrylic jewels, and any other things that you think you want to decorate your plastic eggs.

Easter Eggs Supplies

So I started with a pink egg (obviously).  It is very simple and I knew what I wanted to do on the egg.

Easter Egg Pink Egg Before

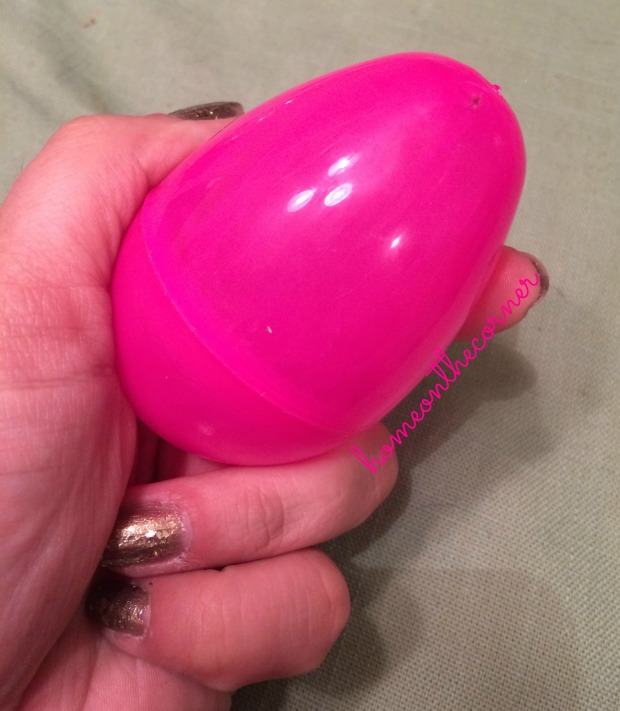
I took my glue and drew my own design in it to cover with glitter.  I decided to draw a sun with some other designs like dots and swirls.

Easter Egg Pink with Glue

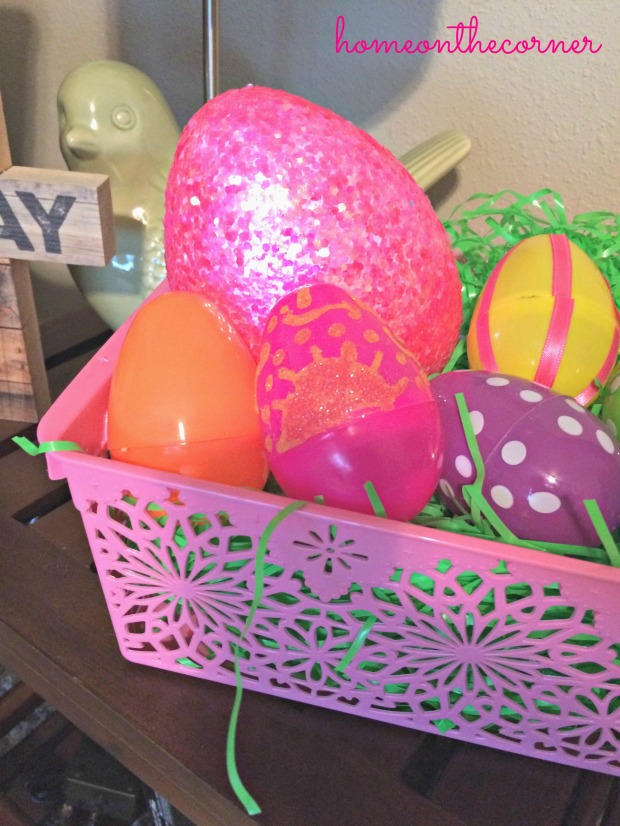
Next, I went with a yellow egg.  This one was going to get a very simple makeover.  I decided to use my pink ribbon to add something to the egg.

Easter Egg Yellow Before

Finally, I went with a green egg that has white polka dots on it.  So, it is a little more creative.

Easter Egg Green Before

So I decided to add a little glue to each dot and bedazzle it!  Is that super obvious for me?  Here is the first one I did before I covered the egg.

Easter Eggs Green with Jewel

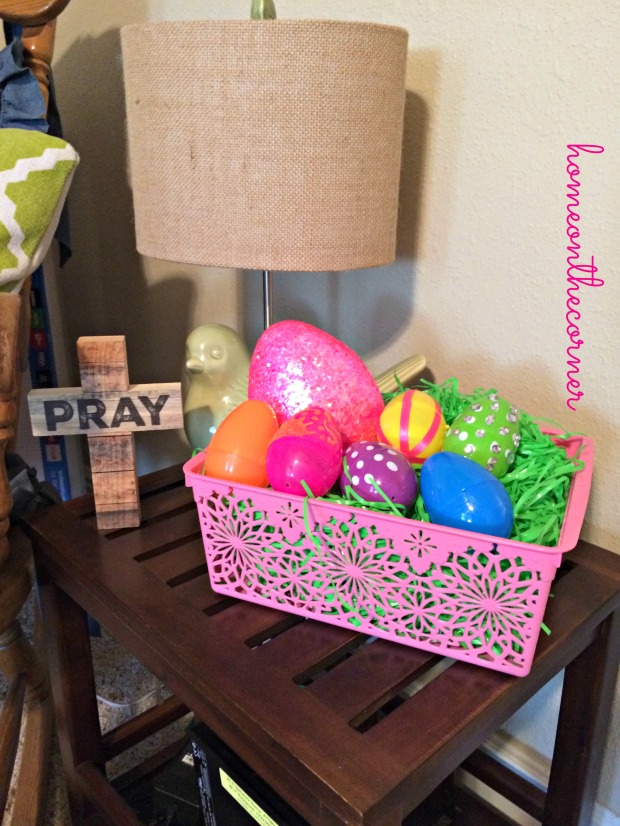
So here is the finished eggs in a cute Easter basket!

Easter Egg BasketEaster Egg Basket Close UpEaster Egg Pink Close Up

I love how they turned out!  They were super easy and it only took about 10 minutes for each egg! I did have some trouble with the green egg because while the glue was drying, the jewels slipped into a different spot.  But, they still look pretty!

sparkle

BlitzyBlingArt Makes a Public Appearance!

Hello everyone!  So I know that I have been away for a while, and I apologize.  But, there is a reason why.

I have been working nonstop on BlitzyBlingArt.  Why would I do that?  I’m going to a craft show tomorrow.  Hooray!

Now for this craft show I am taking 50 separate pieces.  And for me, I did almost all of it by myself.  With the help from some of my friends, I was able to complete all of these pieces.

So here are some of the pieces that I am taking with me!  I hope you like them all!

First is this adorable turquoise crown.  Of course it can be made in any color, but this looks like it belongs in Frozen.

IMG_3373

Next is this cute fat penguin.  Who doesn’t like penguins?

IMG_3391

Then we have a Fleur de Les.  This is such a classic design that looks great in any type of decor.

IMG_3372

Now we have a cute little pig.  The color is perfect for a pig, don’t you think?

IMG_3180

Next we have Cinderella.  I have many different Disney silhouettes, and Cinderella is one of my favorites.  I love how elegant she looks.

IMG_3131

Why no have a little bit of fun with emojis?  Of course I had to make a unicorn!  I love the colors and how perfect it looks.

IMG_3393

Finally, I have a few pieces that were extremely tricky.  And this one was no exception.  This mandala was one of my favorites to work on and is definitely one of my favorites that I am taking!

IMG_3390

So that’s it!  These are some of the 50 pieces that I am taking with me to my craft show.  I hope it goes well, and I hope I come home with less than 50 pieces!

sparkle

More Bedazzling Shoes!

Hello everyone!  So, I want to inform you that last week’s blog post was a lead up to this weeks post!  Hooray!  So, if you don’t remember last weeks blog post, click here and read it first!

So, my niece’s birthday is coming up at the end of the month, and being the awesome aunt that I am (cough cough  plugging myself for being the best aunt ever lol), I love making her gifts.  So, my niece is turning 4 and love Minnie Mouse.

But then again, I love Minnie Mouse as well, so we have the same taste in Disney stuff.

I decided that I wanted to make her a pair of shoes with Minnie Mouse on them.  Now, I had an idea where I put Minnie Mouse on the side of a pair of Toms knockoffs like my shoes that I did last week.  Unfortunately, Walmart does not carry Toms style shoes like I wanted.

So these were my two choices.

Now why these two pairs of shoes?  First of all, the brown and pink ones are just absolutely adorable!  And the white one were just simple.  I thought about the white shoes because then I could do the classic Minnie Mouse.  But then…my niece will be four and the shoes will not be white for long.  So….I went with the brown and pink.

I then went to Michaels and bought black, white, and pink gems to put on the shoes.  Here was my biggest issue…finding the same pink as the shoe laces!  Michaels had one package that had pink gems and it only had 13 gems in it.  But, with the help from mom I was able to gain more pink gems.

So I found an outline of Minnie Mouse online and printed it out to measure for the front of the shoe.  It took two or three tries, but I got the perfect size.  I then took a pencil and sketched around the Minnie Mouse outline.  I had to cut the inside of the outline to get the bottom of the bow.

minnie-mouse-outline

And after a lot of sticky fingers and incorrectly placed gems (oops) I finally got the shoes done!

minnie-mouse-finished

I think they are absolutely adorable!  I added some gems to the sides of the shoes next to the laces and a small line on the back of the shoes to add a little bit of extra bling.

They are so cute!  I hope my niece is as excited to open them as I am to give them to her.  They were so easy to make and I hope that she gets a lot of use out of them!

sparkle

Adding Some Dazzle to an Old Pair of Shoes

Hello everyone!  Is it fall yet?  Because out here in California it is still 90 degrees almost all week and I could really use a rainy cold day.  Wouldn’t that be nice?????

Well, this weeks blog was an experiment for a present for a friend of mine.  I wanted to try this on something that I had before I put I worked on something and I didn’t like how it turned out.

So, I want to bedazzle a pair of shoes for my friend, but wanted to bedazzle a pair of my own shoes to see if I liked it or not.  My supplies included a pair of shoes that I drew on, Jolee’s Boutique scrapbook embellishments, and fabric glue.

bedazzled-shoes-supplies

Now, I already had the design drawn on the shoes, so I didn’t have to worry about messing up.  But, I definitely suggest drawing on the shoes before doing anything else.  It makes your job 100 times easier.

And then I didn’t know what would be easier to put the black gems on.  If I put the glue on each gem individually, or if I smeared the glue on the shoe and then stuck the gems on.  So, here’s my verdict.  Putting glue on each gem individually makes the line nicer, but smearing the glue on the shoe is much faster.

So it’s up to you what you what you want to do!  The picture on the left is glue on each gem and the picture on the right is the glue smeared on.  Don’t worry, the glue dries on clear.

And after you spend however long sticking your gems on the shoes, you will have a completed look!  Whatever you decide to put on your shoes, or whatever you decide to bedazzle, it will look awesome!

bedazzled-shoes-finishedbedazzled-shoes-close-up

I love how the turned out!  Obviously, the glue hadn’t completely dried in the picture, but it did dry completely clear and they look awesome!  I am happy with how it looks and cannot wait to compete the project for my friends present!

sparkle