2017 ORNAMENT EXCHANGE-FROM URCHIN TO JELLY-FISH

  1. Welcome to the 2017 Ornament Exchange & Blog Hop! This year, there are 47 amazing bloggers participating in the exchange. The rules of the challenge were simple: be partnered with a fellow blogger, create a handmade ornament for $15 or under, create a tutorial, and ship the ornament off to a new home!

My partner this year is Terri Steffes. She has been married for 40 years!  She has one daughter and two dogs (she would love to have a cat).  I was excited to find out that she is a retired school principal who started out as a preschool teacher, just like me! She loves to read, write, decorate, travel, cook and entertain. We have a lot in common! She actually has 2 blogs, ChristmasTreeLane.blogspot.com and terristeffes.com. I can barely keep up with one! She also likes coastal decor for her Christmas tree like I do, so this was an easy one for me!

You can find all the participants and links to their blogs below. Also, if you would like to join the link-up, there is a button at the bottom to join in the fun!

2017 Ornament Exchange and Blog Hop

Meet the 2017 Ornament Exchange Hosts

Erlene ⋅ My Pinterventures Kim · Made In A Day Amanda · Domestically Creative

Shirley · Intelligent Domesticatons Michelle · Our Crafty Mom

Beverly · Across the Blvd. Christene · Key to Inspiration Pili ⋅ My Sweet Things

Nicki · Sweet Parrish Place Megan · C’mon Get Crafty

Hilary · Raising Fairies and Knights Emily · Two Purple Couches

Tina · One Crafty Mess Marie · The Inspiration Vault Debra · Shoppe No. 5

Trisha · Rosewood and Grace Jeanie · Create and Babble Katrin ⋅ Kreativ K

Terri · Christmas Tree Lane Maureen · Red Cottage Chronicles

Toni ⋅ Small Home Soul Ula ⋅ Lulu & Celeste Sue ⋅ A Purdy Little House

Pamela · Home On The Corner Lorelai Life with Lorelai Cindy ⋅ DIY Beautify

Debbie ⋅ Tweak and Style Stephanie ⋅ Swoodson Says Chelc ⋅ Inside the Fox Den

Susan ⋅ Super Mom – No Cape! Molly ⋅ Just a Little Creativity

Roseann ⋅ This Autoimmune Life Angela ⋅ Simply Beautiful by Angela

Vicki and Jenn ⋅ 2 Bees in a Pod Joanne ⋅ Our Unschooling Journey

Tylynn ⋅ Bitterroot DIY Sam ⋅ Raggedy Bits Mary ⋅ The Boondocks Blog

Cyn ⋅ Creative Cynchronicity Dione ⋅ Clever Chameleon Quilting

Erica ⋅ Erica Ever After Chelsea ⋅ Love Paper Crafts Evija ⋅ From Evija with Love

Samantha ⋅ Little Bits of Home Hope ⋅ Hopes Crafty Niche Anne ⋅ Orange Bettie

Pam · P.S. I Love You Crafts


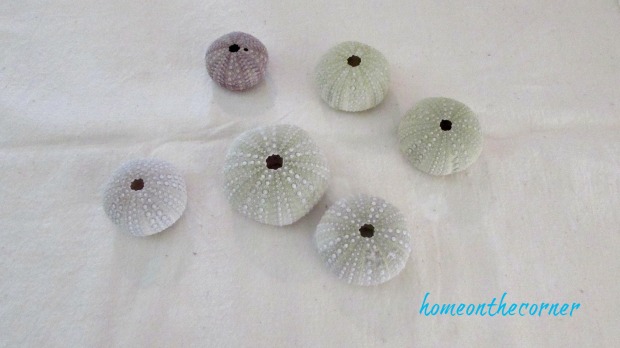
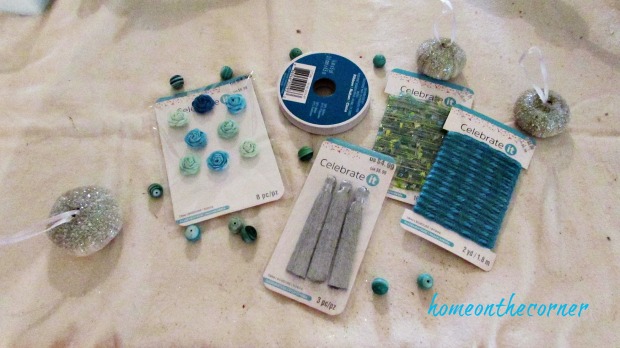
When I found out that Terri liked coastal decorations like I do, I was very excited! I had an idea for some ornaments I wanted to make and now I could make them for someone else too! I love creating special gifts for others. I already had the sea urchins and I found the embellishments at Michaels. They were on clearance, so I was able to create these very reasonably. I did find sea urchin for sale on Amazon and Etsy and online at Jo-Ann’s. There were even some pink ones, which would look very cool too.

ornament exchange 2017 jellyfish sea urchin

Since my sea urchins came from the California coast, I made sure they were clean before starting. 🙂

ornament exchange 2017 sea urchin

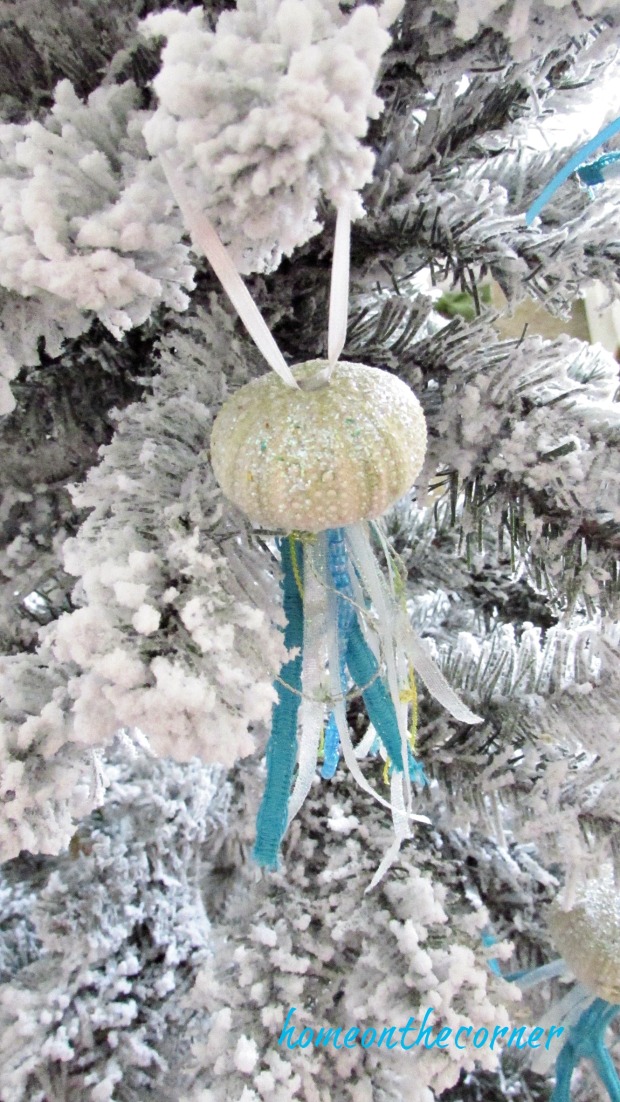
I took a small piece of white ribbon, folded it and hot glued it into the small hole on top of the urchin.

ornament exchange 2017 green and purple urchin

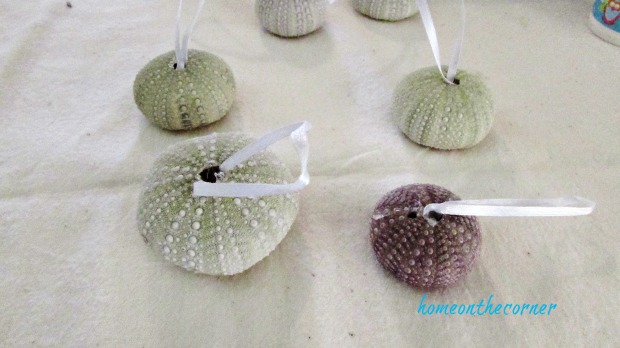
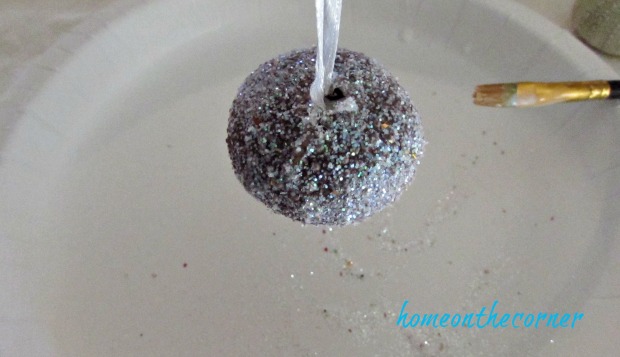
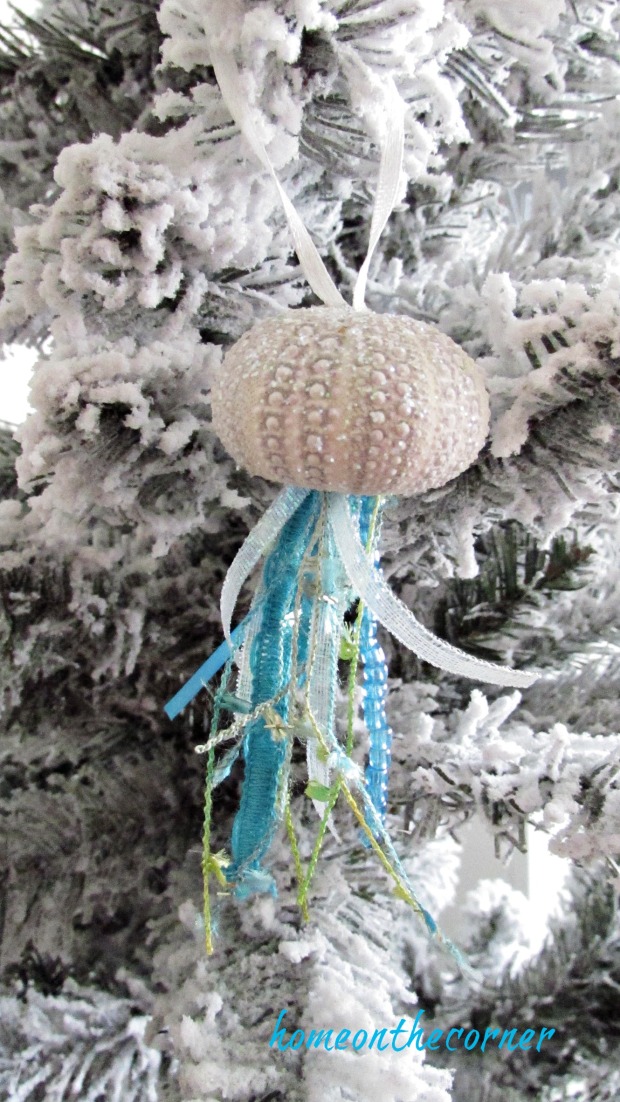
I put the ribbon on before the glitter, so that I would have something to hold onto while gluing and glittering. I brushed regular Elmer’s glue all over the urchin and sprinkled on the glitter. I used in iridescent glitter, but you could use other colors too. I made sure to rub it all over the shell. I had a hard time showing you how glittery they are, but they look so nice.

ornament exchange 2017 sparkly glitter urchin

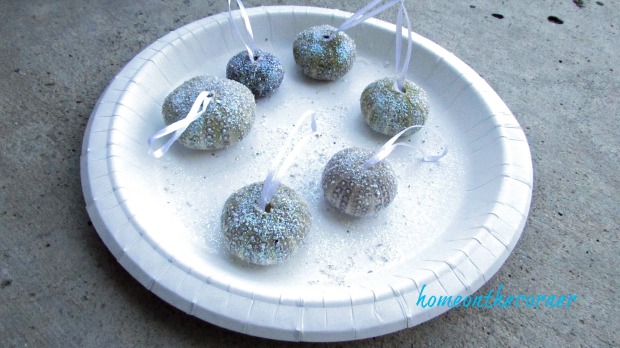
I love the purple one!

ornament exchange 2017 urchin sparkles glitter

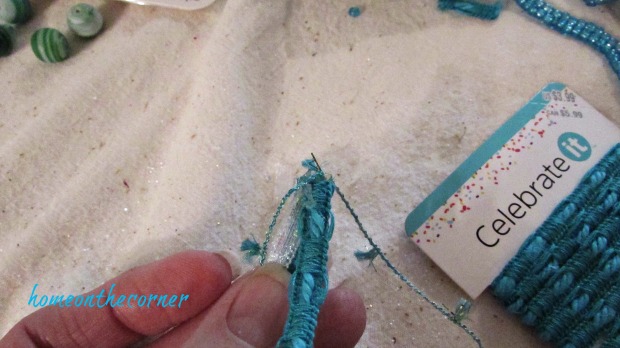
Here are the embellishments I found. I didn’t end up using everything, mainly just the different ribbons. I did add some small beads to some of them with some beads I already had on hand.

ornament exchange 2017 embellishments

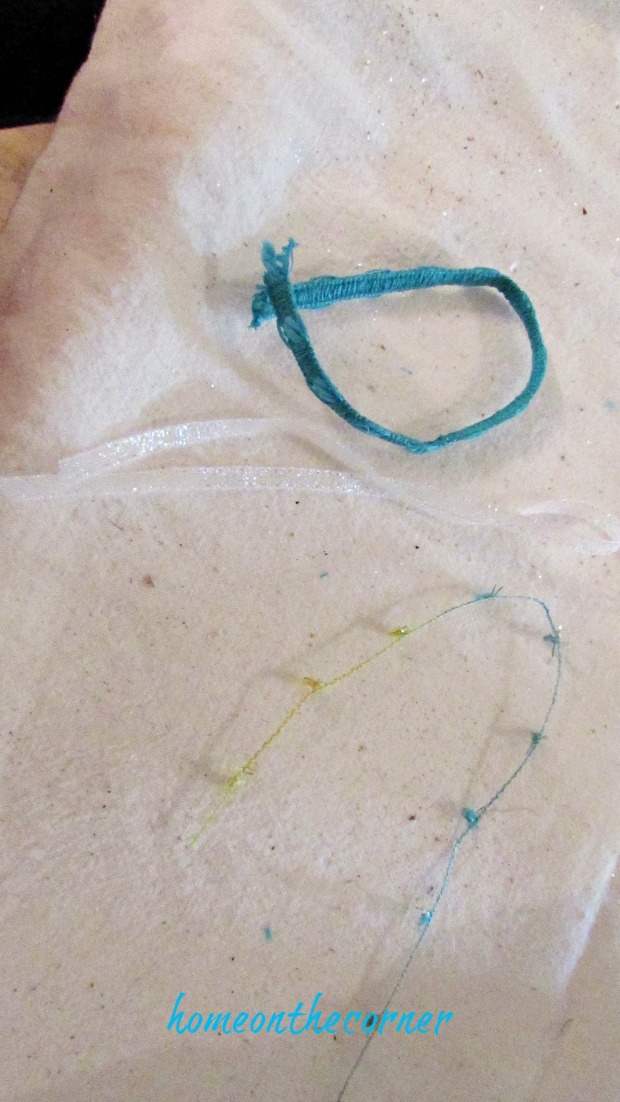
I cut each type of ribbon into small lengths and then hot-glued them, in the middle, on top of each other, one at a time. Now I had 6 ends hanging down. I made two sets for each urchin.

ornament exchange 2017 turquoise and white ribbon

Once the pieces were glued together, I hot-glued them into the bottom of the urchin, pushing them way up inside using a pencil so I didn’t burn my fingers.

ornament exchange 2017 turquoise ribbon

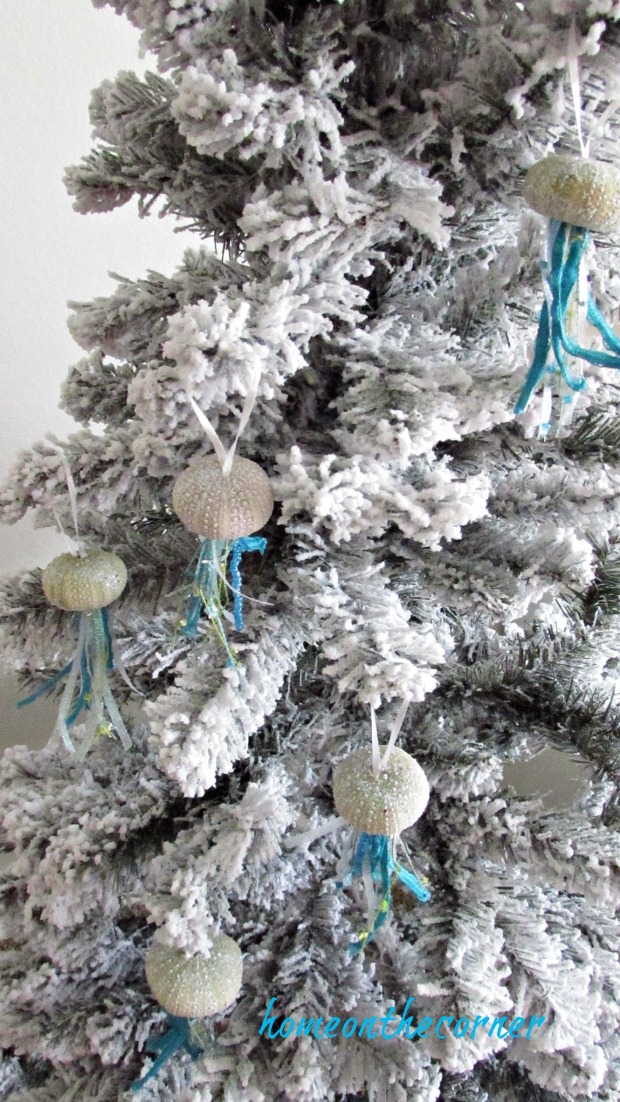
Ready to hang on the tree!

ornament exchange 2017 tree of jellyfish

You can see some of the turquoise beads I used on this one.

ornament exchange 2017 sparkly sea urchin

I also glued some individual beads onto the white ribbon.

ornament exchange 2017 sparkly sea urchin jellyfish

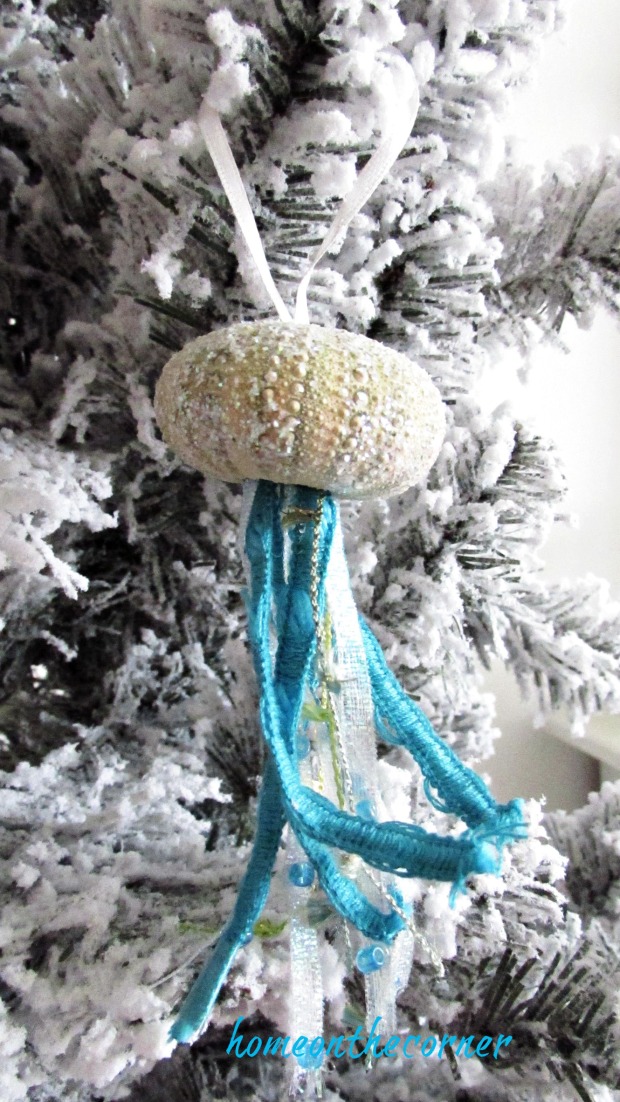
I love how the tails turned sea urchins into jelly-fish!

ornament exchange 2017 sea urchin jelly fish

I’m so glad I had the opportunity to make these for my new blogger friend, Terri! Thanks to Erlene, from My Pinterventures, for hosting another year of Ornament Exchange! Remember to check out all the other ornaments below! Have fun creating!


FIND ALL 47 HANDMADE ORNAMENT TUTORIALS BELOW AND SHARE YOURS TOO! Use Hashtag #2017OrnamentExchange so we can see your creations on social media.

From Black Lace to Turquoise Beachy

Hello! Sorry about missing last week Monday! Between being gone two weekends in a row, getting stuff done at school, working at the animal shelter, and just life, a post didn’t get written! Just the way it goes sometimes. This week we take Haley to college. Wah! How did it come to this!? I’m going to miss her greatly, but I am also excited to see where this takes her and to see everything I know she is capable of accomplishing!

Remember when Lauren painted these bar stools? After moving this summer, she decided she didn’t need them at her new apartment. So guess where they end up? That’s right…mom’s house! They don’t really fit in my decor with the black and white, so I went with a more beachy look.

I sanded down the top first, not completely down to the wood, but just to get most of the black off. I kept a bit of it because I knew I wanted to sand down whatever I painted and let some of the black show through. The next step was primer. I used my favorite Kilz Primer.

bar stool makeover

I used my Benjamin Moore Simply White over the whole stool. After the paint dried, I used painters tape to make stripes on the seat of the stool. I’m not very good at measuring things out, so I just eyeballed it, trying to keep my lines as straight as possible. I actually did pretty well!beachy barstools with painters tape

I pressed down the edges of the tape really well and then I used the same ‘unknown paint color’ that I used in my bedroom and the front door. You can see it here.

beachy bar stool with blue stripes

After the paint dried a bit, I peeled off the tape. The lines look pretty good!

beachy bar stools farmhouse stripes

I used an orbital sander over the seat and around the edges. I sanded down to the black in some places and to the wood in other places.

Here it is in the bathroom. You can still see some of the black showing through.

bar stool beachy makeover turquoise stripesbar stool beachy makeover white and bluebar stool beachy blue and white stripe

I also used one in my entryway. It’s the perfect place to take off your shoes or leave a bag for a moment.

bar stool beach stripes white and bluebar stool beach stripes blue and white

So what do you think? I love how these turned out! I have two more and I am thinking about painting them the same. I’m so glad I got this project done! On to the next project!

sunshine-and-blessings-picmonkey

*Here are some of the products that are similar to what I used. This is a sponsored post.*


Here are a few other previous posts you might enjoy!

Travel Sign 2

filing cabinet makeover files, chair, pillow  wooden crate starfish, garland, blue

A Spring Tablescape Contest

It’s Spring Break this week! Yay! I was actually out of work 2 days last week too, because I didn’t feel well, but went back on Friday for our Jesus Lives party. The kids really enjoy that. We do some crafts, listen to the Bible story, dye eggs, decorate cookies and go on an egg hunt. It’s a fun filled morning, and now I am ready for the break.

*This post contains affiliate links for your convenience. Any purchase made will not cost you any extra, but a little comes back to us. Thank you!*

This weekend I was putting some tablescapes together for a blog post, when Haley decided we should do a competition. We used to put together a place-setting complete with menu for 4-H competitions. She stated we should do it for the blog. We won’t tell you whose is whose and you can vote in the comments. The winner gets bragging rights, and if Haley wins, we will never hear the end of it! We collected all these things from around the house and had a great time teasing each other about who would win. So here we go!

  1. Retro Turquoise Chic

This tablescape starts out with a white tablecloth and is layered with a turquoise, grey and white patterned napkin. A white plate is layered with a grey plate and a white napkin and silverware are laid by the side. The wood and white cake stand is topped with turquoise mason jars and a topiary to bring in some texture and coziness. A retro turquoise fan will keep you cool on those hot summer nights. Perfect simplicity for a summer dinner under the stars.

tablescapes 2017 turquoise and grey

2. Summer Chic

This is the perfect tablescape to add a little glam to your table! A navy blue tablecloth is layered with a bright pink runner. A stack of plates combines white and gold, both solid pieces and ones with designs. Silverware is packaged into a crisp white napkin. Simple details, such as a white bunny with gold ears, white and pink peony and a green fern add to the chic. Add a few candles for the perfect dinner with someone special.

tablescapes 2017 gold, spring, bunny

3. Seaside Charm

This tablescape features a white tablecloth with a burlap runner. A white and turquoise chippy metal charger is layered with a grey rattan plate holder and a turquoise plate with white trim. A grey swirled napkin is topped with a starfish.  Flatware tied with rope adds to the coastal look. A twine wrapped candle inside a rope and glass candleholder adds some ambiance and charm. Glass floats and a little burlap treat bag bring in some character and texture. Great for imagining yourself at the sea.

tablescape 2017 nautical turquoise, blue and grey

So, which one did you like the best? Let us know in the comments and I will let you know next week who the winner is! This was a lot of fun for us and we hope you enjoyed it too! Have a great week and a blessed Easter!

sunshine-and-blessings-picmonkey

For your convenience, here are some links to similar items on Amazon. There is no extra cost to you, but a little bit comes back to us. Thank you!

New Gallery Wall in the Dining Room

Hi everyone! Did you all have a good weekend? I drove up into our mountains with Haley and enjoyed the beauty up there. It was so nice and green and the water in the river was flowing. I love the sound of the water running over the rocks. It’s so relaxing.

kings river

I have been trying to complete lots of little things around the house, but nothing is quite finished or it’s not enough to be blog-worthy. We have just about completed the entryway-I am painting the floor this week. Probably won’t get the stenciling done right away, but at least it will look better. We have had quite the adventure with the light fixture. I was going to order the one on Amazon, and then thought I would just see if there was anything similar at the local stores. I found the hanging lights where you can add whatever shade you want and thought that would work instead. There are so many pretty shades! But then we couldn’t find what we needed to hang it without it being too long. I also realized I already had a drum shade from the old house. We finally took everything back and found the ceiling fixture we needed and now it is finally up. That’s what happens when you try to be creative and not have something everyone else does! 🙂

*This post contains affiliate links for your convenience. Any purchase made will not cost you any extra. Thanks for your support!*

I did manage to finally hang up some pictures on my dining room wall. I took everything out that I had and laid it all out on the floor. It stayed like this for an embarrassing long time. Here are just some of the pieces. I played with the different pieces until I found the way that looked best to my eye.

gallery pictures

Here’s what I came up with. You can see I used different shapes and different types of textures. Using different textures allows you to have a more neutral wall, but not look boring.I also try to use odd numbers, whether on the wall or in a vignette.

gallery wall dining room

On this side I used a metal diamond shape piece, a round rattan mirror and a square canvas.

gallery wall mirror, metal, beach

Here I have a metal star, and wooden frame with a printable in the middle and a metal round piece that was actually a charger plate I found on clearance at Target.

gallery wall pictures, star, eggs

Here is my favorite piece! I know it’s a little early for summer weather, but I am ready!

gallery wall summer subway sign

Here it is with the table. I love adding pattern with tablecloths and then adding items to the centerpiece. Using a tray helps things together and creates a vignette.

gallery wall dining room table and chairs

I added everything to a tray which helps create a focal point. It’s also easy to move out of the way if needed. I added a little bit of beach and a little bit of spring.

gallery wall dining table centerpiecegallery wall dining room table centerpiece orange and turquoise

Well, one more thing to check off the list. This week is the entryway floor and the baseboards in the hall bathroom. I still don’t have anything over the couch in the family room, but oh well. I’m still on the search for the ‘perfect’ thing.

Hope you all have a great week! Talk to you next time!

sunshine-and-blessings-picmonkey

*This post contains affiliate links for your convenience. Any purchase made will not cost you any extra. Thanks for your support!*

Here are some other posts you may want to check out!

turquoise and white spring tablescape title       scrabble-letters-spring-sign-spring-mantle      concrete planter stencil succulents

Light Up the Entry

Hi everyone! I hope you are all doing well! I don’t know if you have noticed, but we have been a little bit absent lately. I have been busy getting projects done in the house and on the front porch and that doesn’t leave me as much time to write any posts. I have also had to work a few extra hours and then I am usually so tired, I can’t even think about writing something up!

I have been working on the entry and front porch these past couple of weeks. My husband took out the closet in the front entry and it has been dry-walled, primered and painted. I am trying to figure out what I am going to do with the cement floor. I am thinking about painting it and adding stencil to it, so wish me luck on that idea! I have painted both sides of the front door and fixed up the front porch a bit. Now I am on to lighting! This is kind of difficult for me…there are so many choices! My home has a bit of coastal influence, so I am trying to stay with that idea. I would love to have some kind of chandelier in the entry, but unfortunately, we only have 8 foot ceiling and the front door opens right under the light, so I can’t have anything too long. So I have been looking for flush lighting for the entry and a new outdoor light for the front porch. I thought I would share a few of my ideas with you!

These are all from Amazon. I could look for hours at all the different choices, but here is what I have narrowed it down to.

1. Trans Globe Lighting 5128 ROB 1-Light Flush Mount

2.Elegant Designs FM1000-CHR Ellipse Crystal 2 Light Ceiling Flush Mount, Chrome

3.Design House 519876 Kimball 1 Light Semi Flush Mount Ceiling Light, Galvanized Steel Finish

4.Capital Lighting 3537PN-134 1 Light Ceiling Fixture in Polished Nickel Finish w/Clear Glass

This next set is from hayneedle.com. They carry so much more than lighting and have such great products. Here are a few picks:

1. Eglo USA Thebe 91166A Flush Mount Light

2.Golden Lighting Duncan 3602-14 Flush Mount Light

3. Sea Gull Lighting Bretton 7647EN Flush Mount Light

4.Z-Lite Chelsey 314F Flush Mount Light

Here are a few of the outdoor porch light I choose.

  1. Maxim Wharf Outdoor Wall Light – 9.5H in.

2. Trans Globe Lighting 4632 BN 14-1/2-Inch 1-Light Outdoor Down Wall Lantern, Brushed Nickel

3.Kichler Lighting 9777WH 3 Light Chesapeake Outdoor Sconce, White by Kichler

4. Kichler Seaside 9Outdoor Wall Lantern

Well, what do you think? Are there any you would choose or think would look good? Let me know! Hope you all have a great week!

sunshine-and-blessings-picmonkey