More Bedazzling Shoes!

Hello everyone!  So, I want to inform you that last week’s blog post was a lead up to this weeks post!  Hooray!  So, if you don’t remember last weeks blog post, click here and read it first!

So, my niece’s birthday is coming up at the end of the month, and being the awesome aunt that I am (cough cough  plugging myself for being the best aunt ever lol), I love making her gifts.  So, my niece is turning 4 and love Minnie Mouse.

But then again, I love Minnie Mouse as well, so we have the same taste in Disney stuff.

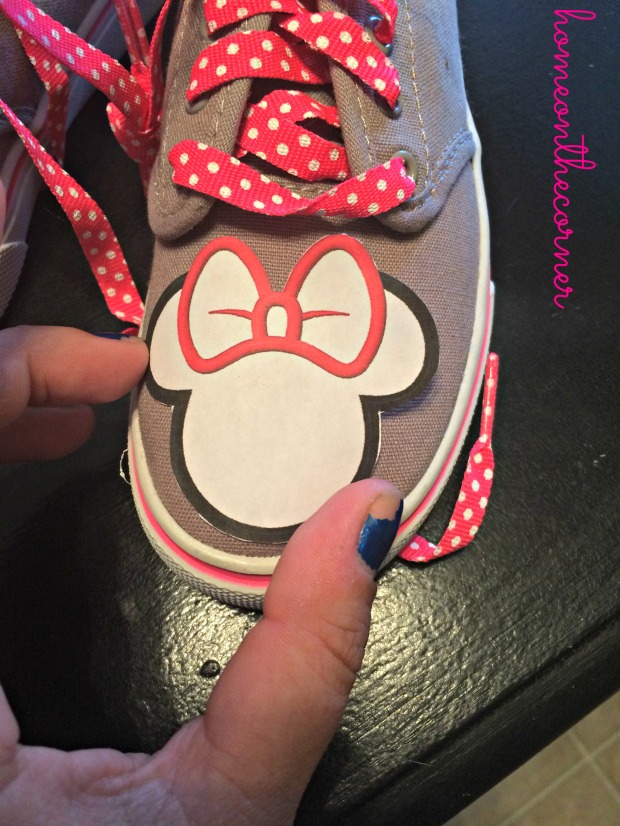
I decided that I wanted to make her a pair of shoes with Minnie Mouse on them.  Now, I had an idea where I put Minnie Mouse on the side of a pair of Toms knockoffs like my shoes that I did last week.  Unfortunately, Walmart does not carry Toms style shoes like I wanted.

So these were my two choices.

Now why these two pairs of shoes?  First of all, the brown and pink ones are just absolutely adorable!  And the white one were just simple.  I thought about the white shoes because then I could do the classic Minnie Mouse.  But then…my niece will be four and the shoes will not be white for long.  So….I went with the brown and pink.

I then went to Michaels and bought black, white, and pink gems to put on the shoes.  Here was my biggest issue…finding the same pink as the shoe laces!  Michaels had one package that had pink gems and it only had 13 gems in it.  But, with the help from mom I was able to gain more pink gems.

So I found an outline of Minnie Mouse online and printed it out to measure for the front of the shoe.  It took two or three tries, but I got the perfect size.  I then took a pencil and sketched around the Minnie Mouse outline.  I had to cut the inside of the outline to get the bottom of the bow.

minnie-mouse-outline

And after a lot of sticky fingers and incorrectly placed gems (oops) I finally got the shoes done!

minnie-mouse-finished

I think they are absolutely adorable!  I added some gems to the sides of the shoes next to the laces and a small line on the back of the shoes to add a little bit of extra bling.

They are so cute!  I hope my niece is as excited to open them as I am to give them to her.  They were so easy to make and I hope that she gets a lot of use out of them!

sparkle

2 Projects in 20 Minutes (ish)

So, this week, I have 2 projects.  I was going to split the into 2 separate blogs, but realized that they were too short and sweet to post separately.  So they are here together!  Because, as you know, sharing is caring.

The first thing on the docket is a Poshmark binder.

I was looking through my Poshmark sales (shameless plug: follow me on Poshmark @2smallofacloset), and even though I have a full spreadsheet on my computer of my sales and all the information, I wondered what would happen if my computer completely died.  Like, blue screen of death, never turning back on died.  How would I have all the information besides on the app?

Oh yeah, I have all the info on the app.

But what if something happens to my phone?????

Anyway, I decided that I wanted to print out all the information on separate pieces of paper to file in a binder.  It would be easy for me to look through and find out my sales and what my items are selling for.

Supplies Pink Binder.jpg

Here are my supplies: A pink binder (duh), a pink folder with a cute typewriter on the front, pink and purple glitter tape, pink and purple gel pens, and my sales paperwork.  I also used a hole punch and scissors, which are not pictured.

The first thing I did was take the pink glitter tape and line the top and the bottom of the binder.  I just used a long strip and went along the edge of the binder.  I then took the purple tape to make a second strip on the binder.  I finally added two small strips on the spine of the binder so I know which side is the top and the bottom.

Binder with Tape BeforePink Binder with TapePink Binder Spine

The second thing I did was hole punch all of the paperwork.  To make sure that they were all hole punched the same distance apart (because I don’t actually own a 3 hole punch), I placed one paper in the folder and hole punched it.  Of course, I then took that paper and used it for the rest of the papers.

Hole Punched Papers

The third thing I did was write single sale or bundled sale on the paperwork.  This is just for “office work” so I know if my bundled sales are working or not.  I wrote single sale in pink and bundled sale in purple, and even added a glitter tab to each paper so they are easy to page through.

And this is the final product.  I’m really happy that I got it to work and look this nice.  It took me approximately 10 minutes to put it all together.  It will take a little longer if you still have to type out all of your sales from Poshmark.

Pink Binder Final

The second project I have is a nautical plaque.  Mom and I found a blue piece of wood in our shed and I took it to figure out what I wanted to do with it.

Supplies Blue Board

Here are my supplies: a blue piece of wood, rope, design of your choice, and sparkly glitter glue.  You can use paint if you want, but I found this glue at Michaels and had to buy it because of reasons.

The first thing I did was hot glue the rope to the board.  When I got it around the edges, I cut the end and hot glued the end of the rope so it wouldn’t fray.  I don’t know if it will help, but it worked for me.

Board with Rope

The second thing I did was trace my design onto the board.  I found this compass on Google images and decided to use it on the board.  I covered the back of the piece of paper with pencil and then traced it onto the board.  The only issue I had with this was that it was a little difficult to see the design on the board because it is blue.

Board with

The third thing I did was use the silver glitter glue to cover the pencil design.  I really like how it turned out, but I do wish that it was a little thicker.  I thought that it would be much brighter where you could see the design better.  Oh well, I still like it.

Compass Close Up

And here is the final product.

Board Final

I like how it turned out.  It’s very simple and perfect to hang in a nautical themed room (maybe my living room when I move into a house?).  I am happy with how it turned out and can’t wait to actually have it as a decoration.

So, I hope this gave you some inspiration for some easy projects.  They took about 20 minutes to finish both of them all together.  The Poshmark binder has already come in handy when looking at sales and the board will come in handy very soon.  Thanks for stopping by and I can’t wait to see you tomorrow for the Corner News!

sparkle

When I See an Elephant Fly

Have you seen an elephant fly?  No…me neither.  But wouldn’t that be cool, to see this giant creature flying through the air with ease?  Yeah, that would be awesome.

Or, you can watch Dumbo and get almost the same thing.

So, why am I telling you this?  Well, of course it has to do with a project I was working on.  Specifically for my coworker Linda.

Linda is the resident cat lady at work.  She takes care of the cat room 5 days a week while the rest of us take care of the dogs.  She is an amazing person and someone who is very easy to talk to and she will help you with whatever is needed.

Well her birthday just passed and I wanted to give her something that was meaningful.  Which is why I decided to make something from her favorite Disney movie, Dumbo.

supplies

I started with a blank canvas (literally and figuratively), grey paint, paintbrushes, and a black paint pen and started on my masterpiece.  The canvas was purchased in a pack of 2 from Michaels for $10.99.  Hey, I’m happy with it.  Now I can make 2 pictures!

Carbon Dumbo

I printed out a silhouette of Dumbo from Google images that I wanted to put on one of the corners.  I decided to use a pictures of Dumbo and Timothy Mouse flying because the picture of Dumbo sitting didn’t look as good.  I printed the picture on carbon paper so that way it was easy to copy onto the canvas.  And I think that it turned out great!

dumbo sketch

I also started writing the lyrics of the song ‘When I See an Elephant Fly’ on the canvas.  I didn’t have to write super tiny because there aren’t that many lyrics to the song.  But, I still didn’t cover the entire canvas.  So I added the title of the song and the Disney logo at the bottom.

full dumbo

After writing the lyrics in pencil, I wrote over them in black paint pen.  The only issue I had with the paint pen was that it started to run out near the end of the lyrics.  It might have been better to use a sharpie to write the lyrics instead of the paint pen.

finished dumbo

Finally, after writing all the lyrics, I finally painted in Dumbo.  Originally, I wasn’t going to outline Dumbo in black, I was just going to leave it grey.  But, he didn’t have a whole lot of definition without the outline.

I think it turned out super cute!  I love how Dumbo turned out and how the lyrics worked out.  I also like the title at the bottom, even though it wasn’t intended.  Overall, I am extremely happy with this canvas.  And I hope Linda is as well when she sees it!

sparkle