The Fabrics of Life

Do you ever have something that you will get as much of as possible if you get it for free or really cheap?  You know, like food or clothes or home decor.  If you don’t have something like this, you are lucky.  But if you do, you know my pain.

Because for me, this addiction is fabric.

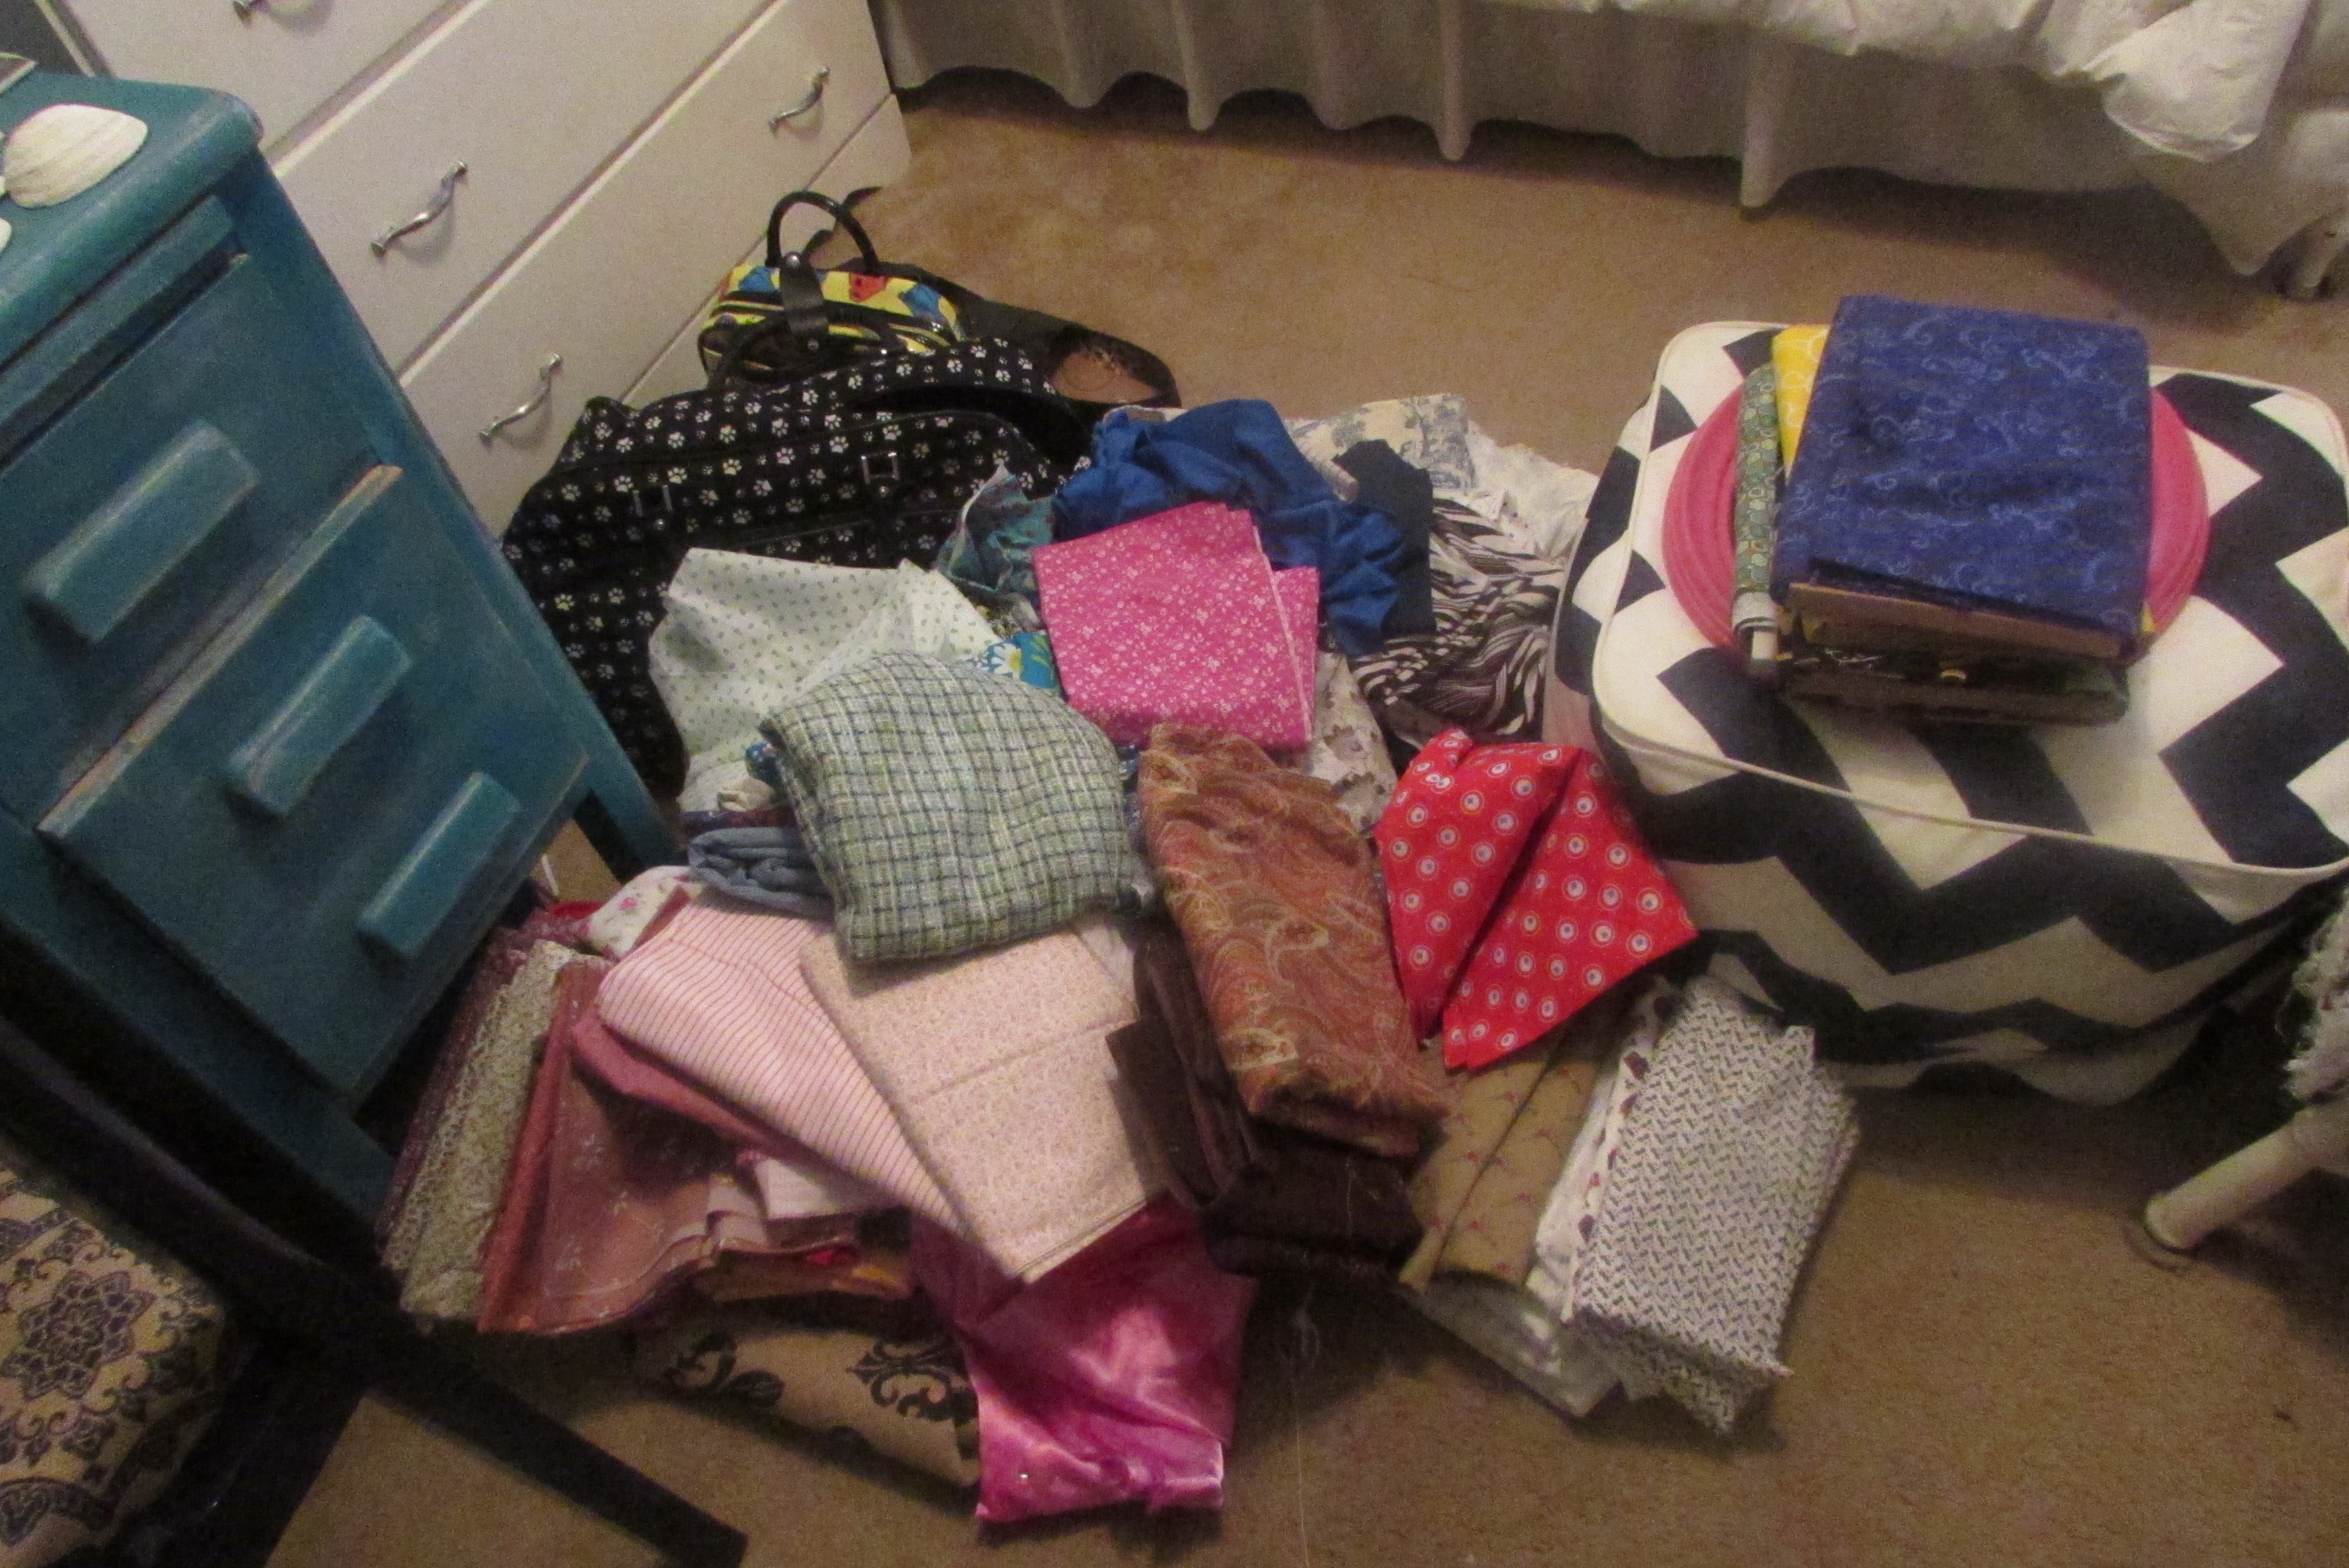
I love fabric: to decorate with, to make clothes with, or even to make pillows with.  I have fabric that I won in the Make It Yourself With Wool contest, I have fabric that I have bought from JoAnn’s or Hobby Lobby, and I have fabric that I have gotten for free from other people.  And it would be okay if I actually had a use for all of this fabric.  But for now, this is what my fabric closet looked like.

IMG_2521

Now, I did bring some of this fabric to my apartment to try to sell rice bags to fellow students and friends.  But, it didn’t really work out…so I brought it all home and made this mess in my fabric closet.  And as I looked at my fabric, I decided to organize it all to put into a nice neat closet.

I took all the fabric out and nicely threw it on the floor.  This way, I was able to start fresh in the organization of my fabric closet.  As I started to put some of the fabrics away, I went through and found some that I didn’t want to keep anymore.  Either they weren’t my style or there wasn’t enough fabric to try to make something out of.

IMG_2522

So here is my clean closet!

IMG_2524

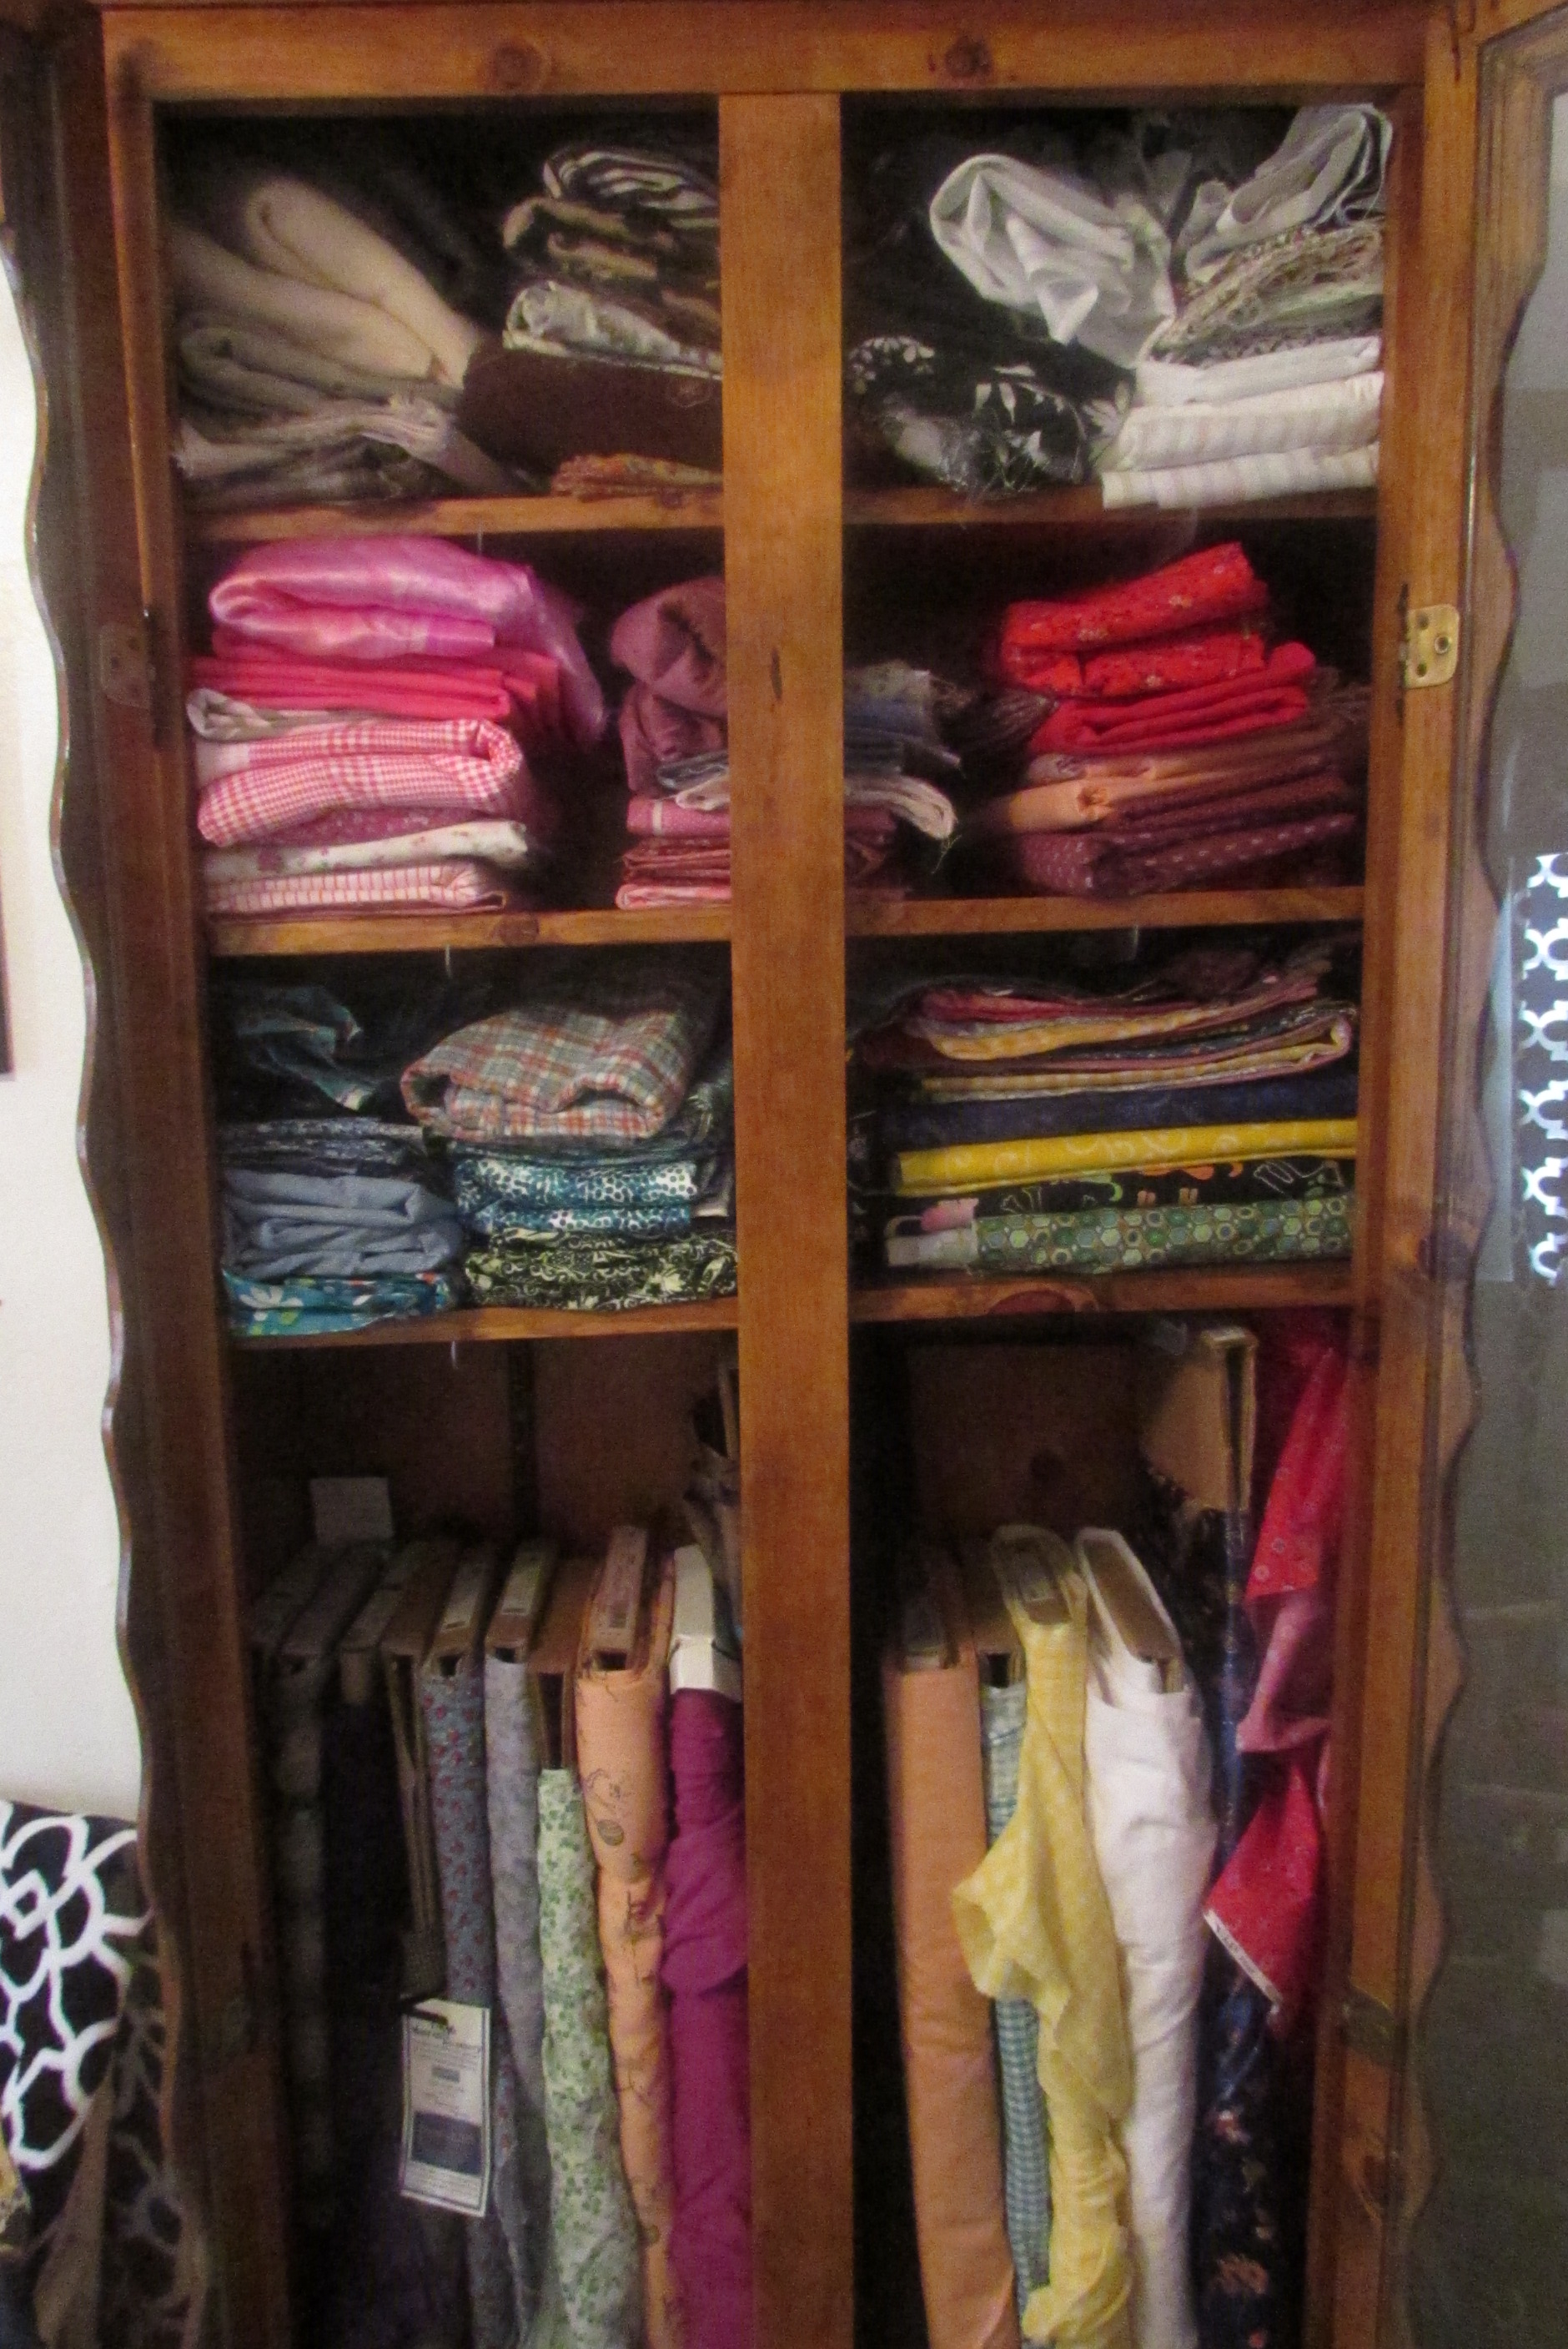
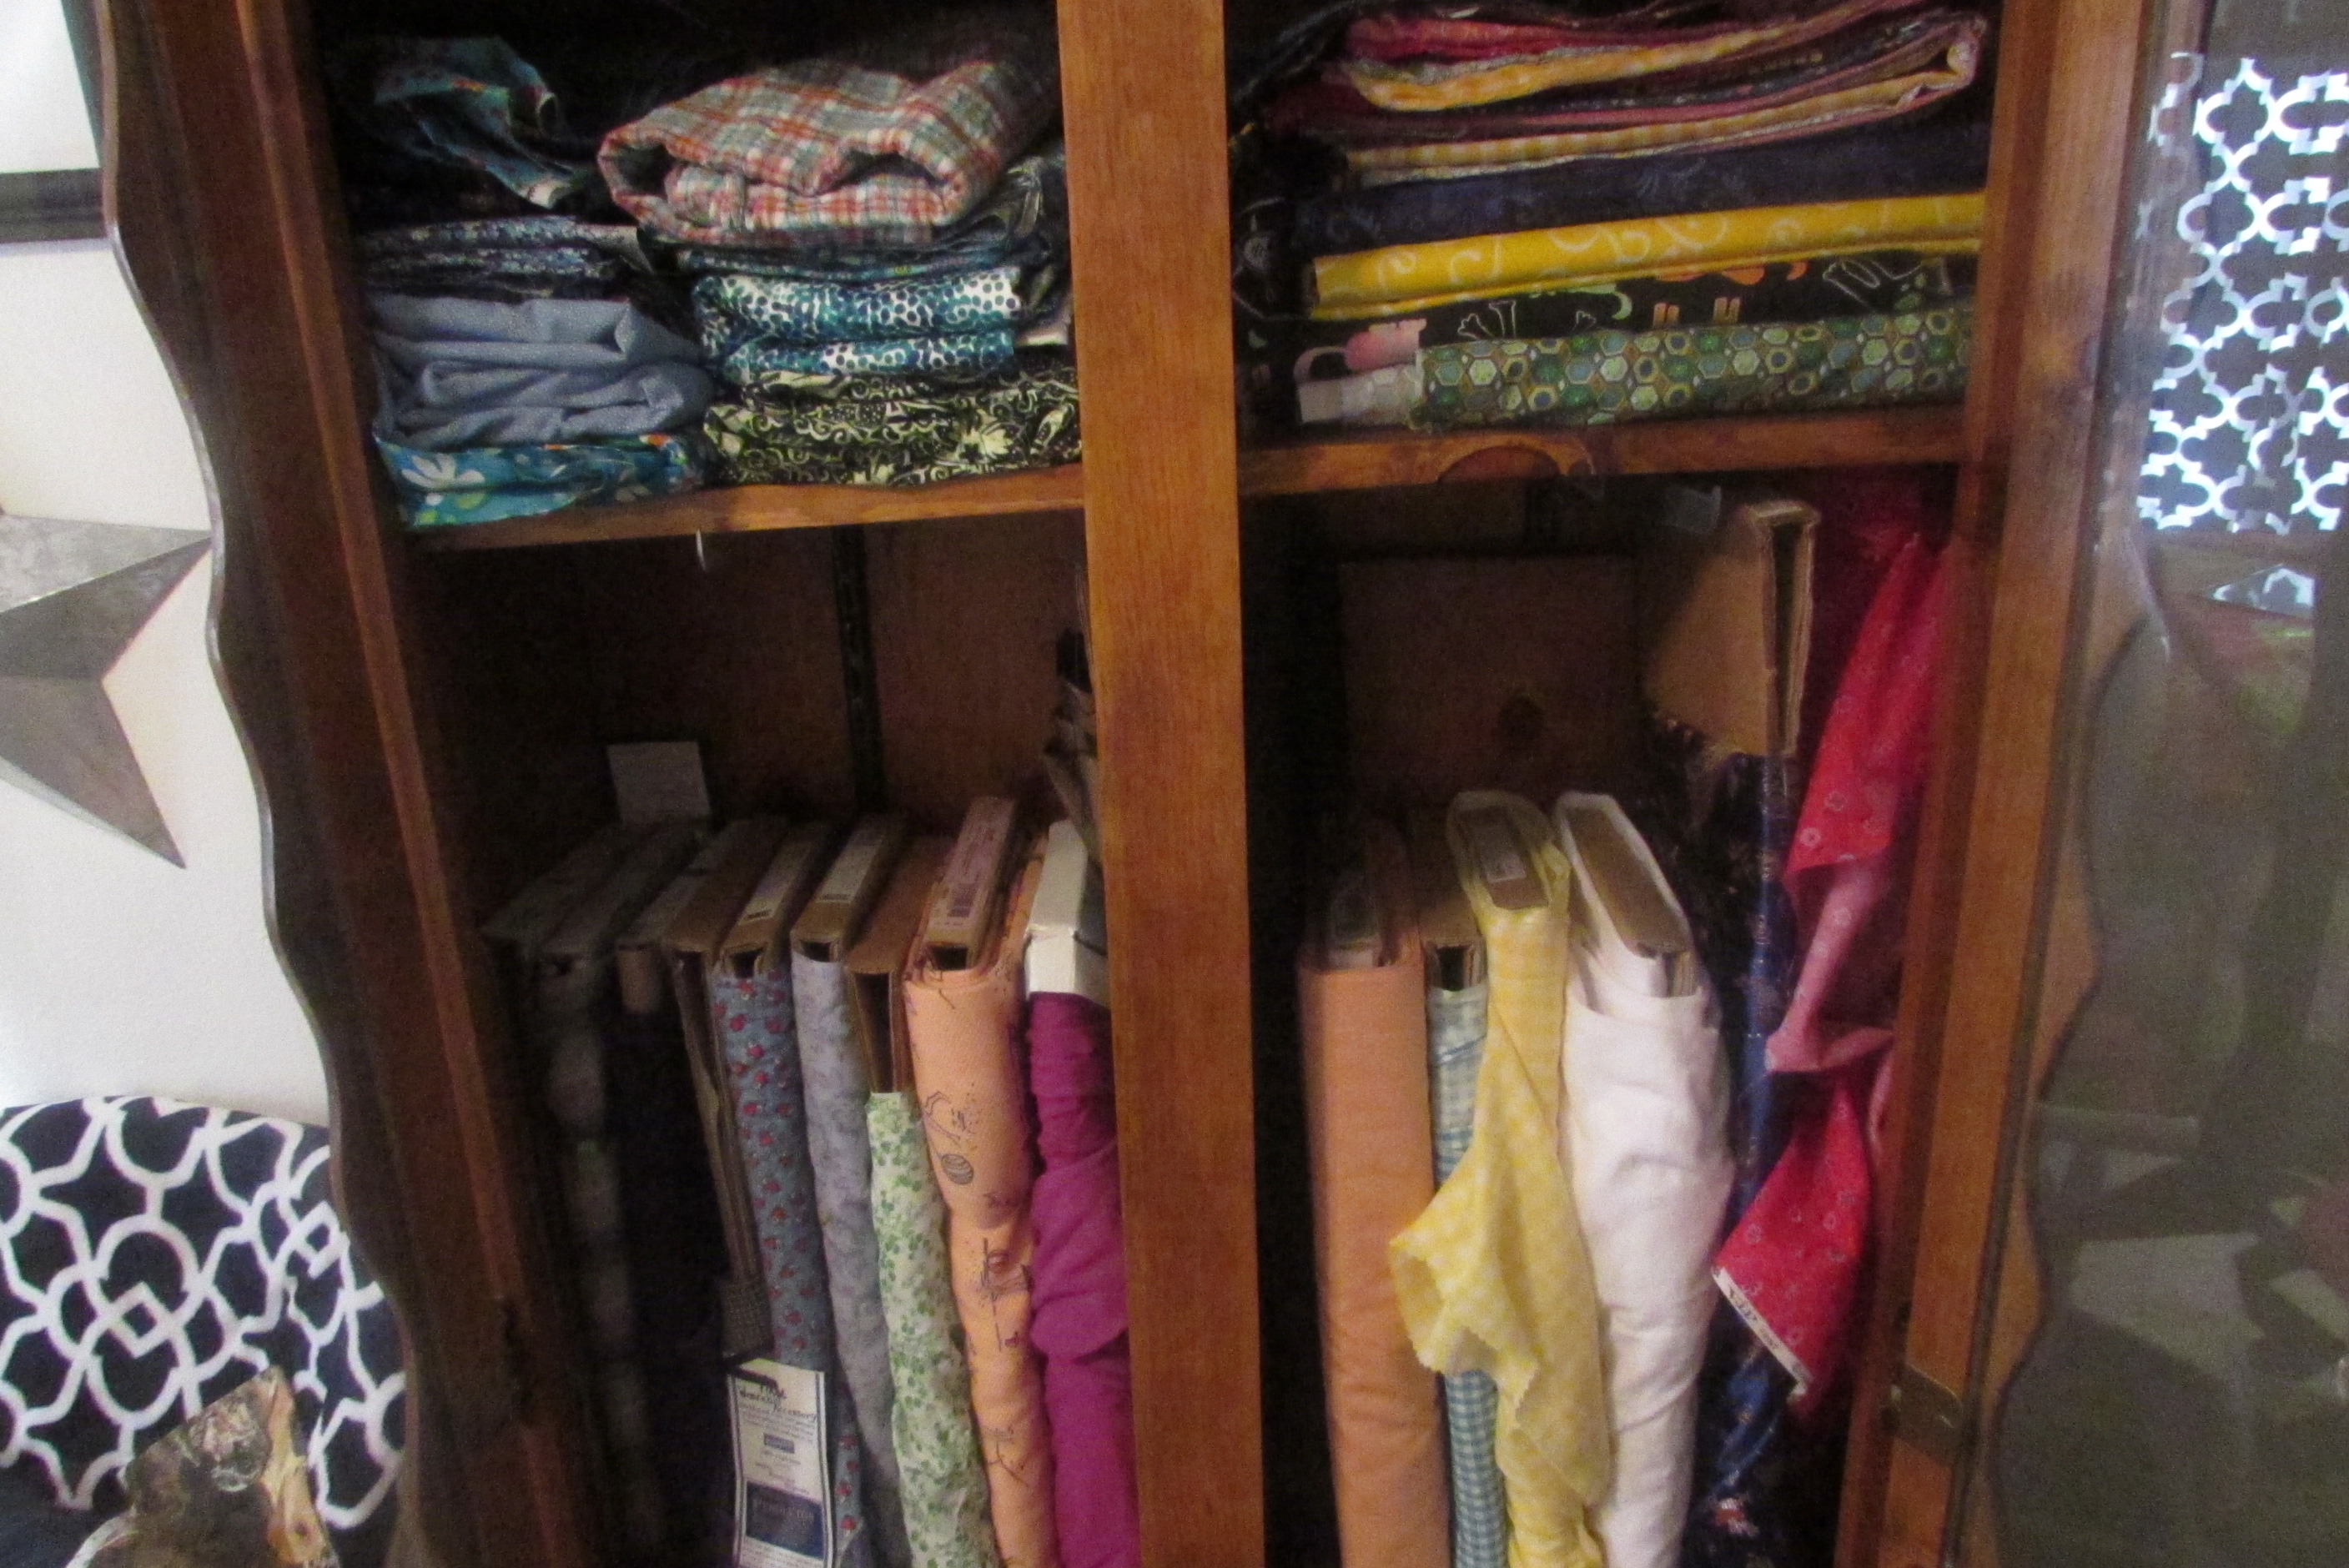
Let’s start from top to bottom.  On the top shelf I have the neutral colors: black, white, and brown.  I also have wool on the top shelf that wasn’t long enough to put on boards and stood up on the bottom shelf.  The second shelf has all of my pink, red, and purple fabric.  These are my favorite colors, so they got a shelf to themselves.

IMG_2525

The bottom shelf has the blues and greens and also some small boards that were too small for the bottom shelf.  There wasn’t too much, so it isn’t too crowded.  The bottom of the closet has all the boards with a lot of fabric on them.  Some of these are cotton fabrics, some are wool, and then there are other miscellaneous fabrics.

IMG_2526

My fabric closet looks so clean!  I am happy that I set aside a little time to organize this.

But I need some help.  I have these two fabrics that I absolutely love, but I have no idea what to do with them.  I am looking for suggestions on what to do with this fabric.  If you have any suggestions, please write them in the comments.

IMG_2529

Leave a little Sparkle wherever you go -Lauren

We linked this blog to the following bloggers

http://www.skiptomylou.org/2015/02/16/made-monday-14/

http://theturquoisehome.com/2015/02/work-it-wednesday-no-85/

http://www.thethriftyhome.com/

http://thecottagemarket.com/2015/02/morning-cup-joe-cottage-market-diy-projects-recipe-linky-party-features.html

http://allthingsfee.blogspot.com/

http://www.tumbleweedcontessa.com/blog/whatd-you-do-this-weekend-107/

<a href=”http://www.apinchofjoy.com/category/linky-party/&#8221; target=”_blank”><img class=”alignnone size-full wp-image-889″ src=”http://www.apinchofjoy.com/wp-content/uploads/2014/03/Busy-MondayAquaRed125x125.jpg&#8221; alt=”apinchofjoy.com” height=”125″ width=”125″ /></a>

ww.mabeyshemadeit.com/decorating-walls-and-ceilings-do-tell-tuesday/

http://justagirlandherblog.com/hit-me-with-your-best-shot-57/

http://thissillygirlslife.com/2015/02/project-parade-no-32/

http://diybydesign.blogspot.com/2015/02/winter-blues-wednesday-its-party-208.html

http://www.hopeineveryseason.com/

http://acreativeprincess.blogspot.com/

http://thestylesisters.blogspot.com/

http://whatscookinglove.com/2015/02/showcase-talent-thursday-153/

99 Cent Store Valentine Gift Ideas

This week has been Secret Sister Week at work and it has been so much fun!  We pick names and then for the week before Valentines, we bring the other person a little gift each day. It’s fun to figure out what to get and how to sneak it in so nobody can guess who you are! We only spend between $10-15, so a trip to the 99 Cent Store or the Dollar Tree was where I headed.  I thought I would show you how you can buy a few small, inexpensive things and it can still be special.

The first day, I gave a small glass red polka-dotted milk bottle and filled it with peanut   M & M’s. My Secret Sister had noted that her favorite color is red and her favorite candy were the M & M’s. I tied on a paper heart with her name on it.

             IMG_2512

The next day was a baseball theme. She likes the L.A. Dodgers, so the colors I chose were royal blue and red. I found a cool old-fashioned looking box of Cracker Jacks, a blue Gatorade, a box of chocolates with baseballs on the cover and a blingy blue keychain.

IMG_2513

My Secret Sister also stated that she likes Disney and to cook and bake, so the baking aisle was my next destination.  I picked up a box of cupcake mix, a couple of turquoise and white cupcake holders and some cute Mickey and Minnie Mouse cupcake liners.   

IMG_2518                

The last day was the little Starbucks sandwich box that I covered with pretty Valentine paper.  I showed how to make this box a couple of weeks ago here on the blog.  You could use any box you have on hand.  I will fill it with some heart-shaped sugar cookies.

IMG_2377

I’m excited to let my Secret Sister know I had her name and find out how she liked all her gifts. I hope you all have a wonderful Valentines Day!

Sunshine and Blessings, Pam

FUDGY CHOCOLATE-OATMEAL BARS

Valentine’s is getting closer and Hopefully spring is on the way, no matter what the Groundhog says! ! Ithought I would bake up a sweet treat to give to your Valentine or a whole group of Valentines!  am not sure where this recipe came from, but I have had it for a long time and it is so good.  It makes a large amount of bars, so it is a good dessert to take to a potluck or family gathering. So here is the recipe!

FUDGY CHOCOLATE-OATMEAL BARS

1 cup (2 sticks) butter, divided

2 cups packed brown sugar

2 eggs

4 teaspoons vanilla, divided

2 1/2 cups all-purpose flour

1 teaspoon baking soda

3 cups quick-cooking rolled oats

1 can (14 oz.) sweetened condensed milk (not evaporated milk)

2 cups (12 oz. package) semi-sweet chocolate chips

1 cup sliced almonds, divided (optional)

Heat oven to 350 degrees. Set aside 2 tbsp. of the butter. Beat the remaining butter in a large bowl on medium speed on mixer for 30 seconds. Add brown sugar, beat until combined. Beat in eggs and 2 tsp. of the vanilla.  Stir together flour and baking soda in another large bowl, stir in oats. Gradually stir flour mixture into beaten mixture. Set aside.

IMG_2263

Combine reserved 2 tbsp. butter, the sweetened condensed milk and chocolate chips in a medium saucepan.  Cook over low heat until chocolate melts, stirring occasionally. Remove from heat.  Stir in 3/4 cup of the almonds and remaining 2 tsp. vanilla.

IMG_2262

Pour two-thirds (about 3 1/3 cups) of the oats mixture into the bottom of an ungreased 15 1/2 x 10 1/2 x 1 inch jelly-roll pan.  Spread chocolate mixture over the oats mixture.

IMG_2264

Using your finger, dot remaining oats mixture over the chocolate.  Sprinkle with remaining 1/4 cup almonds.

IMG_2265

Bake about 25 minutes or until top is lightly browned (chocolate mixture will still look moist). Cool in pan on a wire rack. Cut into 2 x 1 inch bars. Makes about 75 bars.

IMG_2266

Mmmm, mmmm, good! I hope you enjoy this fudgy goodness!

IMG_2267

Sunshine and blessings, Pam

Sharing with:

http://sandandsisal.com/category/inspire-me-monday-link-party

That DIY Party

skiptomylou.org/2015/02/09/made-monday-13/

http://www.sugarbeecrafts.com/

ww.astrollthrulife.net/2015/02/255th-inspire-me-tuesday.html

http://www.cozylittlehouse.com/2015/02/tweak-it-tuesday-128.html

 http://img706.imageshack.us/img706/350/nmo9.jpg

http://somedaycrafts.blogspot.com/

http://chiccalifornia.com/2015/02/12/tiful-link-party-57/

Princess Wall Hanger

We all know that little princess who has too many dress up clothes.  And they have too many boxes of dress up clothes, causing some of them to get wrinkled and ruined.  This is an easy project that will help to organize the dress up clothes and not cause them to get wrinkled and ruined.

I started with a piece of plywood that I cut 10 inches by 8 inches.  This is big enough to place two hooks on the board to hang more clothes.  I then primed the board so it was easier to paint later.

IMG_2278

The dimensions of the wall hanger

I decided that since this hanger was going to be for little girls, it should be painted pink.  I chose a berry pink spray paint to use as the main coat of the hanger.  It is a vibrant pink that I could cover in other colors to make it colorful and cute.

IMG_2282

The color is Berry Pink!

The design I decided to make on the wall hanger was circles of different sizes.  I found these two plastic lids to use as my two circles.  So I traced my design on the pink plywood before I started to paint the circles.

I used these lids for my circle design

I used these lids for my circle design

Here are my circles before the paint

Here are my circles before the paint

I wanted to go girly, so I went with black and white.  I did a little bit of a random black and white circles so it didn’t look like a real pattern.  I also took a small paint brush and added black and white dots on the plywood, putting white dots next to black circles and black dots next to white circles.  I wanted it to keep this fun and cute for the little girls.

IMG_2291

Almost done! Just the hooks to go!

I then added two white hooks to the bottom of the board.  I placed them about 2.5 inches up from the bottom and about 1.5 inches from the edge of the board.  With the help of my dad, we were able to screw these two hooks on the front of the board.  We also placed a hanger on the back of the board so we could hang it on the wall.

IMG_2292

The placement of the hooks on the board

And here is the finished product!

IMG_2293

It’s all finished and ready to have clothes hung on it!

This project was really easy and really fun to work on.  It is something simple to help organize the dress up clothes and not have so many boxes to have clothes in.

Love, Lauren

WOOD SLICE VALENTINE HEART

I have another Valentine post for you all today!  This idea I got from a couple of wonderful bloggers I follow. I just love their posts! They have the greatest ideas and wonderful homes. Please take time to check them out!

The first post is from Laura at FindingHomeonline.com. Here is the link to one of her ideas: http://findinghomeonline.com/christmas-table-ideas-mini-wood-slice-wreath-place-setting/

Here is another: http://findinghomeonline.com/wood-burlap-natural-fall-wreath/

Wood and Burlap Fall Wreath

Here is my version. I also made the small ones for my table settings, but I already have those packed away :(.

woodslicewreath

Then Karianne from ThistlewoodFarms came up with this one for Christmas: http://www.thistlewoodfarms.com/wood-slice-christmas-tree

Wood Slice Christmas Tree

So I made a similar one!

 I started out with some of the wood slices.  My husband cut mine from some tree branches he had pruned from some of our trees. You can also buy them already cut at Michaels or Hobby Lobby. He cut several different sizes.

IMG_2387

While Karianne used an old chalkboard, I use a bulletin board I had taken out of Lauren’s room when she moved into her apartment. I stained the frame a little darker brown, using Minwax Wood Finish in Red Oak. Then I spray-painted the cork with black chalk paint. Since I was using a cork board, I glued a tack to the back of the wood slice and just stuck it into the cork. Here is my Christmas version. I added chalk for the trunk of the tree and the star.

pic

So, since my wood pieces are movable, I decided to change it up for Valentines Day! I took the pieces off and then rearranged them into a heart. I wrote ‘Love’ in chalk across the top. Super easy!!

New Image

loveheart

 This project was easy and something that is very versatile for any occasion.

Love, Pam