Neutral Decor Book Page Mobile

Good morning! Well, I am back to school today! I’m not sure if this is good or bad. 🙂 I am really praying for a good year, but we shall see. I have lots of plans for the classroom, and hope I am able to really enjoy doing activities with the kids. I am almost done with my post for my master bathroom, but I didn’t quite get it done, so I will share this one with you again and help you get a head start on fall. Enjoy!

I don’t have any instructions for you today, but this is very similar to the Falling Leaves Mobile I made a couple of weeks ago. I mentioned then that I thought it would be nice to add some crystals or bling to this, but instead I made a whole new one! 🙂

fall-leaves-with-twine-and-stick

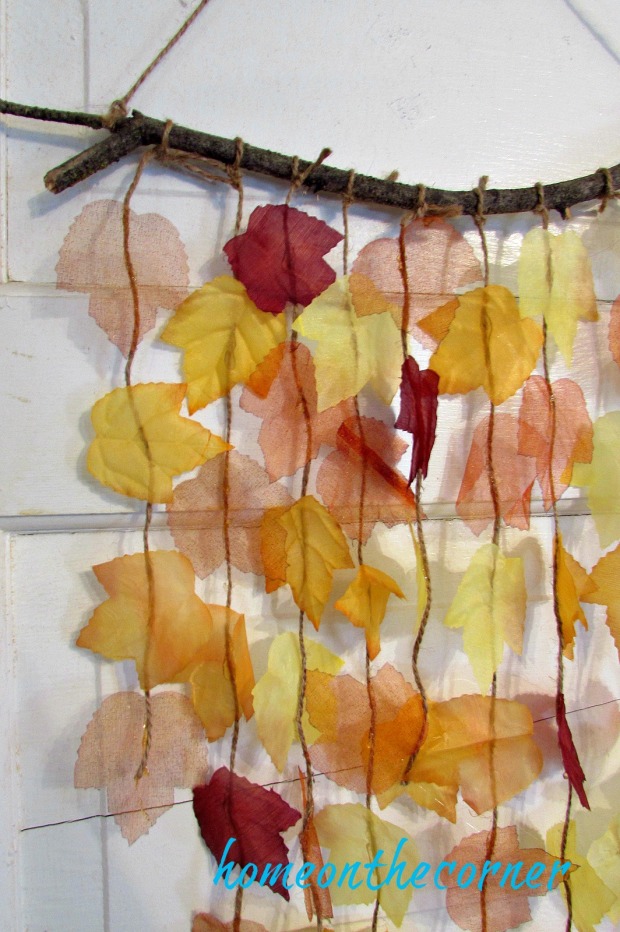
I cut out some leaf shapes from a book I picked up at a thrift store. I used 3 different shapes.

bookpage-leaves-and-crystals

I painted a stick black and added a silver a black ribbon to the top to hang it from.

bookpage-leaves-blowing

I strung clear pony beads and some silver beads onto fishing line. This took the most time. It wasn’t hard, just took the most time of the project.

bookpage-leaves-hanging-mobile

The trick to keeping the beads from moving is to run the string or fishing line through the bead twice. This way you can move the bead to the position you want, but it won’t keep slipping. I actually ran the line through the silver ones three times, since they were heavier.

bookpage-leaves-mobile

Once all the beads were strung, I put a little bit of glue on the top of the stick, and placed the line in the glue-very carefully!

bookpage-leaves-over-the-mantel

I added more line and then glued the leaves on with just a little dot of glue.

bookpage-leaves-crystals-and-beads

And that’s it! Now I have a neutral mobile I can use all year long! Plus a little bling!

Don’t forget to order Karianne’s book at Amazon and get some bonuses too!

So many pre-order bonuses—so little time! And right now the book is on SALE, too! Get your bonuses on or before 9-4-17!
Plus, Karianne is hosting a link-up arty for all your So Close to Amazing storis! Here is the link to the page. Or you can just head on over an enjoy all the stories!

I hope you all have a great week!

sunshine-and-blessings-picmonkey

Travel Theme Entryway

Good morning! I’m glad to be back this week! Last week was a little tough..we dropped Haley off at college! We had 2 car loads of her things to take. Thankfully, the school had big bins on wheels that we could load up and take to the rooms.  I’m not sure how many trips we would have had to take up and down stairs without that bin! Sure glad we didn’t have to find out!

I am so not ready for summer to end! I like fall too, but I just love the relaxed feeling of summer. I wish we had been able to do more traveling this summer, but instead I decorated my entryway with some California signs and other travel items. I pulled out a variety of things and then made a vignette on my door beverage table which I have placed in my entry. It’s the perfect thing to decorate for the seasons!

Travel theme entry way

I cut out the CA from some maps I had, the same maps Lauren used for her Travel Sign. I used a little tape to attach them to the window. Lauren sent me the Seattle postcard when she went on her road trip.

travel theme entry way CA window

I love these signs! I ordered them from Groupon a while back and love the vintage look they have. I placed them in some black frames I already had and hung them above my hat and California tote bag.

travel entry way hat california bag, postersentry way california, san diego

I cut the hole in the globe to make a hanging light, but so far I haven’t gotten around to it. Instead, I rolled up a USA map and placed it inside. When the girls were younger, I placed stars on the different states we had visited. After it’s done here in the entry,  I think I have finally found another spot for it.

travel entry way globe map

A bucket and some starfish remind me of the beach. Some California gardening books and a nautical book are more hints to summer.

travel entry way california bucket starfish

I found this big basket at a thrift store and love the colors! It’s the perfect thing to take a picnic in at the park or the beach. A giant conch shell and a Welcome sign invite everyone in.

entry way travel basket welcome

Hopefully this brings back lots of good summer memories! I think this is the last of the summer decorating. Bring on autumn!!

travel entry way hat, California, San Diego

sunshine-and-blessings-picmonkey

Ferris Wheel Ca. Adventure      Sleeping Beauty Castle Disneyland    Pink Flamingo printable, sunshine and summertime

From Black Lace to Turquoise Beachy

Hello! Sorry about missing last week Monday! Between being gone two weekends in a row, getting stuff done at school, working at the animal shelter, and just life, a post didn’t get written! Just the way it goes sometimes. This week we take Haley to college. Wah! How did it come to this!? I’m going to miss her greatly, but I am also excited to see where this takes her and to see everything I know she is capable of accomplishing!

Remember when Lauren painted these bar stools? After moving this summer, she decided she didn’t need them at her new apartment. So guess where they end up? That’s right…mom’s house! They don’t really fit in my decor with the black and white, so I went with a more beachy look.

I sanded down the top first, not completely down to the wood, but just to get most of the black off. I kept a bit of it because I knew I wanted to sand down whatever I painted and let some of the black show through. The next step was primer. I used my favorite Kilz Primer.

bar stool makeover

I used my Benjamin Moore Simply White over the whole stool. After the paint dried, I used painters tape to make stripes on the seat of the stool. I’m not very good at measuring things out, so I just eyeballed it, trying to keep my lines as straight as possible. I actually did pretty well!beachy barstools with painters tape

I pressed down the edges of the tape really well and then I used the same ‘unknown paint color’ that I used in my bedroom and the front door. You can see it here.

beachy bar stool with blue stripes

After the paint dried a bit, I peeled off the tape. The lines look pretty good!

beachy bar stools farmhouse stripes

I used an orbital sander over the seat and around the edges. I sanded down to the black in some places and to the wood in other places.

Here it is in the bathroom. You can still see some of the black showing through.

bar stool beachy makeover turquoise stripesbar stool beachy makeover white and bluebar stool beachy blue and white stripe

I also used one in my entryway. It’s the perfect place to take off your shoes or leave a bag for a moment.

bar stool beach stripes white and bluebar stool beach stripes blue and white

So what do you think? I love how these turned out! I have two more and I am thinking about painting them the same. I’m so glad I got this project done! On to the next project!

sunshine-and-blessings-picmonkey

*Here are some of the products that are similar to what I used. This is a sponsored post.*


Here are a few other previous posts you might enjoy!

Travel Sign 2

filing cabinet makeover files, chair, pillow  wooden crate starfish, garland, blue

Rustic Crate with Starfish

Good morning! Are you ready for another week? Are your kids in school yet or do they still have a couple of weeks off? I don’t start until August 28, so I still have a little bit of time to get some projects done. I have a pretty easy one today.

I have had this wallpaper border for longer than I can remember. I keep coming across it in my stash and think I should do something with it. Well, I finally came up with an easy project. I didn’t use too much of it, but at least it’s a start. A few weeks ago, I bid on a couple of crates from an online auction nearby and ended up winning these 2 crates, plus a few other things. I painted both of them white, giving one to Lauren, which is the one I forgot to take after pictures of. I did better this time. 🙂

*This post contains affiliate links for your convenience. Any purchase made will not cost you any extra. Thanks for your support.*

wooden crate makeover

I left it rough so it would still have a rustic look to it.

wooden crate painted wallpaper roll

I cut a piece of the wallpaper to fit across the center of the bottom of the crate. I cut it a little longer and then I will trim it after it’s applied. Because this is old wallpaper, I had to get it wet first, so I dipped it into a sink full of water.

wooden crate with wallpaper border

I had a spatula handy, so I used it to smooth down the paper and make sure all the bubbles were out and the edges were down. Once the paper had dried, I used a blade to cut off the excess.

wooden crate apply wallpaper

I’m thinking of using this in my bathroom, if I ever get it done, but for now, I placed it on my bar cart with a few other summer items.

wooden crate starfish seashell garland

A lantern and some seashells bring it all together.

wooden crate seashells and lanternwooden crate seashells blue, neutralwooden crate starfish wallpaper border

I made the seashell garland a few years ago.

wooden crate wallpaper border with seashellswooden crate starfish, garland, blue

I hope you are enjoying your last few weeks of summer! See you next week!

sunshine-and-blessings-picmonkey


Here are a few other seashell DIY’s you might enjoy.
boho seashell mobile title
      rattan plate holder number 2seashell specimen art title

Robin Egg Blue Beachy File Cabinet

Good morning! Ready for another hot summer week? That’s all we have been having for several weeks now. Over 100 degrees every day. I think there are a few 90 degree days thrown in, just so we survive. 🙂 But I have been able to get a few projects done!

*Links are provided for your convenience.*

file cabinet title

My first project was this file cabinet. Steve got this from his work place. They were getting new office furniture, so 2 of these were up for grabs. Haley took one for her room and I decided to make over the other one. First order of business was wiping it all down. It was pretty dirty!

File Cabinet Makeover

After a good cleaning, I spray painted Rust-oleum primer all over the whole thing, including the handles, locks and other pieces. I decided later to switch out the handles, but it made painting a whole lot easier.

file cabinet makeover rustoleum primer

I tried out this Rust-oleum paint this time. I had never used it before, but I love this color! My only complaint, was that the spray was kind of wide and seemed to take more to cover the cabinet. I was really glad I had used Rust-oleum primer first, because I’m sure I would have had to use more. The color is amazing though!

file cabinet makeover rustoleum Robin's egg

Here are the handles I decided to use. Here are some that are similar. I bought these from HomeGoods quite awhile ago thinking I would use them in the bathroom. Unfortunately, they didn’t fit and I didn’t feel like changing the holes on the cabinets. But they worked perfect for the file cabinet! I love the look!

file cabinet makeover front drawer files and warrenties

I already had the pretty file folders and they go perfect with the color. Here are some other pretty ones.

filing cabinet makeover files, chair, pillow

The dachshund pillow cover came from Amazon.  I love to have little touches of doggies around!

file cabinet makeover, dog pillow, flowersfile cabinet makeover top file foldersfile cabinet makeover robin's egg blue, turquoise, pillowfile cabinet makeover drawer handles file labelfile cabinet makeover front drawer files and warrentiesfile cabinet makeover pencils, rug, crockfile cabinet makeover robins egg blue and white

I hope you enjoyed this makeover! I’m excited to get all my papers organized and have everything put out of sight. Thanks for stopping by and have a great week!

sunshine-and-blessings-picmonkey