Valentine Pixy Stix Flower Vase & Blog Hop


Valentine's-Day-Blog-Hop-Budget-Crafts

Hello everyone! Thank you for joining me for the Valentine’s Day Blog Hop! I’ve joined with 13 other talented bloggers to share Valentine’s Day crafts on a budget. Each blogger was given a budget of no more than $10 and challenged to create a Valentine’s Day craft using items from the dollar store or dollar section of their local stores. If you have budget Valentine’s Day crafts to share, please add it to the link-up at the bottom of this post so it can be seen on all of our blogs.

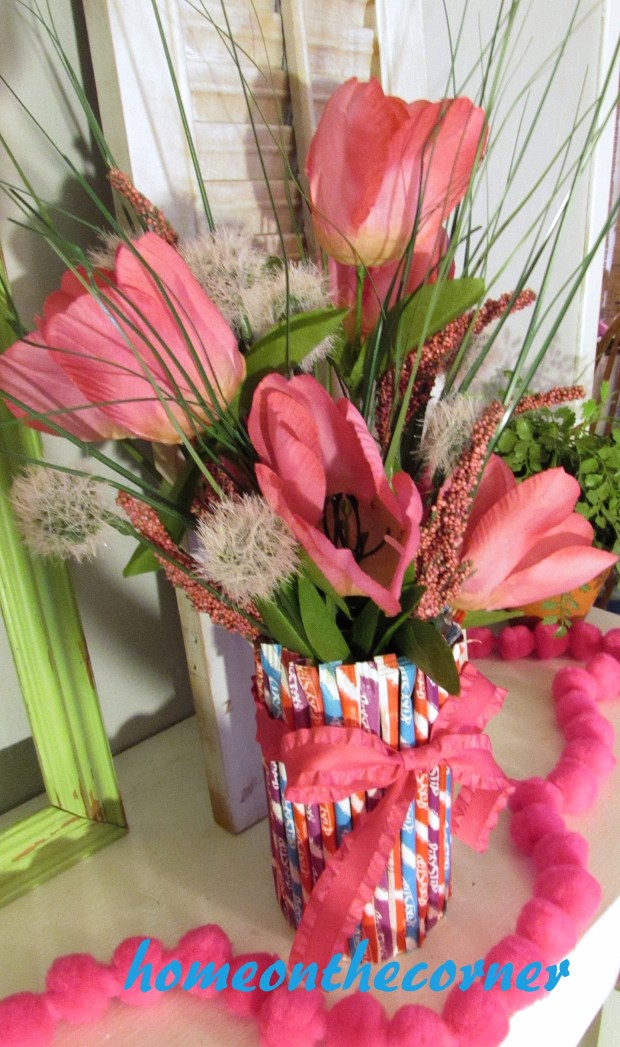
For my Valentine Budget Craft, I made a Pixy Stix Flower Vase. So simple too!

valentine mantel pixie stix flower vase 2016

I bought what I needed from the Dollar Tree and used some things I already had. Here is what you will need:

  • Pixy Stix or any other long candy- I bought 2 bags so I would be sure to have enough of red, purple and blue. $2.00
  • A tin can-I used some beans for dinner and cleaned the can and removed the label.
  • Styrofoam ball or square- I had some of these from Christmas, but I know I have seen square pieces at the Dollar Tree. $1.00
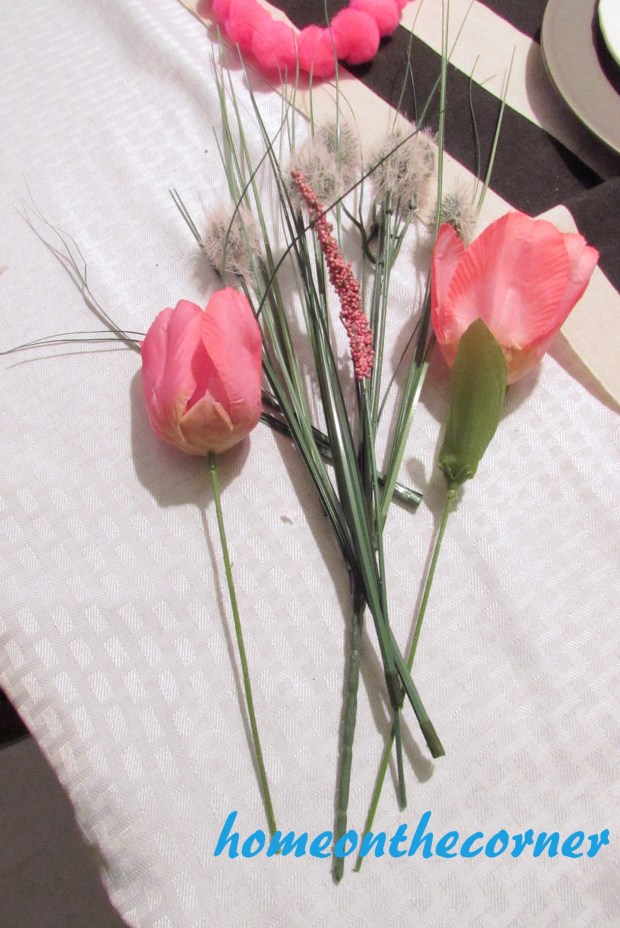
  • Silk Flowers-(2) Pink Tulips, (2) pinkish fuzzy ball things, (1) pink berry-$5.00
  • Ribbon-I had mine, but they had some cute designs at the store. $1.00

pixie stix flower holder tin can

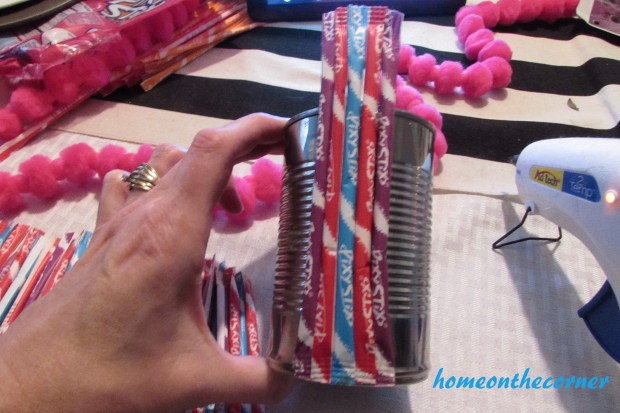
I first sorted through my Pixy Stix and pulled out the colors I wanted to use. I put them into the pattern I wanted and then started hot gluing them onto the can.

pixie stix gluing the stix

pixie stix flower holder covered

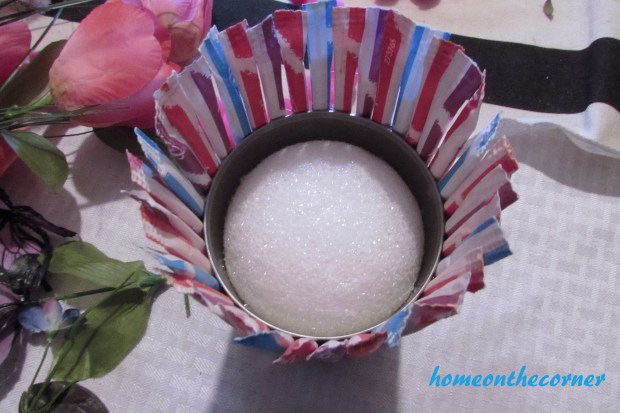
Once my candy went all the way around, I pushed the styrofoam ball into the can.

pixie stix flower holder styrofoam ball

I used wire cutters to cut each stem of flowers off the big part on the end.

pixie stix flower fase silk flowers

I arranged them in the can by pushing them into the styrofoam ball. I placed a taller tulip in the middle and then placed shorter ones all around it. Next I filled in with the fuzzy balls and lastly, added the berries. I used the green spiky leaves that came with the flowers to fill in any empty spaces. After the arranging was done, I added a pink bow around the middle of the can.

valentine mantel pixie stix flower vase 2016

There you have it! A cute, simple and budget friendly vase! You could even fill it with those fresh flowers you are sure to receive!

valentine mantel flower vase 2016

If you are looking for more budget friendly Valentine’s Day crafts, visit these blogs for their creative Valentine’s Day crafts ~

Copy of Valentine's Day Blog Hop Update (3)

  1. My Pinterventures
  2. DIY Adulation
  3. Houseful of Handmade
  4. C’mon Get Crafty
  5. Olives-n-Okra
  6. Inside The Fox Den
  7. Made In A Day
  8. The Robin’s Nest Designs
  9. Arrows & Awe
  10. Happily Ever After, Etc.
  11. Our House Now A Home
  12. Home On The Corner
  13. Decor by the Seashore
  14. Intelligent Domestications

Share your $10 or less Valentine’s Day crafts on the link-up below and be seen on all 15 blogs! Have fun!

Sunshine and Blessings


Valentine Gum and Candy Basket


corner news

This post was supposed to happen this morning…but my computer just. would. not. cooperate! I couldn’t get anything to load and then it didn’t save my draft. So very frustrating! But I think it’s ready to work now! So here is my Corner News post! Today I am showing you a very simple Valentine craft-and it involves chocolate!

I had the little box already, and you could use whatever you have on hand or buy a small jewelry box. The gum and candy came from the Dollar Tree and I had the ribbon. The gum was packaged in pink, but when I opened it, all the individual pieces were silver. Oh well. I just went with it!

silver gum covered candy box

I started out by gluing all the pieces of gum around the outside of the box. This box took 20 pieces.

silver gum covered candy box glued

I ended up using 2 different ribbons. First I glued a wider black and white polka-dot ribbon around the box and then used the pink polka-dot one to tie a bow in the middle.

silver gum and heart candy valentine box

After that, it was just a matter of adding the candy! I had to fight people off in order to get a picture with the candy still in it!

silver gum and candy valentine box

Hope you have a wonderful rest-of-your weekend!

Sunshine and Blessings

Pallet Wood Mirror

Today is Martin Luther Kings birthday here in the U.S. I actually teach my preschoolers a little bit about him. I’m always surprised at the important questions they ask. I explain that only some of them can go to the playground today and of course, they don’t think that is fair. It gives them just a little taste of what Martin Luther King fought for.

Here is the piece of mirror I fought with a couple of weeks ago :). Here is the project I was working on when the mirror broke. My husband took the broken piece and using a glass cutter, cut off the broken corner.

pallet wood mirror piece

He picked out some of the pallet pieces we had laying around and cut four pieces to make a frame. He cut a 45 decree miter cut so all the corner would fit together nicely. I don’t have measurements for you, because he just went by the size of the mirror.

Pallet wood mirror miter cut

Screws were put in at each corner, on the sides, to hold it all together.

pallet wood mirror frame

He cut out indention’s in the back with a router bit for the mirror to sit in.

pallet wood mirror router inside for mirror

Here is the front, ready to have the mirror placed in it.

pallet wood mirror wooden frame

It took a couple of tries, but now the mirror fits perfectly.

pallet wood mirror with mirror inset

We didn’t have any type of brackets or anything to hold the mirror in place, so my husband used some plumbers tape we had on hand and screwed it on, overlapping the frame and the mirror. I probably would have attached it corner to corner, but so far this is working too.

pallet mirror backside plumbers tape

It worked! Now to clean it up and find a spot for it in the house.

pallet wood mirror finished

I placed it on a small table in the dining room and it looks pretty good there! I like how it’s kind of rustic and farmhouse looking. Don’t mind the mess in the mirror’s reflection. That’s the dog’s toy corner!

pallet mirror view

My husband doesn’t usually have much time to work on extra projects, so this was a great! I love how it turned out and can’t wait to try it in different areas of the house.

pallet wood mirror styled

Be sure to come back on Friday to celebrate our One Year Blogiversary!  See you then!

Sunshine and Blessings

Corner News-January 16, 2016

Welcome to another edition of the Corner News!  This weeks edition is very short and sweet, but it is all worth it in the end.

Last night, my mom and I were creating burlap tablecloths for an Open House at Valley Animal Haven, the shelter we volunteer with.  We decided that we wanted to stamp some paw prints onto the burlap to make them more personal for the shelter.  So, taking two different stamps and lots of black paint, we got started on our project.

And here is what our dining room looked like when we were done!

burlap paw print

They turned out super cute!  The randomness of the paw prints makes the design even cuter!


And why not just look at the handy work of one of the beautiful paw prints.  Isn’t it splendid?

single paw print

So this is the big excitement of what happened this week.  Hope you all have a great weekend!


The Easy Way to Make a Shutter into a Mirror

Time seems to go so quickly. We will be celebrating our 1 Year Blogiversary in just a couple of weeks. Amazing!

Do you ever feel kind of overwhelmed by all there is to see on the internet, places like Pinterest and Facebook? I know I do. There are so many ideas out there and so many pretty designs, it is hard to know where to begin or even decide what you like! There is so much out there that I like. I like the neutrals, but I also like the turquoise seaside look.  Do I want farmhouse or coastal? So then I have to decide if I want every room to have that look or just some of them. When I see other houses where they use neutrals, I love how they can move things from room to room and it still works. I don’t know. I guess my look is always evolving. But I do know right now, I am liking white. I have always liked shades of white, but when my kids were younger, I had lots of color. Now I am trying to go with more white and then add different colors with accents, such as pillows, blankets and decorations. Now you get to join me on this crazy ride!!

My first project this year is a full length mirror for my room. I had one on the inside of my closet door, but when I went through and decluttered, I hung jewelry there instead. Then the mirror broke when it got moved. After Haley repainted her room, I inherited her mirror. I had it just standing on the floor in the corner and would move it when I needed it. It’s actually the mirror in the first pictures, but guess what? It broke too! 2 mirrors broken! Does that mean bad luck for me? They were both in 2015, so will 2016 be okay? Anyways, I knew I wanted to do something nicer with mirror and I had either a door or a shutter to work with.

door to mirror pieces

I ended up using the shutter because the size fit better with the mirror. I’m sure the door will show up sometime here on the blog! I took the frame off the mirror and as much of the cardboard as I could. This is probably what caused it to break. It didn’t have enough support.

door to mirror back side

The shutter I had was missing a couple of the slats at the bottom. My husband took the whole slat piece off the bottom and turned it over so the missing ones were in the middle and will be covered by the mirror. Smart thinking!

door to mirror shutter

The next thing to do was clean the shutter and buy a new mirror!

door to mirror missing shutter pieces

Alrighty, I’m back. The shutter is clean and the mirror I found had a white frame, so I didn’t have to frame it myself. I’m all about making it easy!

door to mirror shutter painted

After lining everything up, we got to use my new Ryobi Airstrike gun. I actually won this from another blogger! I was so excited about this! Sure makes it easier than hammering nails! We nailed it near the edge so it wouldn’t crack the mirror. We don’t want to break 3 of them!

Door to Mirror Shutter Nailgun the edges

Here it is! I’m so glad to finally have a full-length mirror in my room. I’ve been moving the old one all over, trying to prop it up and other various moves to see what I am wearing!

door to mirror full view

Hi Ezzy!

door to mirror ezzy in the mirror

I really like how this looks in my room.

door to mirror top half

And it could be used in any room!

Thanks for joining me today! See you next time!

Sunshine and Blessings