Golden Yellow Fall Tablescape

Good morning! Are you ready for a new week? Just an update on the house…we got an offer and accepted it within 4 days of putting the house on the market!!! Woo hoo!! God is good! Now we just have to worry about the inspection, and hope nothing major comes up. We have been looking at houses and it is making my head hurt. 🙂 I know I am being pretty picky, but we will probably never buy another house, so I want this one to be one we will be in for a very long time. The right one will come along!

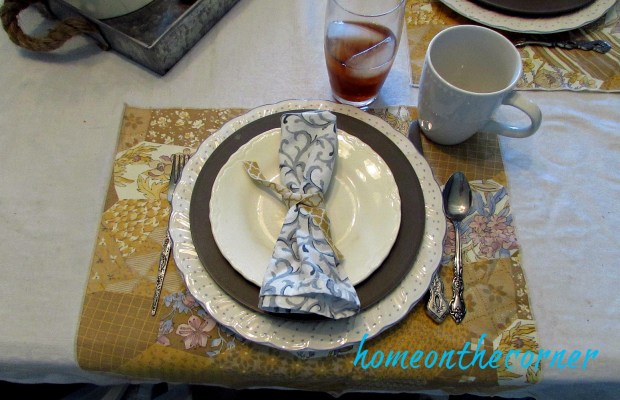
I set up a very simple tablescape for the blog this week. It’s a little difficult to come up with stuff to post since I am packing a lot of it up! But I do still have my dishes out, so you might be seeing a lot of place settings!

I used my white tablecloth and then used golden yellow and white napkins for the placemats. I have been wanting to try this out for awhile and I do like how it turned out. The plates on the bottom were the dishes I received for my wedding. They are called Blue Peony and are white with a little bit of blue around the edges and some flowers in the middle. I paired them with a grey plate and a smaller white plate. The napkins are kind of a greyish blue and I found some ribbon in my stash that was just the right color yellow. I used mismatched silverware this time. I have been picking up miscellaneous pieces from thrift stores when I see them. A mug for something warm and some iced tea finish it up.

fall-2016-yellow-gold-tablesetting

For the centerpiece, I used a ceramic pot which looks like a stump and placed some sunflowers inside, with a few other various stems. I put some small pumpkins and gourds inside a black candle lantern. I added a couple others onto the galvanized tray.

fall-yellow-centerpiece

I think the secret to a nice looking place-setting is the layering of the different pieces. It looks so nice to have all the different shapes and colors.

fall-yellow-gold-placesetting

I hope you all have a great week and see you next time!

Sunshine and Blessings

Here are a couple of other fall posts you might like!


Fall Tablescape Placesetting Pumpkin 2015         2015 Home Tour Fall Glittery Pumpkin

Fun Braided Leather Headbands

Hello everyone!  We are here with another simple blog, but it is very fun and easy to do!  I hope you are all excited!

I was in Target in the dollar section (a very dangerous section of the store for me and my mother) and found this awesome leather ribbon.  I loved the colors and knew that they would look great as some sort of project.  I didn’t know what, but I would figure something out.

lanyard-leather

And that I did.

I took each piece and measured it out to the size and a half of my head.  I then added a little extra for safety.  I did this with all three pieces for all three of the designs I am about to show you.

The next thing I did was tie a knot in the end with a loop.  This was going to be the end of the headband.

lanyard-knot

The first design I did was a simple chevron design.  I had the brown as the outside strands, white as the second and fifth strand, and blue and the middle two strands.  I crossed the outside strands over to the middle from both sides to make a v shape.  I then continued this pattern until I finished the entire headband.

lanyard-chevron

The second design was a bit more fun, but tricky.  I laid the leather out in the same pattern.  But this time instead of doing a chevron design, I did a bow design.  I tied a bow about the entirety of the leather and put the tails in the middle to use again.  After tying 3 bows of each color, I then braided the rest of the leather in a simple three strand braid.

lanyard-bows

The final design was the most complex, but probably the most fun.  I separated the strands into two sets of three, with one color in each set.  I then started with a braid and went a short distance.  After that, I tied a knot around the entirety of that set, five knots for each color.  Unfortunately, the strand was a lot shorter than I expected it to be.

lanyard-braid-and-knot

So with the other set, I did a simple braid on the entire thing.  When I finished that braid, I tied the two together so they wouldn’t come apart.  Unfortunately, it looks a little silly, but it works if you have a side braid or ponytail.

lanyard-braids

And here are the three finished looks!

lanyard-chevron-finishedlanyard-bows-finishedlanyard-double-finished

And there they are!  I really like how they turned out and they were super simple and easy to make.  And the supplies weren’t super expensive!  If you have any questions about how I made any of these headbands, please let me know!

sparkle

Happy Labor Day and an Announcement

Happy-Labor-Day

Happy Labor Day!! Are you off of work today or ‘laboring’? I am home getting work done. Here is what I have been busy with.

IMG_20160902_164427

Yep, that sign is up in front of our house! We have lived here for over 20 years. Both of our girls have been raised here. It is kind of bittersweet. So many memories! Here is the back story.

Back in February, the church down the street approached us about selling our house to them for fair market value. Yes, please! They wanted to buy the whole block and build a youth center. This would mean they would be tearing the house down, but we wouldn’t have to do any work to it or put any money into it to get it ready to sell. The church’s real estate agent came again in May saying the offer was still good, so we started shopping for a house. We found one I absolutely loved, but it was out of our price range. We found a second one, that had tons of character and needed some updating, but that was fine for us. So I called the real estate agent and told him we found a house and wanted to be sure the offer was still standing. He came by a few days later and informed us that the church was not all in agreement, so they would not be buying. Bummer! Now we had to decide if we still wanted to sell or not. This would be a lot more work!

In the end we decided to go ahead with it and see what happened. We started cleaning out the house to get it ready for showing, we had a termite inspection and roof inspection, and we repaired the things that needed fixing.

Here is what my trailer looks like right now. Full of stuff!

trailer stuff

We put our house on the market last week Thursday, had 3 showings the first day and had an offer by the second day! And we were getting more than the church offered! We go in today to discuss with the realtor whether or not to accept the offer.

Here is my makeshift closet in the trailer. All my winter clothes are in here to make my closet in the bedroom look bigger!

trailer closet

This is kind of scary for me, since we have been here so long. It is new and uncharted territory! But I know God will help us through the process and help us find just the right house for our family.

Here is the shed, full of boxes, waiting to be packed.

shed full of boxes

So, now that I told you the whole story, I will also say, that I will try to keep up on the posts here on the blog. There may be some crazy stuff going on over here, but I will do the best I can to keep up! Hope you all have a wonderful holiday and see you  next time!

Sunshine and Blessings

Wooden Halloween Cat Box

Hey everyone!  This blog was posted last October when I first made this.  And when I moved to this new apartment, I found it again.  So, why not repost about it because, it is super cute!

Fall is not quite in full swing but Halloween is almost here.

And what is something that goes with Halloween besides witches hats, pumpkins, and ghosts?  Well…black cats of course!

Do you remember when mom and I went to Home Depot a few weeks ago (last year lol) and made wooden boxes?  She shaped hers like a pumpkin and I shaped mine like a cat.  Guess what?  I finished mine!  Here it is!

cat box

So I painted the cat black and painted the front of the box in chalkboard.  I added the word BOO for the season of Halloween.

BOO

I also added flowers and a red bow to make the cat more festive and more like a cat.  cat box

I love how this turned out!  It turned out cute and I am able to change it for the different seasons.  I can’t wait to see what I make the next time I do a Home Depot project…which is tonight!

sparkle

DIY Wooden Ocean Buoys

ocean wooden buoys title

Good morning! Today is my first day back at school with students! Eek! I’m a little nervous because some I have never met before. But I know I have good help in my room and hopefully everything will go smoothly.

I know most people are getting ready for fall, but it is still over 100 degrees here! It’s hard to think about cooler weather projects when it is still so hot! So today is another summer post! It’s pretty simple though.  I actually had everything on hand already. I have been wanting to make these for awhile and I finally got it done.

I had some 4 x 4’s (actually 3.25 x 3.25!) in my wood stash and had my husband cut them in various heights. The tallest one is about 13″ tall and the shortest one is about 8″ tall.  I also had him taper in the tops on each side. They don’t quite come to a point, but are flat on top. I also drilled a hole, large enough to get some rope through. The diameter of the hole would depend on the type of rope you are using. I picked up some more Waverly Chalk Paint at Walmart, this time in ‘Ocean’, ‘Pumpkin’, and ‘Lagoon.’

ocean beach buoys

I first painted each piece with either Waverly ‘Plaster’ or ‘Mineral.’ 2 of each! I didn’t cover the wood too well, because a real buoy would be worn by the sea and sun.

ocean buoys painted grey and white

After the paint dried, I used painter’s tape to mark off where I wanted to put the colored stripes. Make sure to really seal the edges of the tape so the paint doesn’t go under and bleed into other areas. Take off the tape soon after the paint starts to dry. I started with the smallest one and decided to paint just one color around the whole thing. This one will be ‘Lagoon.’

ocean wooden buoy painting stripes

I did a variation of the 3 colors on each buoy. This one will be ‘Pumpkin’ and ‘Lagoon.’

ocean buoy grey painting stripes

After the paint was dry, I sanded the piece all over to give it a rough and worn look. Here is the small one. I love it!!

ocean buoy turquoise and white

I took a length of rope, ran it through the hole and tied it at the top. I should have rolled it in the dirt first, so it wasn’t so new looking! I’m sure it will look more worn before long.

ocean wooden buoys

I am so pleased with how these turned out!!

ocean wooden buoys orange, turquoise, blue

I can’t wait to really display them next summer!!

ocean buoys wooden blue and turquoiseocean wooden striped painted buoys

I hope you all have a great week and I will let you know how my first day of school went!!


ps. Redbubble is having another deal! On Monday only, 8/29, you get 15% off the whole site. Use the code CIRCUS15. 

Sunshine and Blessings