Silk Flower Heart Canvas

Hello everyone!  February is now upon us and Valentines Day is a little over a week away.  But, that doesn’t mean that all of the Valentines Decor is complete.  Hence this project.

But, before we get started, congratulations to Sarah C. on winning the Canvas Factory Raffle!  We can’t wait to see what you have picked out!

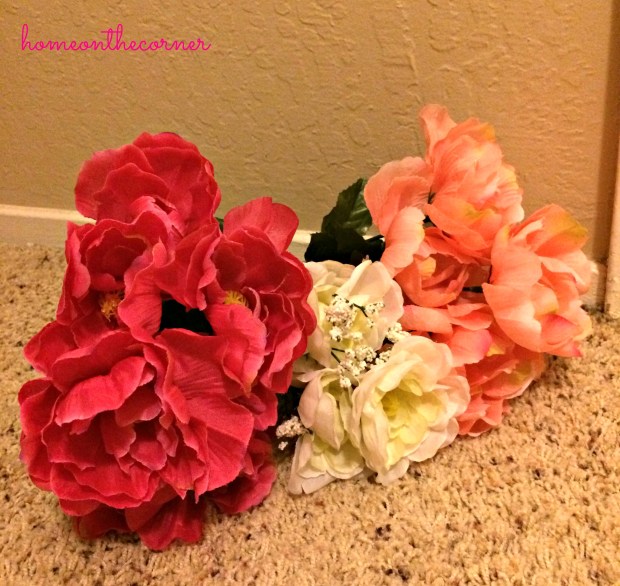
I have been trying to find different projects for BlitzyBlingArt.  And, I went to the 99 Cent Store and found these really pretty silk flowers.  So, naturally I bought a few bunches and started my project.

pink-fake-flowers

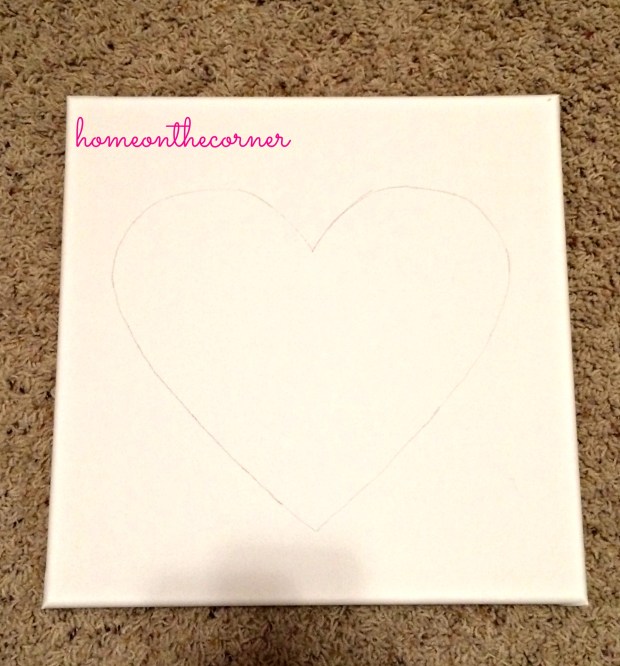
The first thing I did was take all of the flowers off of their stems and cut them short so I could glue them.  Next, I cut out a heart and drew it on the canvas.

heart-on-canvas

Then I started gluing.  First problem I ran into, I attempted to use Elmer’s glue.  Obviously I realized that wasn’t going to work AFTER I attempted to glue the first flower on.  Second problem, I wasn’t going to fill in the heart.  But then I realized that that as I started to put flowers around the heart, you couldn’t see the shape of the heart.

first-row-pink

I decided to use the pink flowers around the heart and the white inside the heart.  That way the heart is a bit more obvious and you could see it.

floral-half-canvas

And after lots of hot glue and a few flowers falling apart with cutting the stems off, the canvas was finished.  And it looks amazing!

finished-heart-canvasfinished-heart-canvas-2finished-heart-canvas-3

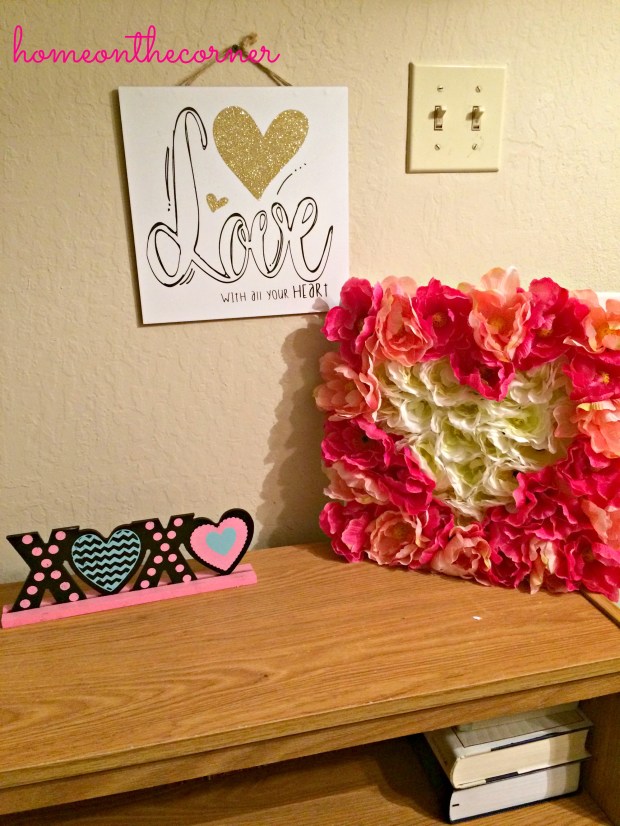
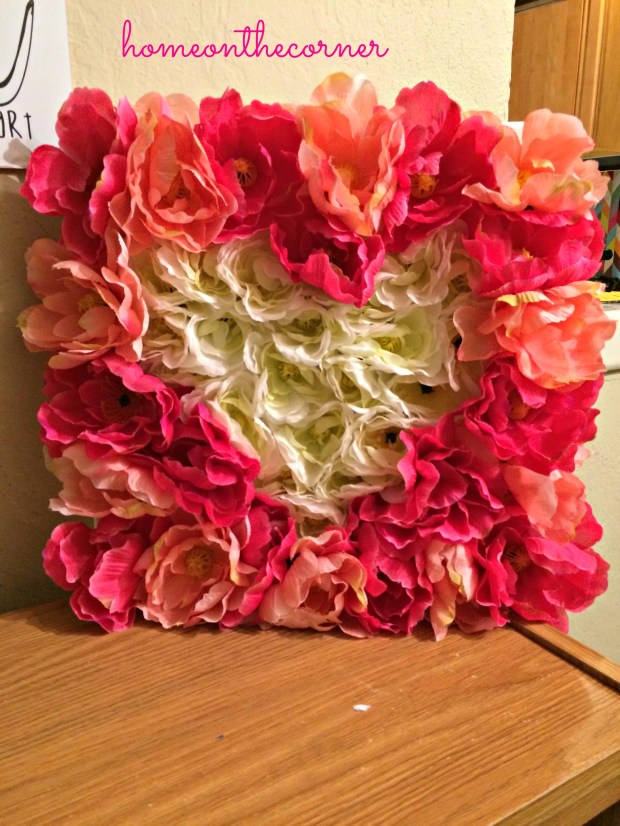
The heart still isn’t very heartish (if that is even a word), but it looks really cool!  I love how it looks.  The flowers look really nice and it looks full.  I also like how it look next to my other Valentines Decor!

sparkle

Beautiful, Blingy, British Flag

Hello everyone!  I hope that you are all getting prepared for Halloween that is just around the corner.  Are all of your costumes ready?  Do you have enough candy?  Is your front porch all decked out?

Well this weeks post has nothing to do with Halloween…Sorry.

So you know how last week I posted about a project that I was working on?  If not, don’t worry, I’m going to go through it again!

Here are your supplies!

img_2837

A piece of wood, paint, glue, jewels, paint brushes, and tweezers.  I started by painting the board with grey.  Of course, you can paint it whatever color you want, but I went with grey.

img_2838

Next, I printed out the design I wanted on paper and drew it onto the board.  I did so by coloring the back of the paper with pencil, then drawing over the lines again to have the pencil go through.

img_2839

Once I had the design, I started placing the jewels on the board.  I would put glue on the small section that I wanted to start bedazzling and would hand place, or tweezer place, the jewels on.

Now, I made the design a little bit different than the original.  If you can’t tell from the picture above, the design that I picked was the British flag.  So for me, instead of red, white, and blue, I used pink, white, and black.

img_2840

I added some gems of other colors to add some dimension to the flag.  So, I have purple in the pink section of the flag, and added some purple and blue in the black section.

It took a lot of time and effort, but it was totally worth it.  I would lay out the jewels that I wanted to use on the board and would add glue to place the jewels.

close-up-gems

close-up

And after about 18 hours of work (all broken up, not in one sitting) I finally finished.  And I am extremely proud of my work.  So here it is!

full-blingy-flagblingy-flag-down-viewup-close-finished

It looks amazing!  I am so happy with how it turned out.  And it looks amazing in the sunlight because the light just shimmers off of the jewels.  I am sooooooo happy and I cannot wait to do more!

Thanks for stopping by!

sparkle

Corner News-Time for Bling!

Hello everyone!  Today’s Corner News is a preview of an art project that I am working on.  Hopefully, I will be able to give you a full how-to on Friday….

If I get it done on time.

So, here are my supplies.  A board, grey paint, glue, paint brushes, and lots of gems!  Some are scrapbooking stickers and others are just rhinestones.

img_2837

The first thing I did was painted the board grey and then drew the British Flag on the board.

img_2838img_2839

Then, I started gluing and sticking!  I decided to use pink instead of red and black instead of blue.  But, here is what I have so far!

img_2840

Not too much, but it’s a start!  I can’t wait to finish it!  Thanks for stopping by where, hopefully, it will be done next Friday!

sparkle

Steps to Painting Farmhouse Chairs with a Brush

Happy summer! I have so many projects to do!  Eeekkk! One at a time, right?

So I started with my kitchen chairs. I have the chairs that actually belong to my grandma’s table, but they were getting so much use, I didn’t want them to get too worn out. So when the girls were young, we bought 6 oak ones at a liquidation store. Nothing fancy, just something to have around the table. But by now, they were pretty worn too. Paint time!

Kitchen chair makeover

I know there are lots of different ways to paint and products to use, but I thought I would share what works for me. This time I used just a good old brush and can of paint. I am going to try chalk paint next time and I would like to try a sprayer too, just sayin’!

I cleaned up the chairs, removing dust and any leftover food. I find it easiest to turn the chairs upside down so I can make sure all the underneath is primered and painted well. I didn’t sand this time, and the primer seemed to hold pretty well.

kitchen chair makeover paint underside

There are hundreds of different primers out there, but Kilz is the one I like the best. It goes on thick and covers really well. I have never had any problems with it not adhering or peeling off.

kitchen chair makeover Kilz pimer

After the underside of the chairs was dry, I turned them over and primered the top. Be sure to let all the coats dry before starting a new one. I painted just one coat of primer on all the chairs.

kitchen chair makeover primered

As you can see, I had a very curious kitty come by to see what I was doing! I debated about leaving the pawprints because they looked so cute, but I did end up painting over them. The kitty does still have paint on her ear though!

kitchen chair makeover kitty pawprints

Once all the primer was dry, it was time for the paint! I followed the some pattern as with the primer. Turn the chairs over and start underneath. When it’s dry, paint the top. I used Orchard Supply brand paint, Benjamin Moore’s Cloud White. I did paint a second coat of the paint, but I purposely did not do complete coverage.

kitchen chair makeover painted cloud white

I wanted the chairs to have more of a farmhouse look to them. A little worn. Plus I don’t have to worry if the dogs or cats do a little scratching on them.

kitchen chair makeover farmhouse

Again, wait for everything to dry and then add a protective finish over the whole chair. I used Minwax Water Based Polycrylic Finish. It goes on very smoothly and dries quickly. It’s not tacky to the touch and it cleans up great.

kitchen chair makeover minwax polycrylic finish

They are all ready to sit at the table again! I love the white! What a difference! I have 2 more to paint and then the farmhouse table. I am going to do the table with chalk paint. I will let you know how that goes!

collage

So fresh and clean! I think Ezzy likes them too!

kitchen chair makeover white farmhouse

I will see you next time with the table! Have a great week!

Sunshine and Blessings

Wooden Americana Signs

Board After 2

Good morning everyone!  Are you all getting ready for Memorial Day on Monday?  Are you deciding how to decorate your backyard and what food you are going to barbecue for your guests?  Or maybe you aren’t having your own party, but you are attending someone else’s party.  Whatever you are doing, I hope you have a great holiday!

But, for today, I have a great idea for you to decorate at your party!

I love making wooden signs for different reasons.  And, of course, I had some extra small boards in storage that I had no use for.  So, I pulled them out of storage, dusted them off, and started painting them.

Board Before

I knew I wanted to do Memorial Day themed boards, so I used red, white,and blue paint from Rustoleum that I bought at Orchard Supply Hardware.  I used Colonial Red, Navy Blue, and White.

Board Paint

And here is how the boards look after the paint job.

Board Painted

I knew that I wanted them to be even more patriotic than the paint job.  I wanted to put the lyrics from Lee Greenwoods “Proud to be an American” on the red board, a star on the blue board, and USA on the white board.  So I printed out the designs that I wanted using fonts from Microsoft Word and a star that I found on Google.

Board Designs

I rubbed pencil on the back of the papers and then sketched the designs onto the boards.  The hardest one was the red board because the pencil marks were very light and were very hard to see on the dark paint.  But…I managed.  I then used a red sharpie for the USA board and white paint for the other two.

And here is how they turned out.

Board After 1Board After 2Board After 3

I really like how they look.  They are perfect for Memorial Day and 4th of July, but they could look really nice with any red, white, and blue decor.  They were extremely easy to make were a lot of fun to do.  It was also fun to find the different fonts to use on the boards and make everything look nice.

Thank you guys for stopping by.  See some of my other board projects by clicking on the pictures below!

Subway Art Sign                                                                      Owl Sign

sparkle