Pallet Project Update-Kitchen Plate Rack

pallet farmers market collage

I’m finally back with a project today!! I’m sure you are all thrilled! 🙂

Steve cut out this pallet rack for me several years ago, so I don’t have a tutorial for that part, but you can find them on Pinterest. Lauren, a friend and I did some craft shows a few years ago, and I had made pallet racks to hold books. This one had never sold and had been just waiting for me to come up with a project for it. Finally inspiration struck!

Pallet plate, platter holder update

I spray painted black over the letters first.

pallet plate and platter holder update black

While it was drying, I picked out the phrase I wanted to put on it and found the fonts and size on Microsoft Word. I printed them out and then cut them down to make them easier to work with.

pallet plate and platter holder update lettering

To transfer the lettering to the wood, I rub pencil on the back of the paper. Then I turn the paper over, place it where I want it to go and trace the letters. When you are done, there should be a faint outline of the words. You can see how I did this for another sign too.

jpallet plate and platter holder update farmers market

Once my tracing was on the board, I painted it in with white chalk paint. I used a really stiff brush to fill in each letter. After it was dry, I sanded it down a bit to look more worn. The last step was to go over it with a clear varnish. I knew I was going to hang it in the kitchen, so it needed to be protected.

(please don’t look too hard at the kitchen, ugh! It really needs a make-over. BADLY!!!)

So here it is hanging over the stove. The perfect place to store some platters, plates, and cutting boards.

pallet plate and platter holder update in the kitchen

pallet farmers platter and plate holder

pallet market plate holder

pallet farmers market kitchen plate holder

After looking at the pictures, I realized it was kind of bare on the wall above it. I was roaming through my local Goodwill and found this little cow head. Perfect! Her name is Amelia. She is a little small for the space, so I mounted her on some old boards we had. I didn’t even know I had the one with writing on it. Love it!

pallet rack and amelia

amelia the cow

pallet amelia the cow lettering

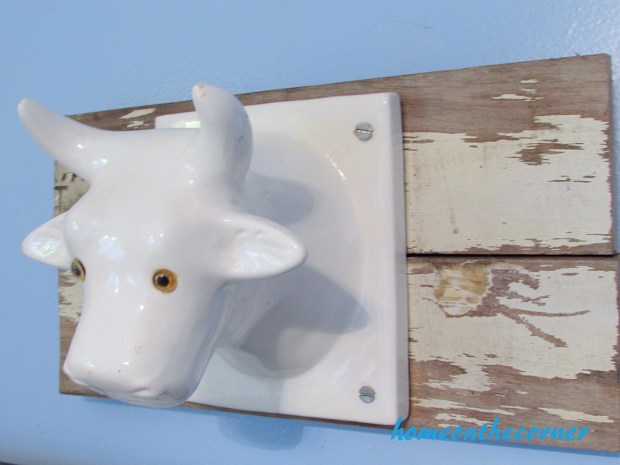
I am on the lookout for a little wreath to go around her neck. Or maybe a cowbell! Have a wonderful day!

Sunshine and Blessings

Corner News-April 2. 2016

Hello! Hope you are having a wonderful Saturday and weekend! I don’t have much to share today. I haven’t been feeling very inspired lately :(.

Here is our family picture from Easter. The weather was absolutely perfect for an Easter morning.

corner news april 2

This is one project I worked on during my spring break. See the cover? And the guilty party?! This happened awhile ago, but with my ‘love’ for sewing, I kept putting it off. I finally just made myself get it done.

corner news april 2 rozy

I used a painters canvas for this cover. This is probably the fourth one I have made (not because of Rozy!). The canvas was really easy to use and it was great to have the edges already hemmed. That is one of the parts I really dislike about sewing. Too monotonous! I used all the hemmed edges for the skirt part of the slipcover.

corner news april 2 ottoman cover

The pillow top cover is a giant envelope cover. This way I can take it off and wash it whenever it needs it. This is often with so many dogs! Isn’t the bicycle pillow cover awesome? They have some great deals on Amazon, under $5.00 and they are so much easier to store than pillows are.

corner news april 2 ottoman

Thanks for coming by today! See you on Monday!

Sunshine and Blessings

Boho Seashell Mobile or What To Do With All Your Seashells

I’m back today with another seashell project! You can see a couple of my other projects here and here. I still have so many more to use! As I was putting this together, it kind of looked bohemian to me. I guess with the sticks and string. I don’t know, but I like it! I just have to find the perfect spot for it!

boho seashell mobile title

I picked up some sticks from my yard. I would have loved to use driftwood, but we just don’t seem to have much at the beaches we frequent, so sticks will have to do. I picked out the shells I wanted to use and brought out a couple different strings and twine. I also had my drill with a 3/32 drill bit. I probably could have used  a little bit bigger drill bit because I ended up using the larger string, but it worked out.

Boho Seashell Mobile pieces

I drilled a hole in each of the shells I wanted to use. I put each shell on an old board so the drill would just go into it and not make a hole in my desk!

boho seashell mobile drill starfish

I cut out my sting in various lengths.

boho seashell mobile strings

Then tied a string to each shell. I threaded it through the hole and then knotted it in the back.

boho seashell mobile strings and shells

Before I started hanging the shells on the sticks, I tied the sticks together at different lengths, starting at the top and then adding on. This is the top stick.

boho seashell mobile starfish

After all the shells were hung, I took it outside to find a good spot for it. Unfortunately, this is it for now. I hope to get some cleaning up done outside during spring break and then will find a better spot for it.

boho seashell mobile hanging outside

boho seashell mobile top row starfish

boho seashell mobile hanging lamp, shellsboho seashell mobile clam, snail

And that’s it! This little project didn’t take me very long at all and will add a lot to my summertime patio! Now I just have to figure out what else to make…

Oh! Look what I got on Saturday!!! The ones on top are the ones I am going to use in my laundry room. I love the numbers and the handles. So cool!

lockers 2lockers

Hopefully I will be able to show you soon!


From Arabian to Modern-Giving New Life

Before I go any further in this blog post.  To my cousin Sarah-if you are reading this, stop here!  Or don’t, it’s up to you.

Okay, moving on.

My roommate Hannah is a giraffe lover.  This includes giraffe blankets, giraffe calendars, a giraffe onesie, you get the point.  She got a set of giraffe bookends from her family for Christmas, thinking that they would be perfect for her.  The only problem was, they weren’t really Hannah’s style.

giraffe bookends

Now to be honest, I think that these look really cool.  I like the colors, all the textures, and the little mirrors lining the bottom and the back.  But, these are not Hannah’s style at all.  She is much more of a modern girl, not so Arabian.

giraffe bookends front view

When she said that she was getting rid of them, I took them.  I thought that I could paint them to give them a new look and give them to my cousin Sarah (who isn’t supposed to be reading this but might be anyway) for her birthday.

But what I didn’t realize, what how stubborn these bookends were going to be to paint them.  Are giraffes stubborn animals?

My original idea was to keep all of the little mirrors on the edges and the few that are on the giraffes.  I thought that it would look really cool to paint them a metallic silver to give them a modern look, but keep the mirrors.  So I painstakingly put Vaseline on all of the little mirrors so that way I didn’t have to tape all of them.

Unfortunately, it didn’t quite work out the way I was hoping it would.  Once I sprayed the bookends silver and let them dry, I went to take the Vaseline off the mirrors.  But, when I was wiping off the the Vaseline, I was taking the paint off as well.

So, I just painted the entire thing anyway.  And here is the final product!

Giraffe finished

I love how they turned out!  They now look very modern and much better than the red and gold.  I also like how the edges look now that the mirrors are covered.

Single Giraffe

So, I hope that Sarah likes them!  I love how they turned out with the paint and I hope she loves them as much as I do.

sparkle

Game Piece Pictures

Do we have any gamers in the audience?  Any kind of game: board game, video game, card game.  Anyone?

Do you ever play a board game and find that there are pieces missing or there are extra pieces and you have no idea what to do with them?  Yep…me too…

Well, a while ago, I found a box of game pieces that were at a yard sale and I purchased them.  They ranged from chess pieces to checkers pieces to dominoes and colored blocks.  There were so many pieces and I wasn’t completely sure what to do with them all.

And, I figured it out.

supplies

So I started with picking my pieces and picking up some frames from the Dollar Tree and started the project.  I picked up three frames and wanted to use the colored blocks, dominoes, and wooden checkers to create my artwork.  I figured that the easiest way to make this work was to use hot glue to keep the pieces on the framework.  So, I took out the glass and added a piece of white paper on the back of each frame to get started.

Before doing all of this, I laid out the pieces on the frames to see what the pattern would be.  I started with the checkers and knew that I wanted them to be in rows and using opposite colors.  So, here is the design that I picked.

pre-checkers

I worked on the dominoes next.  I wanted to do something with the numbers lining up, but wasn’t completely sure how it was going to work out.  So, I tried a few different things before I came up with this one.

pre-dominos

Finally, I used the colored blocks.  I didn’t have a clue on what to do with all of the blocks, and then I started humming the Tetris theme song.  You know what I’m talking about.  So, I made my own version of a Tetris game.  I lined up all of the blocks to make sure that I would have enough, then started making my game.

blockspre-tetris

So, after all of this work, I started hot gluing.  It wasn’t too hard to put everything together, and it was a lot of fun to see how it all came together.

And without further adieu, here are my finished game piece pictures.

finalclose-up 1close-up 2

I think they turned out great!  I love how they look together, plus they could be separate if wanted.  And, they could be hung on the wall if I get tired of them sitting on the table.  I may use the rest of the pieces that I have to make more pictures, but I like how these look together!

sparkle