Pink Paper Flower

Valentine’s Day and springtime are approaching us.  That means all of the pretty colors are coming in and the flowers are starting to bloom.  The scenery is becoming more vibrant and it is time to start spending more time outside rather than in.

So, why not welcome spring by starting to decorate with some flowers and bright colors?

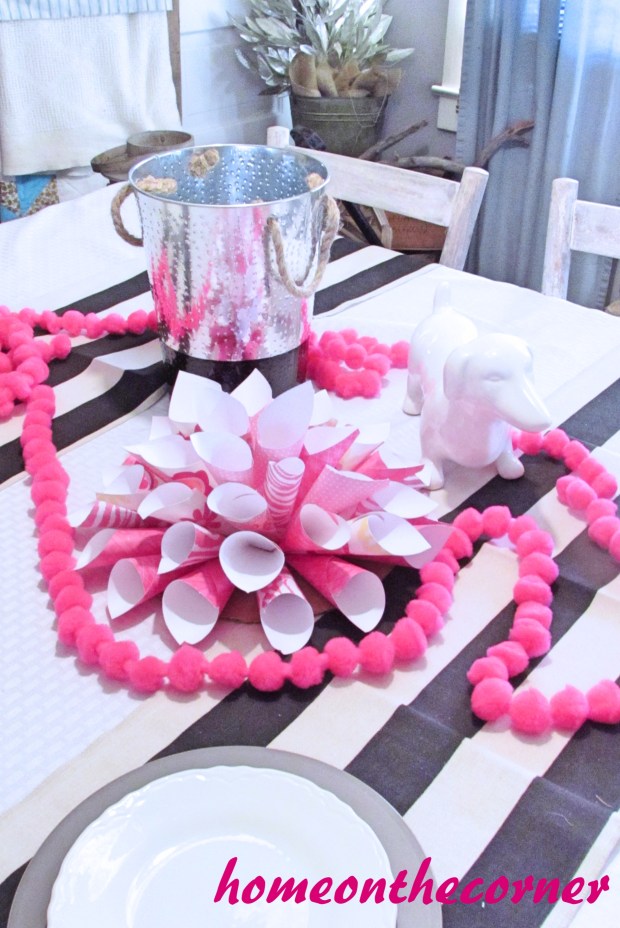
I found this easy DIY paper flower on HGTV.com.  I was excited because it looked really pretty and the instructions seemed simple.  So…here is my trial of making a pretty paper flower.

Items needed are:

Pink Paper Wall Flower Tutorial


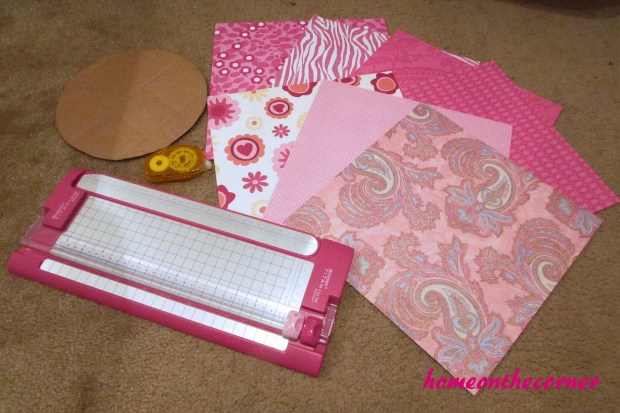
A cardboard circle-the online instructions said to use a cake circle which would work, but I didn’t have one, so I just used a piece of cardboard and cut it into a circle.

Scrapbook paper-the online instructions said to use 7 pieces of scrapbook paper.  I ended up only using 5 1/2.  Granted, I used different designs where the original design used all the same color.

Double sided tape-I didn’t have any, so I used a hot glue gun and regular tape.

A paper cutter or scissors

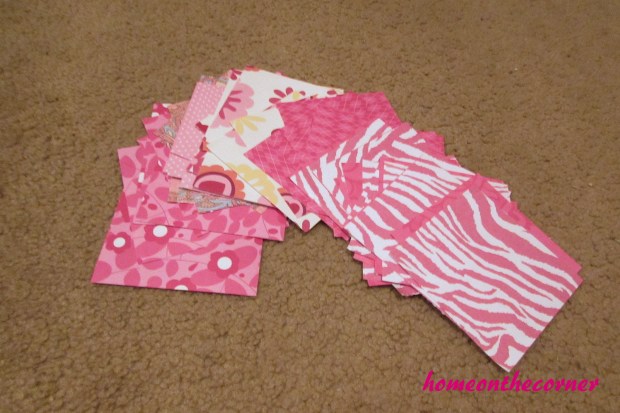
Step 1: Cut all of your paper into 4 inch by 4 inch squares.  (I found it easier to cut the pieces that I wanted to use first instead of all of it because I didn’t end up using all of the pieces that I cut).

Pink Paper Wall Flower Squares

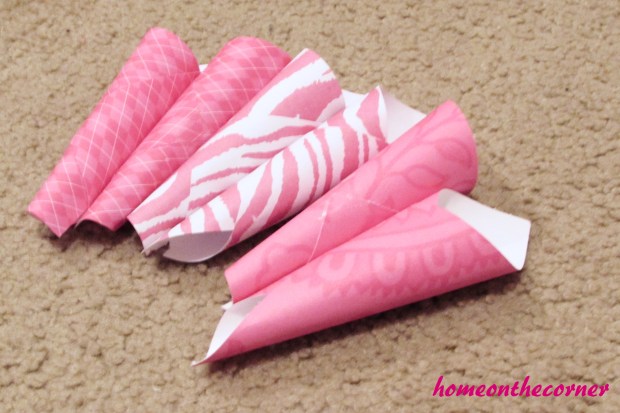
Step 2: Make all of your squares into a cone shape.  I had to use a little trial and error to make my cones look the way I wanted it to.  If you are using designed paper, fold the plain sides together for the inside of the cone.  If the design in on the inside, the flower is going to be a majority white.  Make sure to tape or glue the edges together.

Pink Paper Flower Cones

Step 3: Start gluing the cones onto the cardboard.  I had to use hot glue to get the cones to stick to the cardboard.  Also, the cones need to be a small distance apart so they don’t get too crowded and not make a circle.

Pink Paper Flower Close Up


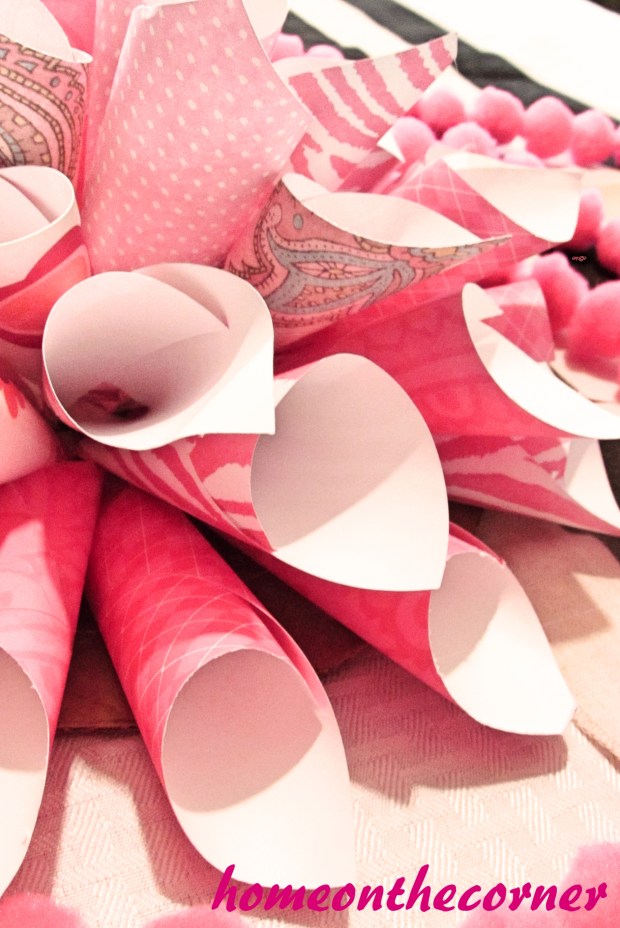
Step 4: Keep adding cones to the cardboard to make the layers of the flower.  Just flatten the end of the cone and put glue on that end to stick to the cardboard.  Keep filling in until you have a flower!

Pink Paper Flower Final 2

Now, this flower can be hung from a wall or just placed on a table like I have done.  I love how it turned out with all the different designs of the paper in the different layers.  It is great with Valentine’s Day decorations or just to hang on the wall.

Pink Paper Wall Flower Final 1

We’ll be back with  more ideas in the next few weeks!

sparkle

Recap of 2015-Our First Year of Blogging

I can hardly believe it’s been almost a year since Lauren and I started this blog! There have been many days of frustration when we can’t figure out how something works, but there have also been many exciting days along the way. Thank you so much to all our followers! It’s always great to hear from so many of you and make new friends along the way! We look forward to some new and exciting stuff in 2016!

Today is Recap Day! Let’s see what were the 10 top posts of 2015!

10. Thrift Store Medallion Makeover

This was the first time I used Antique Wax on a project and I love how it turned out.

metal medallion fall decor

 9.  The Drama In Our Backyard

Spring Time! This was quite an adventure!

Daddy is watching!

8. Old Door Beverage/Candy Station

We have used this Door Beverage station quite a lot. It’s a great way to add a little vintage charm to your backyard or patio!

old door beverage staion-homeonthecorner

7. Recycled Pallet Table

Love, love, love this table! It really wasn’t something planned, but it turned out great!

deck pallet coffee table 2

6. Corner News-December 11, 2015

Awww! I don’t have to say anything else!

IMG_0095

5. Fabulous Vintage Beverage Cart Makeover

This was a great garage sale find! It’s fun to use outdoors in the summer, but also indoors. Right now I am using it for a hot chocolate station.

Retro Beverage Cart

4. We Went Junking (and some other shopping too)

This was a fun day! Just love this truck!!

I want this!!!

3. My Beachy Spring Decorating

Funny how things change in my house so quickly! I don’t even have this shelf anymore! This spring decorating will look quite different.

IMG_2592

2. Paper Pinecone Christmas Ornament

I joined an ornament exchange this past year and it was so fun! I loved seeing what everyone else was doing and coming up with something special for my fellow blogger.

Christmas Ornament Exchange

1. Recovering My Outdoor Swing Cushions (I Cheated a Little)

Wow! Number one! Is it because I admitted I had cheated? Anyways, I love how the swing turned out and love that I didn’t have to use a sewing machine!!

swinging chair 21

Wow! That’s a great list and we will have to stay very busy this year to keep up!

The most popular post?

No surprise here! Not with this cute little face! She will be coming home very soon!

IMG_0095

Thank you so much for a wonderful 2015 and we can’t wait to see what 2016 has for us!

sparkle                                      Sunshine and Blessings

Upcycle A Clementine Box Into A Doll Bed

A long, long time ago, I wanted to be a princess-for Halloween. Isn’t that most little girls dreams? It was kindergarten. I wore a long purple dress and my shoes were covered in tin foil in order to make them shiny. There were no sparkly shoes at Target back then :). Such simple times.

My little, now 3 year old, niece, loves Minnie Mouse. She has loved her since she was one years old. So I created something special for all her Minnie Mouse dolls.

I had several of these clementine boxes. I have used some in my classroom, but still had a few left over. Who better to give them to, but my sweet little niece!

Upcycle clementine box

I first spray painted them, one white and one pink. I didn’t find Minnie Mouse print material that I liked, so I went with black with large white polka-dots and pink with little white polka-dots. I found some Minnie Mouse ribbon and some black/white polka dot ribbon to go around each bed.

Upcycle clementine box painted

My disclaimer: I am not a seamstress. Please don’t think I really knew what I was doing. Besides, I had help. Lauren. She is much better than I am. My directions will be very simple and I am sure, not very complete. Just try to play along :).

I cut a piece of foam for the mattress and cut my material to fit around plus a couple inches extra. I wanted to make it like a pillow sham pillow case, with the opening in the back. This was so it could be washed if needed. I folded over a bit of the edges of the fabric, ironed and pinned. Lauren sewed.

upcycle clementine box fabric

We also made a quilt for each bed. We used both fabrics so it could be reversible. After sewing up 3 sides, we filled it with quilt batting and then sewed up the fourth side. Lauren also sewed an ‘X’ across the top so it would wash up better, if needed.

upcycle clementine box mattress

I love the polka-dots!

upcycle clementine box quilt

We also sewed a pillow for each one using fabric that was left over. It is just a large rectangle, sewn all around the edges, leaving a little space open for stuffing. After we stuffed it, we stitched up the opening. I also added some ribbon around the outside of the box and a narrow black ribbon along the top edges.

upcycle clementine box stacked

They turned out so cute!

upcycle clementine box doll beds

She has so many Minnie Mouse dolls, she probably needs lots of these, but hopefully Minnie will share!

upcycle clementine box doll bed pink dots

These would be great gifts for little ones on your list! They could be made for both boys and girls, depending on the type of fabric that is used.

upcycle clementine doll bed black dots

upcycle clementine box bed set

My niece absolutely adored these! She already had a Minnie tucked in at her birthday party! I would love to see yours if you decide to make one!

Have a great week!

sunshine-and-blessings-picmonkey