A Lacy Look for a Everyday Household Item

Hello everyone!  I hope you have all been having a good week and are ready for another blog post that will blow your minds!

Okay…maybe not, but you never know.

So, I was looking around for free stuff/cheap stuff on Craiglist.  I was looking for some furniture that I wanted to redo.  And, I found these beautiful bar stools for $30 for the 4 of them.

Barstools 1

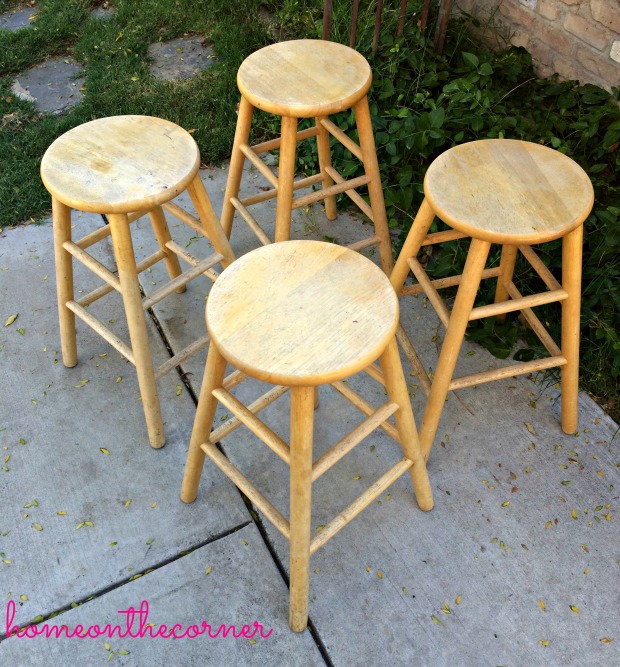
They were really nice, but they did have some damage done to them.  They had some chew marks from a dog and some paint on them as well.  But it wasn’t anything that couldn’t be fixed.

So, I had a great idea on what I wanted to with these bar stools.  So, I started with painting the seats white.  I used Waverly chalk paint and absolutely fell in love with how it covered the bar stool.  Here is how it turned out!

Barstools 5

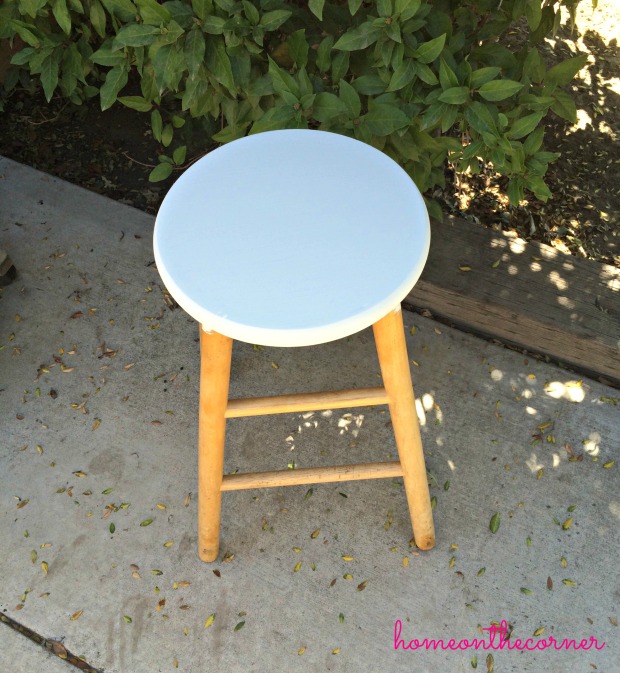
I like how the white paint covered the seat and how well it worked.  I can officially say that I am a believer in chalk paint!

But, moving on.  I really wanted to paint a design on the seat and had a great idea to put a doily on the top and paint over it.  So, here is the doily that I used.

Barstools 6

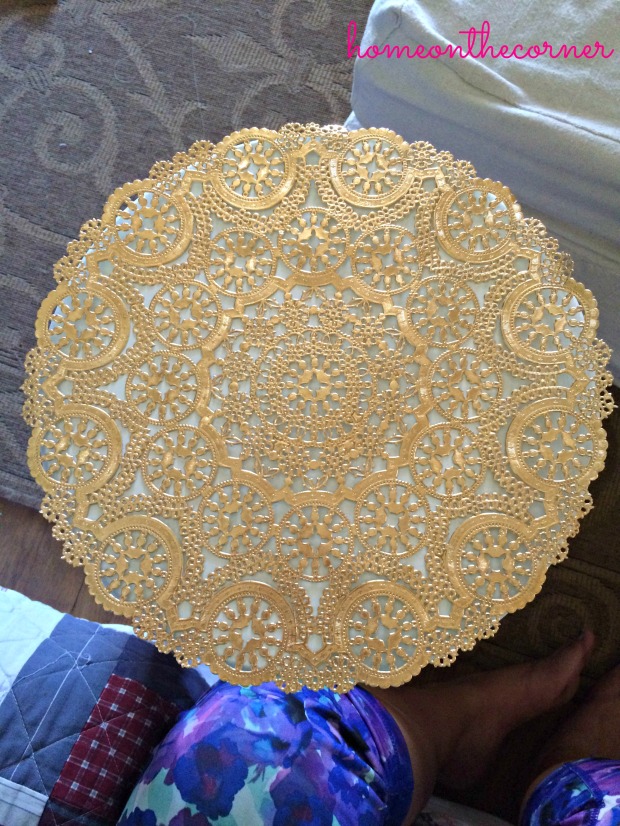
Isn’t it pretty?!  I love it!  I love that it isn’t just a plain white doily and love all the circles and the design.

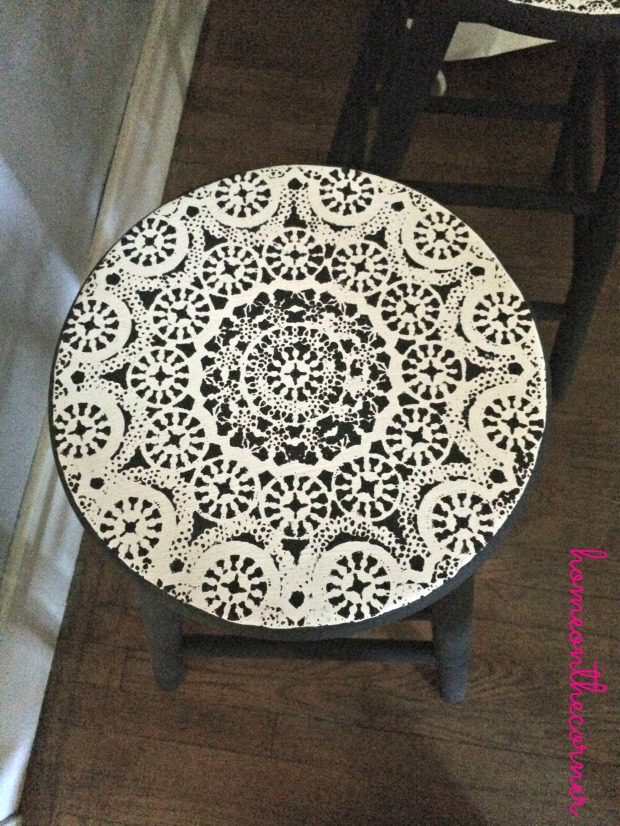
So, I wanted to paint over the doily with black so that the white would show through.  I used American Decor black chalk paint and love how it covered, the same as the white.  So, I used a small circle sponge to cover the doily in the black paint to finish off the seat.

Unfortunately, my first attempt failed miserably.

Barstools 7

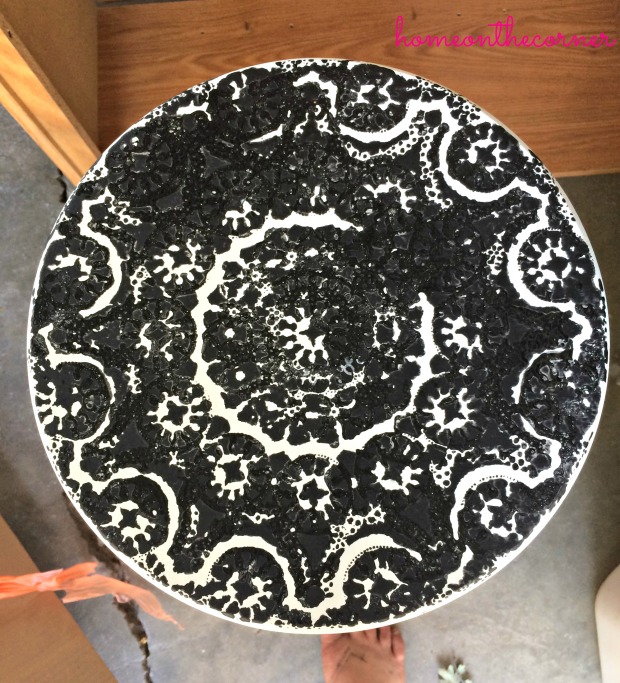
Yeah…I put too much paint on it.  Oops.

So, I had to sand off the paint and repaint it white.  Thankfully, I only did this to one of the seats.  But, this is how all the seats turned out.

Barstools 8

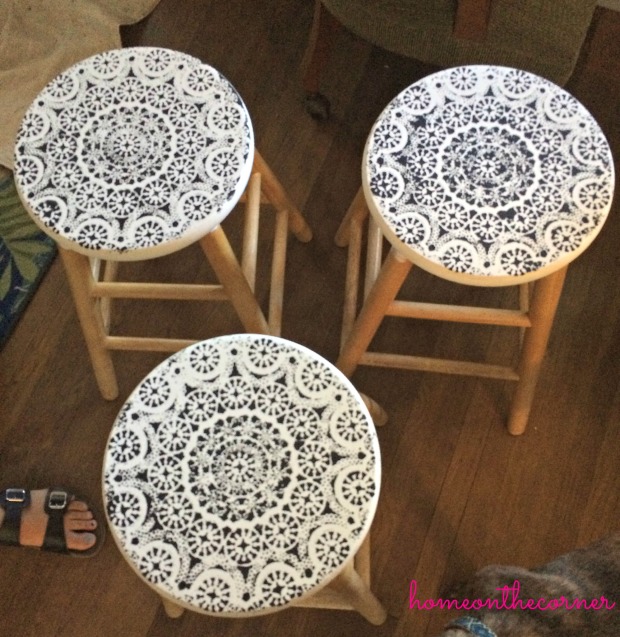
I am so happy I finally figured out how much paint to put on the doily.  Because honestly, this looks so much better than the first one.  Hooray!

the final step in my bar stools was painting the legs black.  I used the American Decor chalk paint that I had used previously and covered the legs, bars, and underside of the seat.  It took about 2 coats of paint with some touch ups, but it wasn’t too bad!

And finally, here are what they looked like when they were done!

Barstools 9Barstools 10

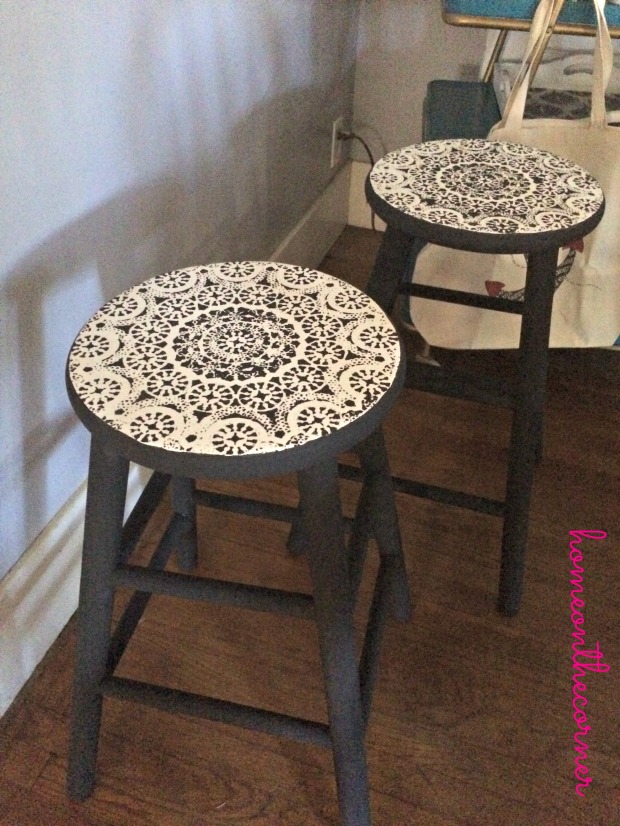
I absolutely love how they turned out.  They look so much better than I was expecting and I am happy!  I hope that I can work on more furniture and show you what I did!

I hope you all enjoyed my blog post.  The stools are awesome and I can’t wait to do more fun projects for you to see!

sparkle


Fabulous Finds and Fashions-Dressing Haley

Hello everyone!  This week is a little different because I was at my parents house and had a little bit of fun.

So, Haley woke up and was complaining that she didn’t know what to wear.  So, I jokingly said that I was going to dress her.  And that is exactly what I did.

Do you know how hard it is to dress someone who’s closet consists of 99% black clothing?  Very hard.

But, I found an outfit that didn’t completely consist of black.  And here it is!

Full Look

So, it consists of a lot of color!  And it looks so good on her.  I dressed Haley in a white pair of Faded Glory shorts with a turquoise tank top under a Rock and Republic black tank top.  See…I added some black to the outfit!

Up Close

I added a Forever 21 layered necklace to add to the neckline.  I love the complexity of the necklace to add something to the look.  It makes a great statement with the outfit and adds something else to a simple outfit.

shoes

I finally added a pair of Mossimo Vans style shoes with Aztec print.  This was the only part of the outfit with print, but it brought the whole outfit together.

I hope that you like the outfit I made for Haley.  I thought that it all came out beautifully and maybe she will actually wear it instead of just black!

sparkle

How To Make a Super Simple Superhero Cape


I have a super easy project for you today! As most of you know, I really don’t like to sew. I made this project without having to sew, but you could if you wanted to make it fancier! I used knit fabric so I wouldn’t have to worry about sewing seams or having the fabric fray. My kind of project! Here are a few of the fabrics I picked.

Superhero cape fabric 2


The size of the cape is going to depend on the size of your child. I made these for my preschoolers and for my 2 great-nieces. I started with a 25″ by 30″, but that looked too big for the kids. I cut them down to a 21″ long by 15″ neck for my 3 year old niece and 15″ long by 12″ neck for the 1 1/2 year old. The ones for 4-5 year old preschoolers were a little longer.

After cutting the rectangle, I cut in from the sides, about half way up, to the neckline. I cut in just enough so it would be a 15″ or 12″ neckline. You could also make a wide seam at the top and run a ribbon through it, but I didn’t want to have to tie it on the kids each time someone else wanted to use the cape. So I used velcro instead.

superhero cape tapered edge 2


I attached a piece of velcro to the top, one on each side of the fabric so it would lay flat.

superhero cape velcro closure 2


I also added emblems to the back. Every superhero needs an emblem! This one is the letters for the preschool where I work.

superhero cape emblem 2


Here it is all done. You can see how it goes narrower at the top to fit around the neck.

superhero cape silver stripe with emblem 2


I added a star to this one.

superhero cape pink with star 2


Here are the ones I made for my great nieces-Super ‘E’ and Super ‘L.’ L had just woken up from a nap, so she didn’t really feel like being a superhero, but E ran ‘really fast’ and ‘flew’ all over the house. It’s so fun to see kids use their imagination when playing! Who need tv when you have a 3 year old playing superhero! By the way, she was just pretending to sleep. No rest for this one!!

This is a great ‘super’ easy project to make for your kids this summer. Hopefully it will provide hours of enjoyment for both of you!

Sunshine and Blessings


Corner News-Let’s Go to the Beach!

Hello everyone!  And welcome to another edition of the Corner News.  I had a great week this past week and wanted to share a mini vacation with you.

So, living in the central valley of California, we live about 2 hours from the coast.  And being that it has been so hot in California, Haley, my friend Bekah, and myself decided to take a beach trip.  We decided that we would drive my little cube the 2 hours and end up at Morro Bay.

We started our trip with some lunch at Bayside Cafe which is next to the marina.  It was a bit cloudy and cool when we arrived, but the sun was out when we left.  And of course, I started with the clam chowder in a bread bowl.  Yum!

Photo 1

We then drove into town and started shopping.  We started at a small shop that is like a thrift store kind of thing.  I don’t know what it is called exactly, but it is fun to look through.  I found this really cool chair in the store that was for sale.  I thought that it was absolutely adorable.

Next we went into the Garden Gallery.  It is a beautiful store that has a lot of decorations and of course, gardening stuff.  I found this really cool California pillow that I considered buying, but it didn’t really match my decor.

Photo 4

I also found this cute piggy bank that I had to take a picture of.

Photo 5

As we wandered down the Embarcadero, we came to a small knick knack shop with a lot of random and cool things.  We found their mask collection, and had to take a picture.

Photo 6

We finally made it to the beach where it was a beautiful day.  The sun was out, and we were able to sit on the beach without being cold or blown away.  Look at this weather!

Photo 7

Now, one of Haley and my favorite things to do when we go places is take pictures.  So, of course we were modeling for each other and taking lots of pretty pictures.  Like this one!

Photo 9

After sitting on the beach for a while, we decided to make our way to San Luis Obispo to go shopping.  But, we also went to Woodstock’s Pizza.  If you are ever in the San Luis or Davis areas of California, I highly recommend going to Woodstock’s.  It is delicious and a good price for amazing pizza!  So, we had a pepperoni pizza and delicious cinnamon bread for dessert.  YUMMY!

And this concludes our beach trip.  Don’t worry, we are already planning our next trip and where to go.  And don’t worry, I will take plenty of pictures while we are there.    I hope you enjoyed seeing my mini vacation!

sparkle

Parisian Style Brass Coffee Table From Chairish

Parisian Coffee Table


Hello everyone!  I hope you all have had a great week and are ready to take on the weekend.  Maybe it’s time for a change around your houses and you are redecorating, so hopefully this will give you some ideas!
You may remember that we did a post for Chairish showing how we would style an armoire.
It was so much fun to put together and imagine what it could look like! If you don’t remember, click here to read that post.  Well,  we were asked to do another post, so of course we said yes!

This time we worked with a coffee table.  We found this trunk that could function as a coffee table, and we loved it.  It is a brassy color which would work really well when it comes to decorating. This could add some sparkle to your room!

ff5b63ff-a8bc-40ff-8090-f6b98e6b7237

But what do you put on your coffee table to make it look nice, but also be functional?  I mean, your table could be your centerpiece of your living room, so why not make it look amazing!  One of the first things I do is decide the theme.  And, I love anything Parisian (this is a common known fact on this blog), so I went with a French theme.  I started with this bowl from Bed, Bath, and Beyond.  I love the look of the bowl, and it can be filled with many different things.  I decided that I would put pink and white beads in the bottom of the bowl and silk flowers to add some accents.  Bowls can be filled with whatever you like, so it is up to you! Trays would be a good choice too. Trays can hold lots of things, but keep them contained and looking neat.
The next thing that I went with was some boxes to hold items in.  This can be important when it comes to holding the precious TV remotes and maybe even some coasters.  The boxes that I found are actually jewelry boxes. They have interchangeable bottoms so you can change them with your theme or color scheme. How cool is that! This works perfectly to hold the Fleur de Lis coasters and make sure they don’t all get separated.
And finally, I added an Eiffel Tower statue.  This piece is to help add some height and interest to your decor, but it’s not too tall to get in the way.  I also added a pink candle to make your room smell nice.  This is important because your table will have decorations, but it won’t be too busy and take away from the beauty of the table.

eiffel tower

Here is the style board again just to remind you how beautiful it is!
Just a couple more tips-use odd numbers when displaying things on tables and use varying heights. This add more interest and is pleasing to the eye. But most of all, have fun with it! Keep playing with it until it pleases you. It’s your own design!
 Parisian Coffee Table
I hope you enjoyed reading about my coffee table that I designed.  If you want to check out any of the items that I put on this blog, click on the link by their pictures.  We are so happy to have the opportunity to work with Chairish again! Be sure to check out their website and tell them we said ‘Hello!’
sparkle