DIY Driftwood Sailboat

Good morning! Can you believe February is almost over? Spring should be right around the corner. We have been having some really chilly days, but it looks like things are beginning to warm up. Yay!! I don’t like the cold. At. All. I am all about summer. Which brings me to today’s DIY!

A few weeks ago I showed you my Driftwood Mirror. I have lots of driftwood left, so I came up with another project for some of my pieces.DIY Driftwood Sailboat Title

I have seen these around Pinterest and decided it was time to make my own. I was trying to decide what fabric to use for the sails, when I remembered several vintage hankies I had. I really hadn’t done anything with them, so I decided this was a perfect project for them. The worst part was having to cut them. Eee. That was a little difficult, but the result turned out great!

Here are the supplies:

  • piece of driftwood
  • skinny sticks (from my yard)
  • fabric
  • thread and needle
  • eye-screws
  • hot glue

driftwood sailboat supplies sticks, hankies, driftwood

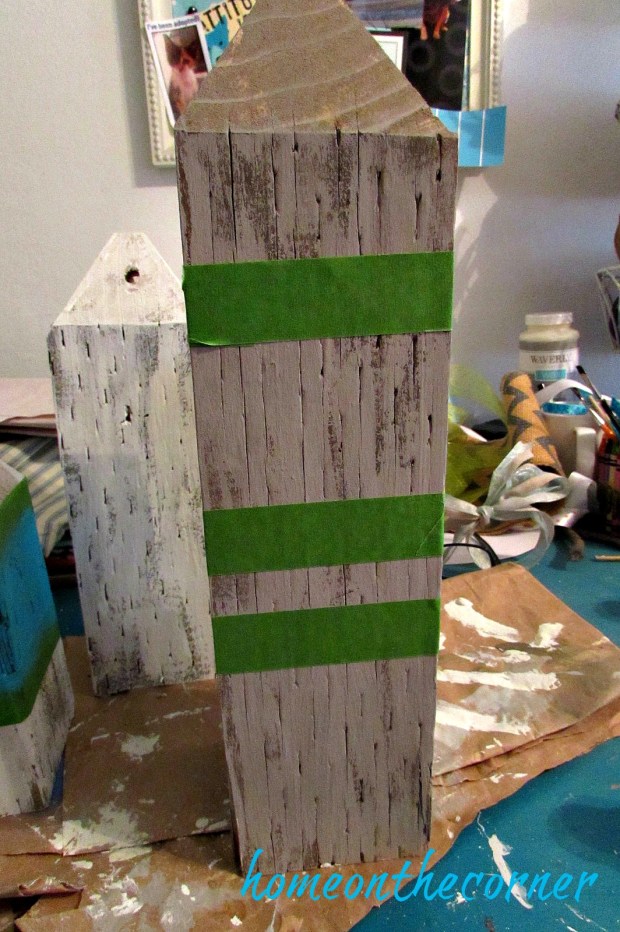
First you need to pick your piece of driftwood. Don’t worry if you don’t live near the ocean, I even found driftwood on Amazon! I included some links at the bottom of the post for your convenience.  I picked ones that weren’t too long, but were a nice rounded shape. They also need to be able to sit flat on a surface. I drilled a small hole in the center of the top and hot glued the stick into the hole. This will be the mast of your sailboat.

driftwood sailboat supplies

I also drilled a tiny hole near each end of the driftwood. I screwed in the eye-screw. This will help hold the sail straight once it is attached.

driftwood sailboat mast

I cut out triangles from the fabric. I used the stick for my measurement. Nothing to exact (of course) :). I used a straight edge for the part by the stick and a straight edge at the bottom. The other side is slanted to make a sail. Once I had my pieces cut out, I hot glued the point to the top of the stick. This held it in place while I stitched the bottom corners on.

I used a needle and thread to attach the bottom corner to the stick and the other corner to the eye-screw. Once those were attached, I was able to peel loose the glue and move it higher or lower on the stick, depending on where the sail was tight and straight.

driftwood sailboat vintage linen

I love the look of the vintage hankies with the driftwood! The perfect summery touch!

driftwood sailboat vintage linen starfishdriftwood sailboat vintage cloth lace

The embroidery and lace is so pretty. I’m glad I found a way to show them off a little.

driftwood sailboat triodriftwood sailboat linen hankies

Can’t you just see those sails billowing in the wind out on the ocean?

driftwood Sailboat displaydriftwood sailboat coastal display ocean

I added them to my faux mantle for now. I placed a few seashells around them and a white lantern to finish out the looks. The window and chalkboard pretty much stay in the same place and I decorate around them. They make the perfect backdrop to my other decor.

driftwood sailboat 3 of a kind

I still need a few more ideas for my driftwood, and now I need to add ideas for vintage hankies too! Thanks for stopping by today! I hope you have a wonderful week!

sunshine-and-blessings-picmonkey

amazon affiliate

DIY Wooden Ocean Buoys

ocean wooden buoys title

Good morning! Today is my first day back at school with students! Eek! I’m a little nervous because some I have never met before. But I know I have good help in my room and hopefully everything will go smoothly.

I know most people are getting ready for fall, but it is still over 100 degrees here! It’s hard to think about cooler weather projects when it is still so hot! So today is another summer post! It’s pretty simple though.  I actually had everything on hand already. I have been wanting to make these for awhile and I finally got it done.

I had some 4 x 4’s (actually 3.25 x 3.25!) in my wood stash and had my husband cut them in various heights. The tallest one is about 13″ tall and the shortest one is about 8″ tall.  I also had him taper in the tops on each side. They don’t quite come to a point, but are flat on top. I also drilled a hole, large enough to get some rope through. The diameter of the hole would depend on the type of rope you are using. I picked up some more Waverly Chalk Paint at Walmart, this time in ‘Ocean’, ‘Pumpkin’, and ‘Lagoon.’

ocean beach buoys

I first painted each piece with either Waverly ‘Plaster’ or ‘Mineral.’ 2 of each! I didn’t cover the wood too well, because a real buoy would be worn by the sea and sun.

ocean buoys painted grey and white

After the paint dried, I used painter’s tape to mark off where I wanted to put the colored stripes. Make sure to really seal the edges of the tape so the paint doesn’t go under and bleed into other areas. Take off the tape soon after the paint starts to dry. I started with the smallest one and decided to paint just one color around the whole thing. This one will be ‘Lagoon.’

ocean wooden buoy painting stripes

I did a variation of the 3 colors on each buoy. This one will be ‘Pumpkin’ and ‘Lagoon.’

ocean buoy grey painting stripes

After the paint was dry, I sanded the piece all over to give it a rough and worn look. Here is the small one. I love it!!

ocean buoy turquoise and white

I took a length of rope, ran it through the hole and tied it at the top. I should have rolled it in the dirt first, so it wasn’t so new looking! I’m sure it will look more worn before long.

ocean wooden buoys

I am so pleased with how these turned out!!

ocean wooden buoys orange, turquoise, blue

I can’t wait to really display them next summer!!

ocean buoys wooden blue and turquoiseocean wooden striped painted buoys

I hope you all have a great week and I will let you know how my first day of school went!!


ps. Redbubble is having another deal! On Monday only, 8/29, you get 15% off the whole site. Use the code CIRCUS15. 

Sunshine and Blessings

The Great State Of Hawaii-Part 3

Happy Monday everyone! Wait! Is there such a thing?! Why do Mondays always seem to be a hard day? It’s so difficult to get back into the routine of school again, especially this close to the end. My preschoolers are definitely feeling it too! At least we can go outside and let them run off some energy. We have 3 weeks left and then we get a much needed break. Yay!!

Since I was thinking about vacation, I decided to show a few (!) more of my Hawaii pictures. I realized I hadn’t done any for awhile. I’m in the midst of some projects, but nothing is complete yet, so this will help fill the gap. Plus it’s nice to dream again!! Here is Part 1 and Part 2 if you missed them.

hawaii aquarium 6 title

One of our free mornings, we decided to check out the aquarium. I decided I saw more of a variety of fish here than I did when we snorkeled, and this was much easier! I don’t remember all the names of the fish, but it’s so relaxing just to look at them and imagine the water and waves.

We probably all know these fish from Finding Nemo-Clown Fish! Did you know that Finding Dory is coming out next month? Can’t wait!

hawaii aquarium 1

This little blue guy looked so pretty in front of the coral.

hawaii aquarium 2

Yes, those are bright orange teeth on this fellow! I don’t think I would want to meet him underwater!

hawaii aquarium 4

A beautiful purple sea urchin.

hawaii aquarium 7

Jellyfish are just so cool to watch as they float in the water. Obviously, this is an Upside Down Jellyfish.

hawaii aquarium 9

I love starfish and use them all over my house to decorate. I loved how these were all in a row.

hawaii aquarium 6

More jellyfish!

hawaii aquarium 12

One more! Isn’t this amazing!?

hawaii aquarium 13

Well, hello grumpy!

hawaii aquarium 15

I love to watch the seahorses too. The way they use their tail to hang onto the plants is so cool!

hawaii aquarium 16

hawaii aquarium 17

Love these guys!

hawaii aquarium 18

hawaii aquarium 19

They are all so pretty!

hawaii aquarium 20hawaii aquarium 21hawaii aquarium 22

Well, I’m not so sure about these two!

hawaii aquarium 23

This guy just stayed in one spot, upright, in the water. He would spin in slow circles around and around.

hawaii aquarium 25

Naptime!

hawaii aquarium 26

After the aquarium we met up with Haley and a couple of her friends for lunch at the famous Duke’s restaurant. This was named for the Duke Kahanamoku, who is famous for making the sport of surfing so popular. We had some really good food and it was fun to meet up with the kids and find out about what they had been doing too.

hawaii 101

We even managed to get a family photo.

hawaii 102

Do you have any vacation plans for this summer? I would love to hear where you are going!  Thanks for stopping by today!

Sunshine and Blessings

The Great State of Hawaii-Part 2

Good morning! I hope you all had a good weekend! I mentioned on Saturday that I haven’t been feeling very inspired, so today is another Hawaii post. But I promise I am working on a couple of other projects to share with you next week!

Our family visited Hawaii in February and we had the opportunity to see so much of Oahu. If you would like to read Part 1, click here. It was so beautiful and the weather was divine. Our last morning we hiked Diamond Head. It was rainy and windy in the early morning, but as you can see, it was nice once we started out.

hawaii diamond head 1

Diamond Head was once a volcano. It erupted and left the crater behind, which you can see very clearly on this hike. In 1908, the trail was built as part of the Oahu coastal defense system. This huge pulley system was used to help haul some of the equipment and building materials up to the top.

hawaii diamond head 3hawaii diamond head 5

The trail is 0.8 miles from the trailhead to the summit, going up 560 feet from the crater floor. It is steep and pretty strenuous.

hawaii diamond head 7

What a view! We made it to the very top! This is looking straight down below one of the bunkers which was built into the side of the mountain.

hawaii diamond head 9

The lighthouse was built in 1917. Aren’t the grounds around it beautiful?

hawaii diamond head 13hawaii diamond head 14

Looking back at Waikiki, you can see for miles. You can see why this was the perfect spot for the defense system. See the marina? Our hotel was right across the street from there.

hawaii diamond head 15hawaii diamond head 16hawaii diamond head 17

The walk down was much easier. 🙂  We just finished walking through a lighted tunnel which is 225 long and includes some very steep stairs.

hawaii diamond head 18

Can you see the trail and the little ants, I mean, people?

hawaii diamond head 19

Ahh! The reward for a hike well done! Hawaiian shaved ice! This one had coconut, pineapple and strawberry flavors. Yum!

hawaii diamond head 20

This was so worth the effort! There were a few times I wondered if I could make it, but then I would look around and see all these others who were doing it and knew I could too. It was a great way to spend part of our last day in Oahu! Hope you enjoyed the hike!

Sunshine and Blessings