Home Depot Pumpkin Box Do-It-Herself Workshop

Can you believe we are already more than halfway through October? Wow! It just doesn’t seem possible! I have some good news to share before moving on to my project. We have been asked to co-host Merry Monday Link Party over at Kolb Korner! Yeah! We will co-host on October 25 and Nov. 1. I’m sure you will be hearing much more about it in future posts!! Now on to this project!

Lauren showed you her black cat last week, so I figured I better show you my pumpkin too. It did sit for a little while until I figured out what to do with it. Here it is the night we worked on it at Home Depot.
pumpkin box

And Lauren’s cat.

cat box

I finally had the time to finish mine! First I painted it a dark grey. This was the paint from Haley’s room. I am trying to use some of the stuff I already have, rather than going out to buy more.

Home Depot Pumpkin Painting

Here it is finished with the grey.

Home Depot Pumpkin Grey Paint

Next, I painted a lighter grey over the top using a technique called dry painting. I put just a little bit of light grey on my brush and lightly go over the dark grey. I even brush some off on newspaper before applying to the project.

Home Depot Pumpkin Dry Brush Paint Brush

Here is the first bit of dry brushing done on the box part of the pumpkin.

Home Depot Pumpkin Dry Brushed

It’s all painted! I sanded over it a bit after it was dry to rough it up a little.

Home Depot Pumpkin Finished

I am going to keep it in the house for now and I was able to add a few items to it for display. If I had it outside, I would add some wax or varnish to protect it.

Home Depot Pumpkin Display

Home Depot Pumpkin Blanket and Books

This workshop was really fun! I had never been to one before and it was a great way to learn some basic skills. I am not compensated by Home Depot, I just thought this was a great girls night out. You can check the Home Depot website for workshops happening in your area. If you get a chance to go, have fun!

Sunshine and Blessings

Fabric Pumpkin Makeover

Happy 3 Day Weekend (for those who get one!)!  This post is late today because I am busy trying to get my house cleaned up and ready for fall!  I don’t have much time during the week, so I figured this was my time to get moving on it. I feel like I accomplished quite a bit, but I didn’t get the blog done for this morning. But it’s here now!

I found these 2 (very) bright orange fabric pumpkins at a thrift store. There really wasn’t much out yet at the stores I usually go to. I wasn’t sure what I was going to do with these, but I figured something would come to mind. I talked with the girls and we came up with a few ideas.

Fabric pumpkin makeover

I started with the small one. Haley suggested turquoise with orange polka-dots, where the dots start out full at the top and then becomes less and less. So I went through my paint stash and started with some colors that I mixed. It did not turn out as bright as Haley was thinking. So, I looked again and found some old poster paint in bright turquoise. It ended up being the perfect color! Here are my different attempts:

Much better color! I added a little more turquoise with some purple mixed in for the stem. After seeing the turquoise, my mind totally went in a different direction than polka-dots! Do you do that? Change your mind part way through a project? All. The. Time!

Small fabric pumpkin makeover turquoise

I decided to add some string around the pumpkin where the previous string was. I picked a navy blue, although it looks kind of purple.

Small fabric pumpkin makeover string

I just put some hot glue on the old string and laid the new string over the top.

Small fabric pumpkin makeover gluing

Here is a little clue to how I ended up decorating the pumpkin. These are a few of the embellishments that I used.

Small pumpkin makeover

The big pumpkin I just spray-painted with Rust-oleum spray paint in Metallic Aluminum.

Fabric Pumpkin spray paint

Then I added some glittery silver filigree washi tape that I found at Walmart. Sorry I don’t have the package to show you. I had already opened it for another project. Isn’t is pretty!

Fabric Pumpkin Makeover 3

And here is the turquoise one! Ta da!

Fabric Pumpkin Makeover 2

Haley loves peacocks and we had decorated her graduation party in a peacock theme. You can see it here. I had a few feathers left over, so it worked out great.

Fabric Pumpkin Makeover Finished

Fabric Pumpkin Makeover 5

Fabric Pumpkin Makeover 4

I just loved how they both turned out! Have been decorating for fall yet?

Sunshine and Blessings

ps. We (mostly Lauren) have been on Periscope! Be sure to follow us there to find out when we go live!

Friday’s Corner News-August 14, 2015

Happy Friday everyone! Hope everyone had a great week ! We are getting away this weekend for one last camping trip before all the school activities take over.

I have been busy with painting projects around the house. This summer I have painted the hallway, Haley’s room, and the living/dining room. I still have a couple of larger projects to do in these rooms, but then hopefully I can reveal them. Here is the color of the shelves for the living room.

living room shelves

Remember I had these pieces of chalkboard from my preschool?  I used one in my bathroom, and now I painted the other to use in my classroom. I made it a Quote Board. Have you heard the funny things 4 year old say?!

Quote board chalk board

I did a little redecorating on my back patio. I added a few late summer flowers and decorations.

late summer back patio

I also have these wonderful paw-prints that I did with my pets. They actually did pretty well with having their paw put in ink and on the paper. Well I have been wanting to frame them with a picture of each dog. I finally found 4 frames that were all the same at the thrift store, and they were half off! Perfect! I will show you the finished product when I am done with all of them.pawprint collage

Have a wonderful weekend and see you next week!

Sunshine and Blessings

A New Dresser…Finally!

So…do you remember a few weeks ago that I posted about a dresser that I was going to be posting soon?  Yeah…life got in the way and it didn’t exactly happen soon.

But I finally got it finished!

If you haven’t read the before post, please click here.

Before and After

before and after

I love the new look on this dresser.  Before it was a weird eggshell whitish yellow, a drawer was broken, and there was peeling paint all over.  Now, it looks like it could fit anywhere in someone’s house.

But it wasn’t all easy.

The first problem I ran into was the broken drawer.  With the help of my dad, we were able to get that fixed.  He also helped me fix the bottoms of the drawers so they wouldn’t fall apart.

When I was painting the dresser, I also ran into the problem that the paint didn’t cover the peeling paint on the top of the dresser.  When I was using the spray paint, it was two different tones because the wood would just soak up the paint.  So, I had to use a can of black paint instead of spray paint.  Thankfully, that worked and made the top of the dresser look nice.

My final problem came when I tried to put the new knobs on.  The space between the screws was wider than the original knobs, so I had to remeasure to make new holes.  After filling in the original holes and drilling in new holes, I was finally able to put the new knobs on.  Yeah!

The Drawers

The Drawers

The featured part of this dresser is the drawers.  They are all chalkboard, so you can write what you have in each drawer (examples: socks, pants, checkbook, undisclosed amounts of money…too much?), or write numbers like I did.  Numbers are really in right now, so that is why I picked them.

dresser 1

Another feature this that every pull for the drawers is different.  I bought all five of them at Junk Days and they all worked perfectly.  It’s a great way to make the drawers unique.

IMG_3595

I love how this dresser turned out.  It has a very modern feel and is something that I can see myself putting in my house when I have my own one day.  Now, if only I can figure out what to do with it in the meantime.:)

sparkle

Extreme Makeover- Lauren’s Room Edition

Happy Spring everyone! I hope the weather is cooperating wherever you are today! Ours is so beautiful! I have to enjoy it now, because I know this summer is going to be very hot!

Last summer, Lauren was getting ready to move out to an apartment to go to college in another town.  This was a very difficult time for me. We always spent lots of time together and I knew this wouldn’t happen as often. I was excited for her and knew this was what was supposed to happen in life, but it was still a hard time as a mom. So to help myself in the process, I planned how I was going to redecorate her bedroom.  I knew I still wanted to keep it for her, because she would still be home quite a bit, but I couldn’t go any longer with this….pink!

Pink room

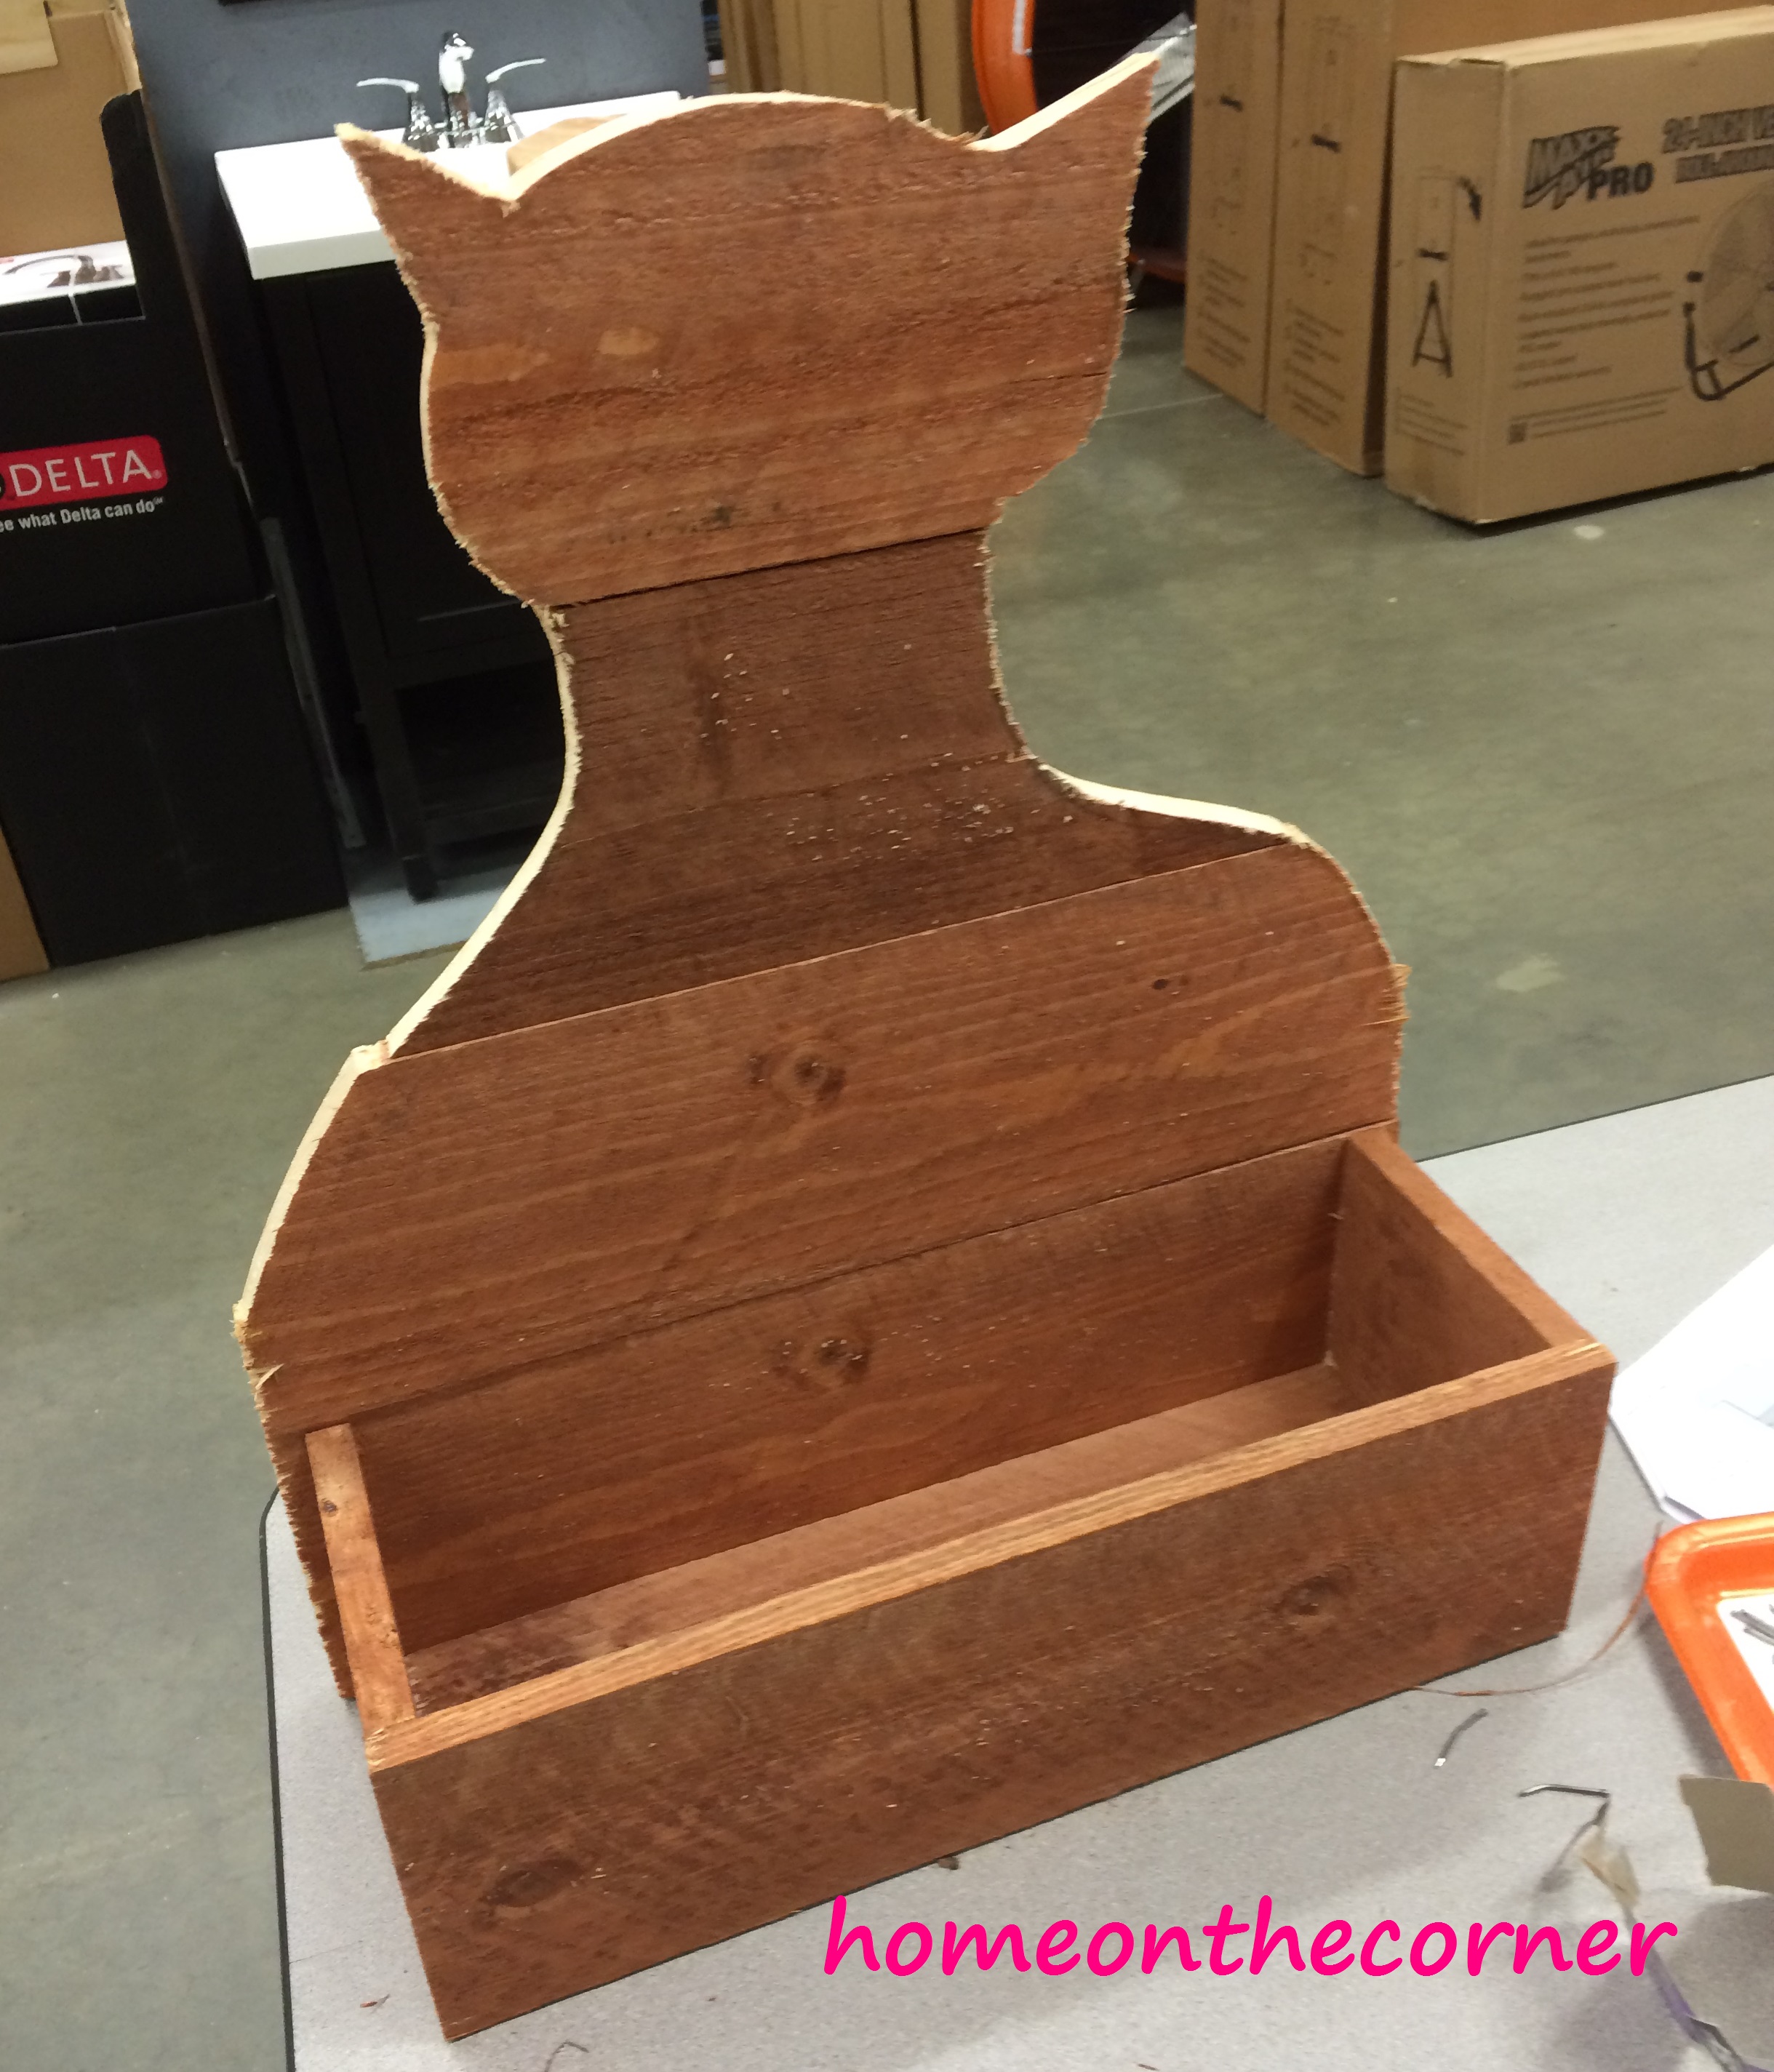
Sorry for the cat-it was the only picture I could find of the pink walls! Remember, this was before I was blogging!

Her room was soooo full of stuff! We went through every item in her drawers, closet, shelves, everything! The room she was moving into was furnished, so I would still have the furniture, but everything else was taken down or removed. Lauren was sad to see the pink go, but I just had to have something a little more soothing. I knew I was moving my scrapbooking stuff in here and there was no way I was going to be able to work with that pink staring at me all the time!

Laurens Room

Tada!

The first step was to primer and paint all the trim. The trim was the same as the hallway, which you can see here. This included all the baseboards, door and door frame, closet door and frame, and the windows and frames. I spent two weekends just on the trim! Finally, I could do the walls. I used Concepts paint from Orchard Supply, semi-gloss in Simply White. Ahhh! Love the simplicity!
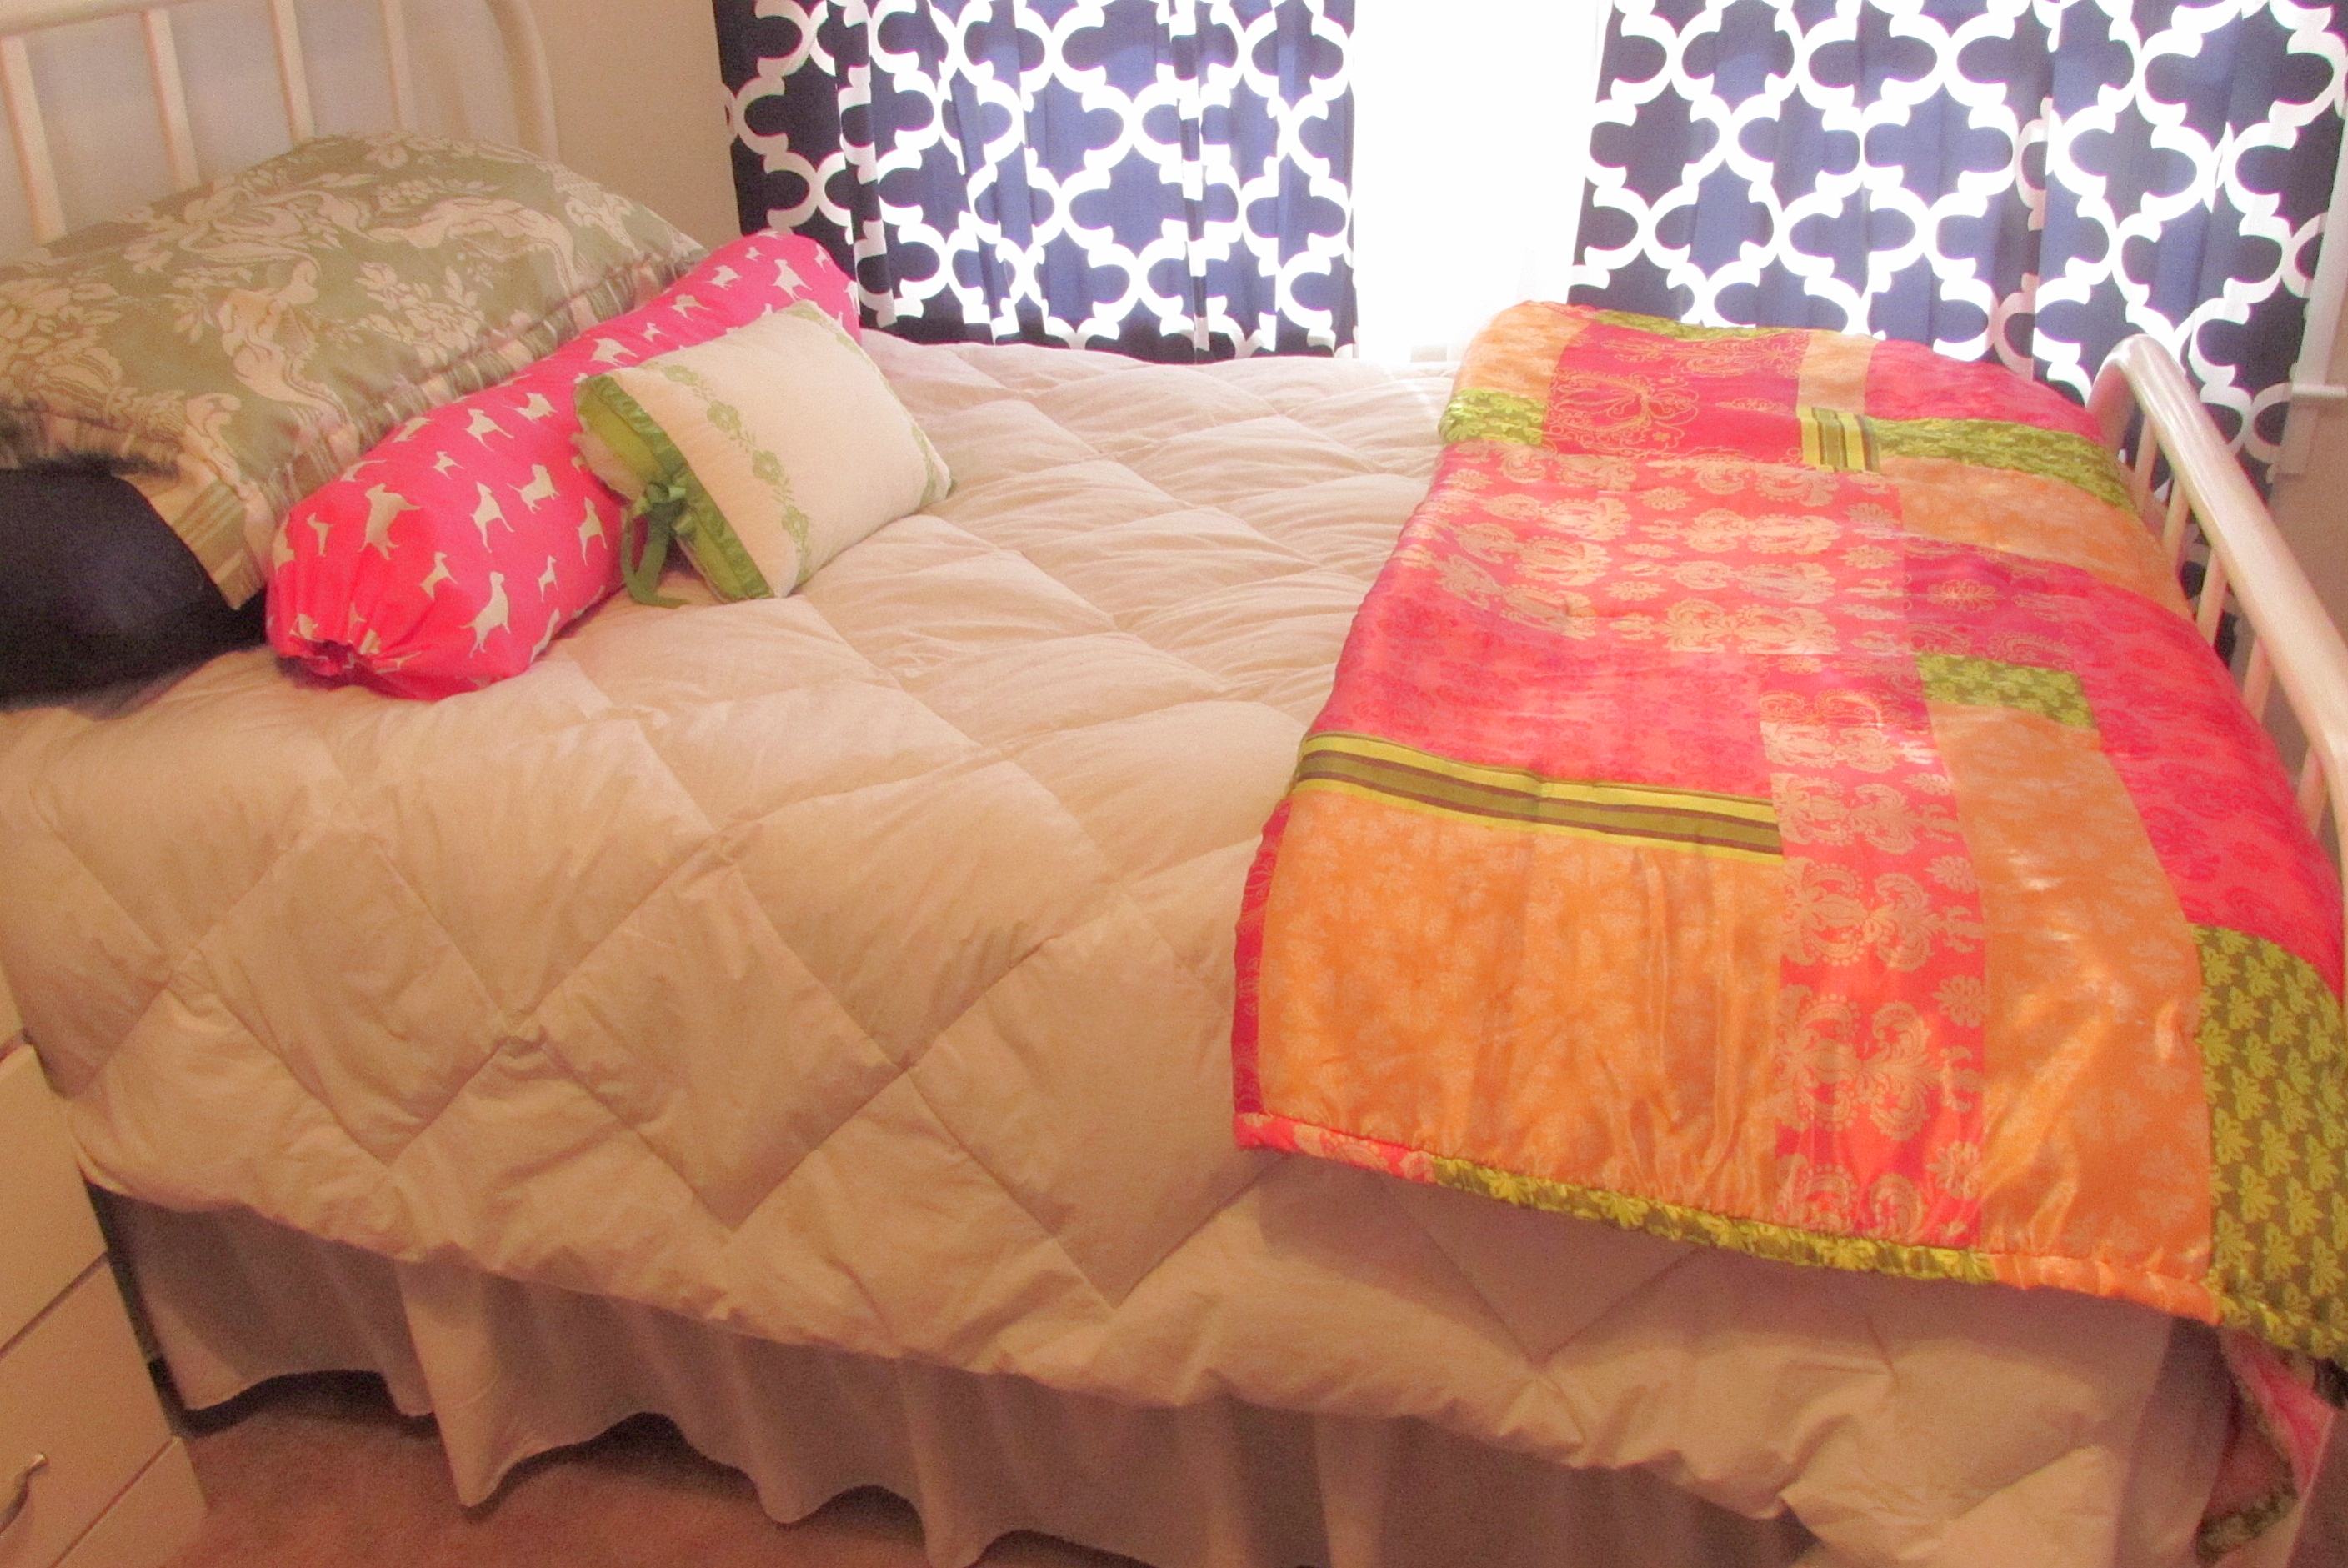
Laurens Room 4

The bed

The full-size bed was my mom’s sisters bed from when she was a girl. My cousin had it for awhile and repainted it, but now it is ours. I could use another paint job, but I kind of like the chipped look. I purchased the white comforter, green pillowcase and little white and green pillow from thrift stores. The pink boho bedspread was Lauren’s from before but she got a new one for Christmas.

Laurens Room 2

I ordered the curtains from Zulily and the blue pillowcases are from Walmart. Lauren found the pink and white dog fabric awhile ago and I made it into a large bolster pillow. I wanted to keep a little bit of pink for Lauren so she would still feel at home (although she still complains about the pink walls being gone!)

Laurens Room 7

Old changing table

There was actually a larger dresser in here, but my other daughter, Haley, wanted it, so this was the changing table from when the girls were babies. It was brown and I repainted it white and added new handles. The smaller size was a better fit too.

Laurens Room 10

Love this little detail

I really like how this turned out! My younger daughter used this box to store her American Girl shoes and accessories in. It was a bright blue and had yellow stars for knobs. I painted it navy blue with white drawers and found these compass knobs at Hobby Lobby. I loved how it went with the maps that I hung above the bed.

Laurens Room 8

Compass knobs

I added this metal tree from Hobby Lobby, the little wooden box, a blue bottle and a little girl with her blankie, because my girls had blankies too.

Laurens Room 9

Some little extras

Laurens Room 11

Sitting spot

Opposite the dresser is a little sitting spot.  I added an old chair from my grandpa, a Target ottoman found at Goodwill, Lauren’s old nightstand and a polka-dot basket from HomeGoods. The blanket I got for Christmas, the pink dog from Target and the whale pillow I made from a t-shirt soften up the chair.

Laurens Room 14

The wall hangings include a metal star, a pink framed chalkboard with a giant ‘L’ and a great print from one of my favorite bloggers, Karianne at Thistlewood Farms. You can find your own print here.

Laurens Room 15

You are a Rockstar!

I think all of us need to hear these words once in awhile!

Across the room, next to the door, are some bookshelves we installed when Lauren was younger.  I left them painted green, for now, and just restyled them. I added some old suitcases that I keep fabric in, and some other odds and ends.

Laurens Room 16

Laurens Room 18

Some of Lauren’s favorite things.

On this side are a couple of pictures of best friends, her Harry Potter books and James Herriot books, a small tea set from Holland and a Disneyland snowglobe. I also added a replica golf cart to remind her of her golfing days!
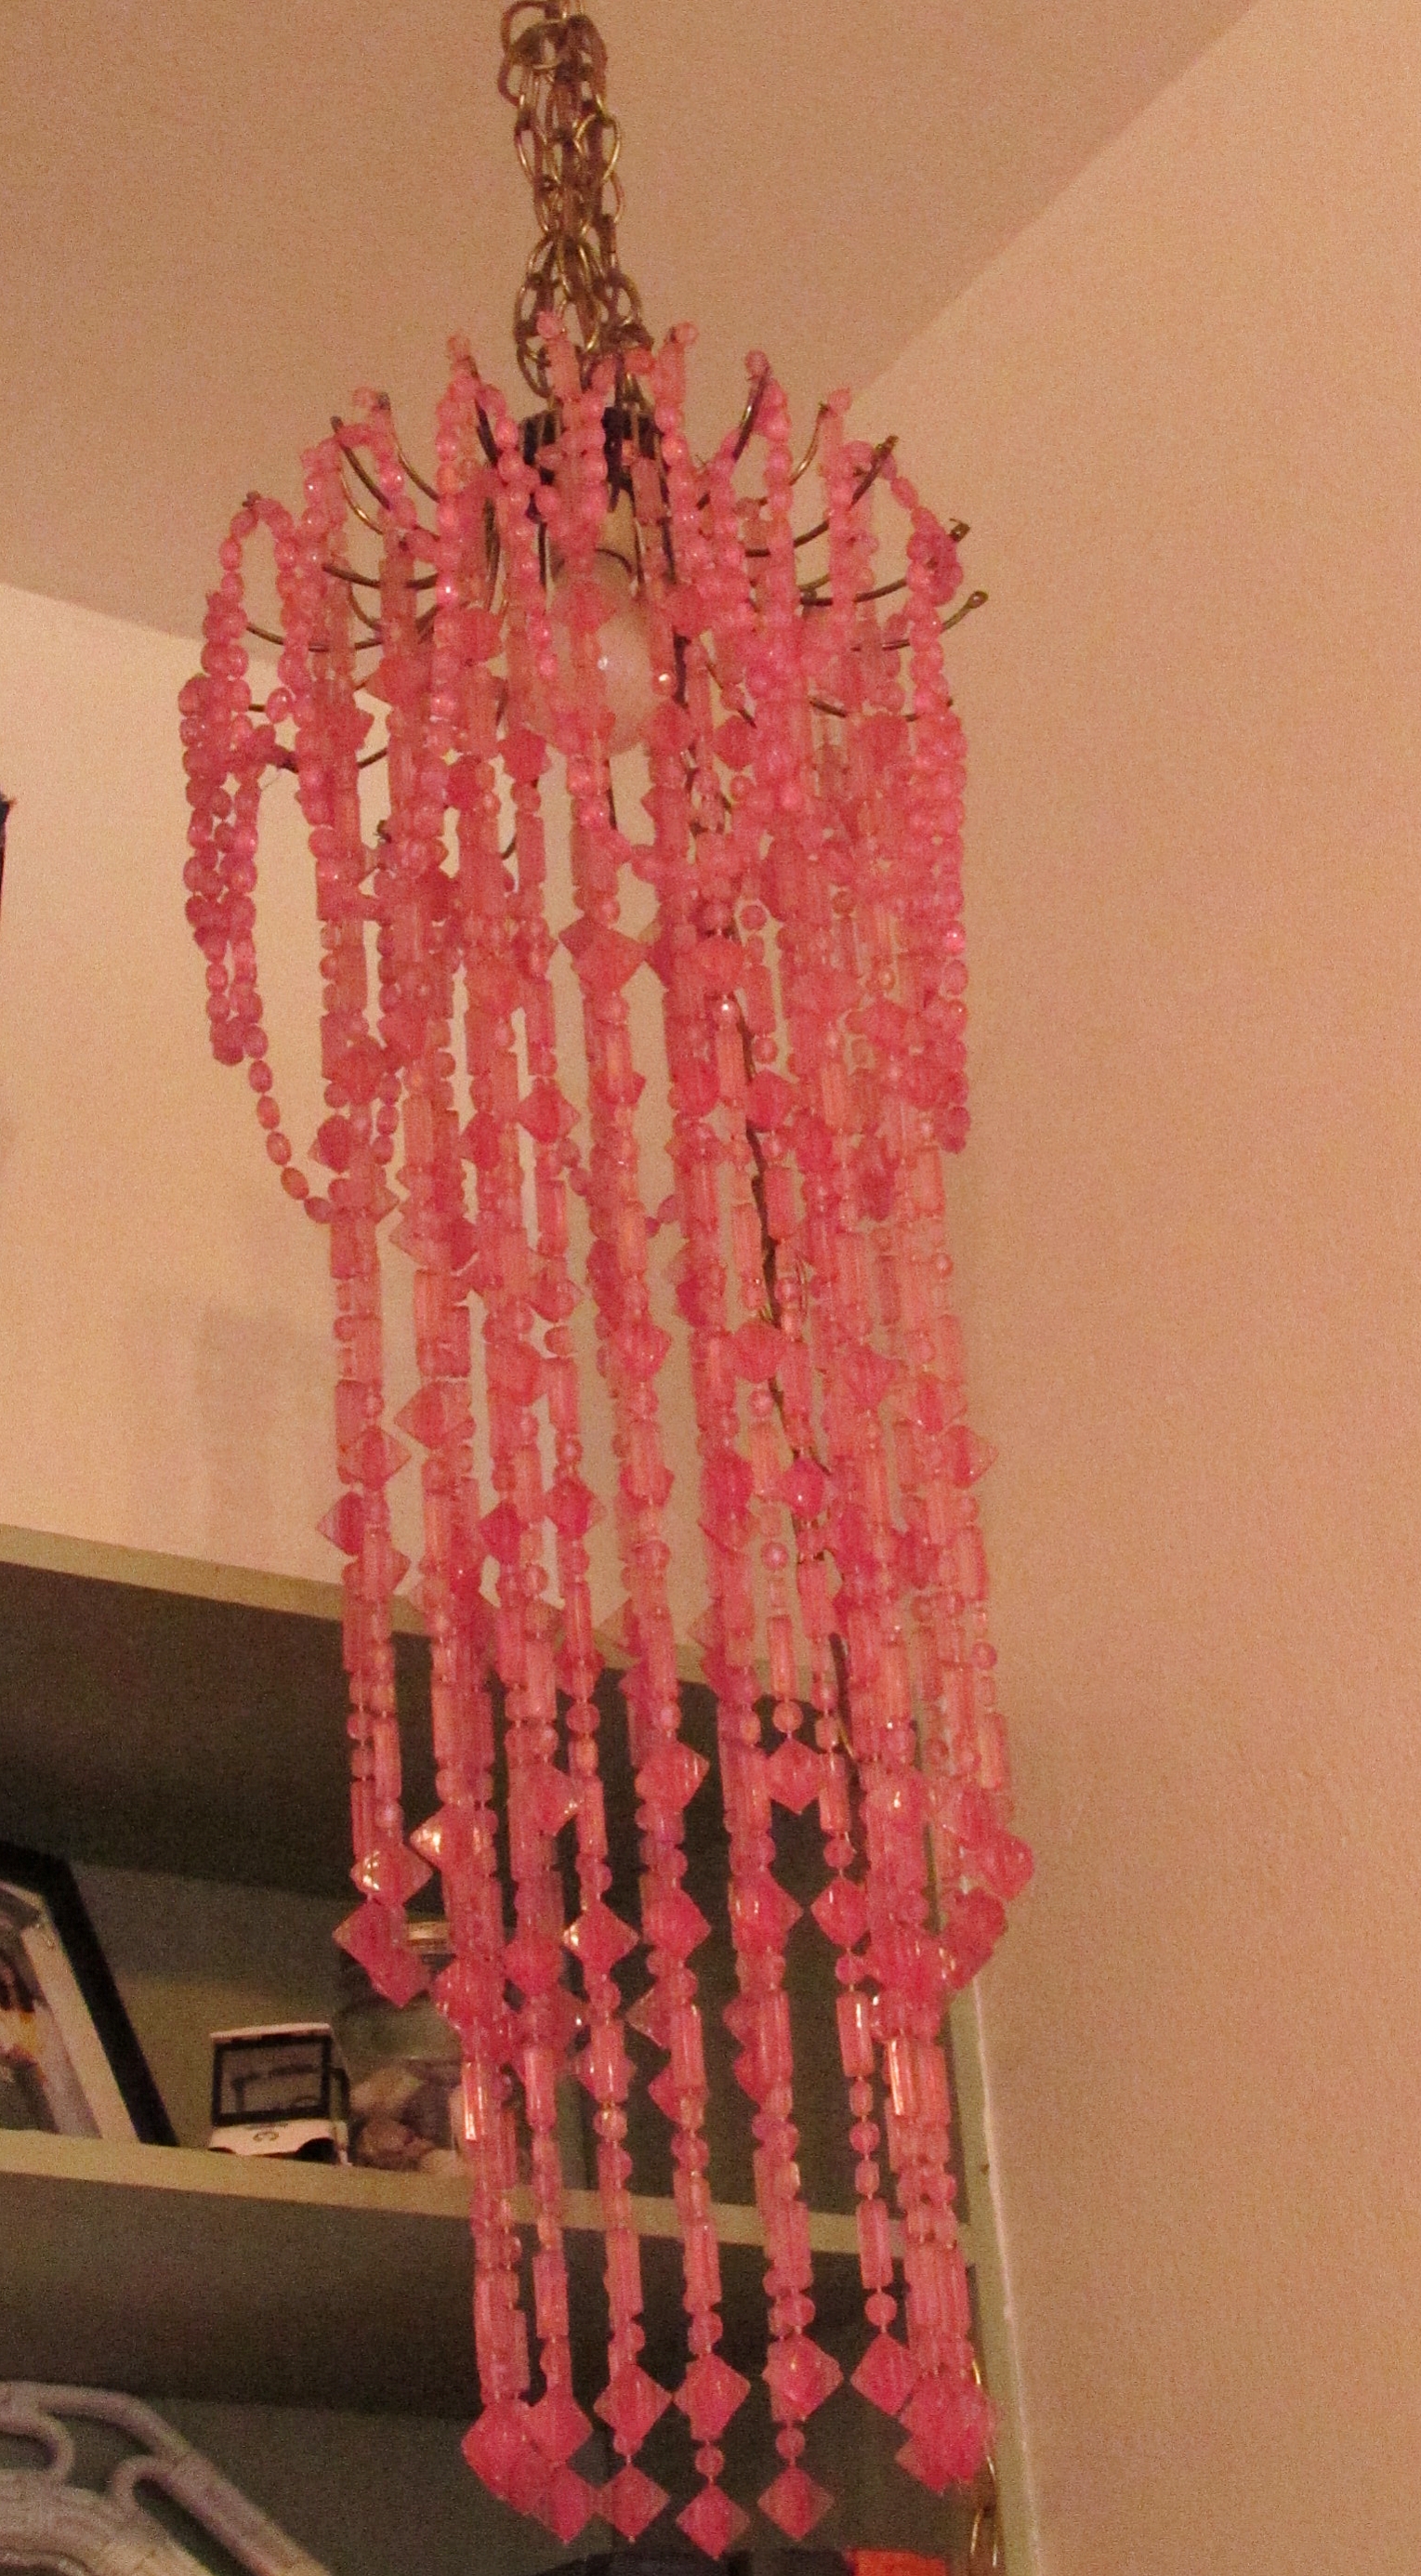
Laurens Room 17

Old pink bead lamp

Isn’t this lamp awesome! It used to hang in a hair dresser shop. I got it from a yard sale and it was full of sticky hairspray.  I took some cleaning to get it to look good, but I love how funky it is!

Laurens Room 26

Star light, star bright

I also added these hanging stars above the shelves.  Lauren decoupaged the middle one with lots of pieces from an old book. It took her a long time, but it looks great!

The last piece of space is filled up with this old teacher desk. Haley and I picked this up from a Freecycle ad.

Laurens Room 23

Old school desk

As soon as I saw the color, I knew I had to have it! I touched it up a bit, but not much. It sat on my porch for almost 2 years before I finally got to use it.  I knew I wanted it for crafts and scrapbooking because it has such a large work surface.  The drawers are really deep and I can keep my paper and other scrapbooking supplies in them.

Laurens Room 20

Ribbon!

I use this plant stand for a ribbon holder. It’s so nice to be able to see what I have available.  I also have a couple of jars of buttons.

Laurens Room 21

More ribbon!

The blue jars on top are filled with the small scraps of ribbon. I won these jars from a blogger and I love them!  I had to find a way to show them off!

Laurens Room 25

Odds and ends

These are just some extra little pieces. The basket holds miscellaneous stuff. I painted the little drawers sitting in the back and was going to add words to the front, but I didn’t have enough sticker letters and then couldn’t find the same ones in the store. So, it’s still sitting there from before Christmas! I will get to it sometime!

Laurens Room 19

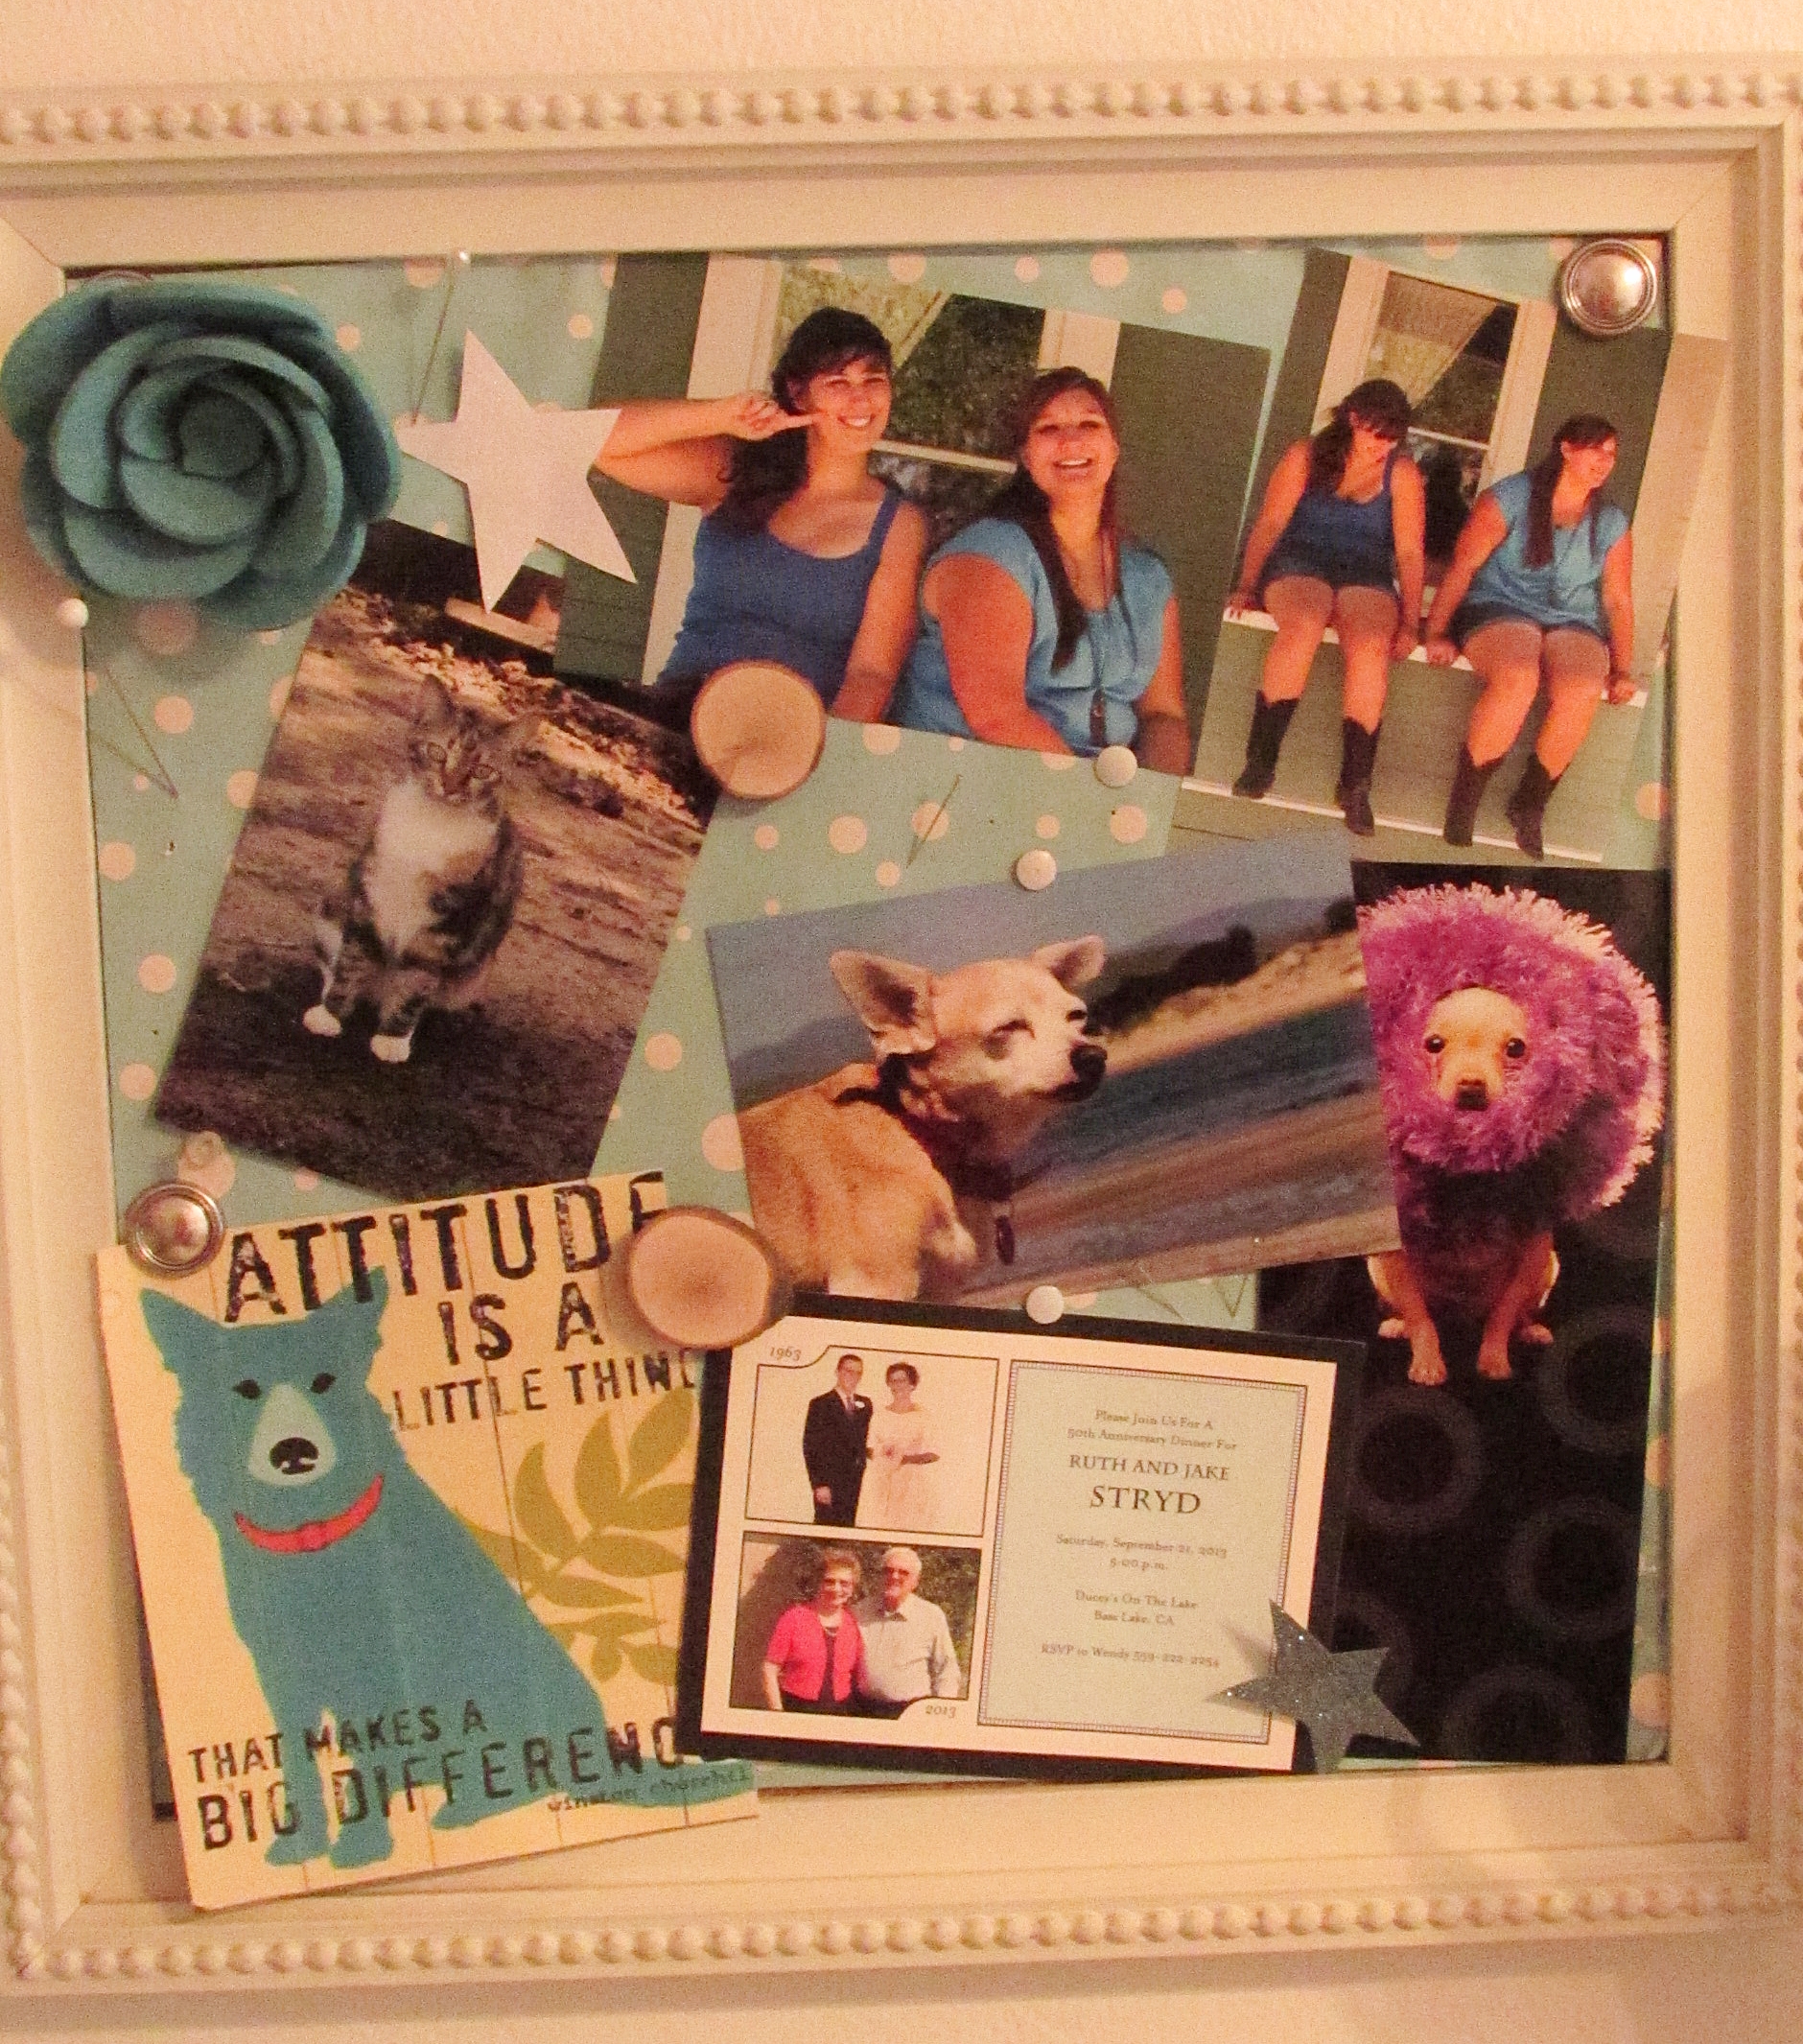
I hung this bulletin board above the desk and added some of my favorite people and things so that I can be inspired each time I look at it-my girls, my parents, a couple of my pets and funny card and an inspirational saying.

Laurens Room 27

I hope you enjoyed this little tour! I had fun decorating and it helped fill my time. I enjoy making it look nice for when Lauren comes home and stays for a bit. I think this room has become a beauty after its makeover!

Sunshine and Blessings